Showing posts with label 6mm Napoleonics. Show all posts

Thursday, May 25, 2023

Thursday Napoleonics: 6mm Polish Lancers Finished

Good morning friends:

Back in April I did a WIP post of these figures as nearly finished, so here they are done and based.   As said before, they are 3D printed, from MC Miniatures, Polish Uhlans in French service.

One pleasant thing I’ve discovered about painting these strips is that a little effort goes a long way.  A few variations in horse colour, for example, gives a pleasing variety but I don’t get fussy about painting socks or blazes on the odd one as I would with 28mm horses.   Likewise, painting only the details like the shabraque on the end figures suffices.

That being said, I still got silly with two-tones of French blue for the tunics, and used a quite tiny bush for the lance pennons, but I think it was worth the effort.  

These fellows will serve either as a single unit if I’m playing LaSalle or a full brigade for bigger battles.  Next unit on the paint bench takes me back to 28mm horses as I have 12 Front Rank Prussian SYW cuirassiers to get to grips with.

Thanks for looking and blessings to your brushes!

MP+

Saturday, April 1, 2023

Saturday Painting Bench: Lots of 6mm Napoleonics

Hello and welcome to April!   The temperature has dropped about 12C today so sitting beside the gas fire writing this post sees like a splendid use of time.

Almost finished today on the painting bench are these four strips of 6mm Napoleonic Polish Uhlans, who will soon I hope be crossing lances with Russian Cossacks in one of the opening battles of the 1812 invasion.

The figures are from MC Miniatures, the brainchild of Marco Campagna of Genoa, Italy.  Marco’s 6mm strips are ideal for mass-producing units, and is my go-to for my current rules interest, LaSalle2, which requires four bases for each unit.  They have just enough detail to satisfy, but are simple enough to paint en masse.  I printed these on an Elegoo Mars 2 machine.   Hopefully done before I go to bed, and then they can report to the Basing Depot.

 Also recently hot off the Mars printer are these strips of Austrian grenadiers, also MC Minis prints.  These fellows will be getting blue trousers, just because the blue and white Hungarian uniform is such a classic look and should pop on the table.  It may be another week before these chaps are finished.


What’s on your painting desk?

Cheers and blessings to your brushes,

MP+

Friday, March 31, 2023

Austrian Napoleonic Dragoons in 6mm from Henry Turner

 Good day friends and welcome to the weekend.  I had fully intended to post this yesterday as one of this blog’s semi-habitual Napoleonic Thursday post, but my computer had some issues and no matter, here they are today.

While I have some Austrian cuirassiers in my collection, I didn’t have any Austrian dragoons (though in 6mm it’s hard to tell the difference between the two) so I easily rectified that by printing myself a mass of 6mm figures thanks to Henry Turner’s Europe Asunder Napoleonic Kickstarter that I’d backed last year.

The figures are based as per my usual standard for 6mm Napoleonics, giving me either a division’s worth for a grand scale game like Blucher, or a full regiment of four stands (1 command stand and three rank and file bases) for Sam Mustafa’s LaSalle 2.  I have a separate post planned for basing units for LaSalle, coming soon.

The flags were purchased from Stone Mountain Miniatures.  To their credit, they have a good selection of 6mm flags, though it took me a very long time to receive them.   I always want to cut self-employed hobby business owners a lot of slack.  Who knows what’s going on in their personal lives? 

A quick word on Henry Turner’s figures.   I printed these on an Elegoo Mars 2 resin printer.   The results were quite satisfactory, the figures have a decent amount of detail, though some have told me the horses don’t look convincing.    I wouldn’t print his figures at any scale larger than 10mm, but for 6 they satisfy and mix nicely with my Baccus collection.  I’m a fan.

I have a lot of 6mm Napoleonic stuff currently on the painting desk - a substantial mass of Austrian grenadiers and some Polish Uhlans, and after that lot is done it’s back to the big scales for a while.

Cheers and thanks for looking.  Blessings to your brushes!

MP+

Tuesday, June 28, 2022

#Terrain Tuesday: Visiting Old Russia

I saw this photo recently on Twitter, courtesy of one @nickfshort, and found it slightly haunting as a glimpse of a lost world, though the houses aren’t much different from some of the humble buildings seen on the front lines of the current Ukraine war.  

The caption reads:

"The village of Pokrovskoe in Siberia. An original colour photograph from, astonishingly, 1912. When Nicholas II was on the throne, and one year before the Romanov tercentenary.” Pokrovskoe was the birthplace of Rasputin, which is cool, but what interests me most here is the white painted church.

I’m wondering if it should be a guide for this lovely little 6mm model, which I bought as an .STL file from a German published called 3D Print Terrain. I have to say that this gave me fits, and it took multiple attempts on my Elegoo Mars printer before I had a successful print. Much trial and error with angling the building, adding supports, cursing and praying.

A Google search, “Rural Russian churches”, produced varying results, such as this one. 

 I suppose I could paint it a heavily weathered brown if it was some tiny village on the way to Borodino, with perhaps a bronze onion dome, but it could also be a white one if it’s a more impressive and prosperous town.   Hmmm, good thing I printed two.

Finally, on the terrain and scenery front, tonight I finished the three tree stands featured in last week’s post.  Two for 28mm gaming and one for 6mm.

Blessings to your hobby endeavours!

M+ 

Wednesday, June 1, 2022

My Napoleonic Game at LardEh - Wertingen1805

Following on the heels of my last post, about the LardEh games day in Hamilton, here’s a report on the Napoleonics game I ran in he afternoon.  It was the first time I’ve stepped into the role of Games Master at an event, so I was quite nervous and wanted to have the game right, balanced, fun, and looking good.   The rules I chose were Too Fat Lardies’ large battle Napoleonics rules, General d’Armee (GdA), by Dave Brown and published by TFL’s Reisswitz Press imprint.

My first challenge was to finish the French ADC chits, to go with the Austrian ADC chits I made last year.   In GdA, ADCs are like command or initiative points in other rules sets.  They are a finite number of opportunities for the player as the CinC to influence the battle by giving orders to his brigades, and hopefully getting them to overcome the friction of the battlefield and actually do what he the commander wants.   Here are eight French officer caricatures, shouting at the player or giving looks of disdain at their lack of battlefield prowess.  I wanted something to add period colour and a little humour to the game.

 Now to decide on the battle.  I have been thinking about Wertingen, the opening fight of the Ulm campaign, which in turn led to Austerlitz and Napoleon’s stunning defeat of the Third Coalition of Russia and Austria.   As the Grande Army advanced through Bavaria, two French corps (Murat’s Cavalry Reserve and Lannes’ III Corps) ran into an Austrian infantry corps under Auffenburg that Mack rashly sent swanning about on an ill-conceived reconnaissance in force.   Historically the French made short work of the Austrians, but in the GMT Command and Colors scenario which introduced me to the battle, it seemed like an even and manageable fight.  

Here’s the playlets table, kept fairly simple as I didn’t want the players interacting with terrain pieces when they could be fighting.   I find that for 6mm games with lots of troops on the table, simple is better.  The cloth mat and roads are from Geek Villain (UK), the fields are latex from Barrage Miniatures (Sp), the buildings are Timecast and the hills are scratch built.


Here is the order of battle, printed on individual unit markers that will be fixed onto 3D printed unit markers courtesy of Aaron at Project Wargaming.   Each marker is for a regiment or for an individual commander.  There were some mistakes that I caught when I took a closer look at the rules.  In GdA only Guards units are Elite, whereas good units like your typical Grenadier unit would be rated as Veteran.  Thus I told the players that for Elite, read Veteran, and for Heavy Cavalry, unless marked Cuirassier in the case of the two Aus units, the French cavalry are considered Battle Cavalry, which in GdA is most well horsed line cavalry (Hussars, Chasseurs, Dragoons).   The French still outnumber the Austrians 2-1 in cavalry units, with two of the Aus regiments being Small or understrength.

All is quite in the village of Wertingen.

A view of the dispositions early on.    That’s one of the voices of the Canadian Wargamer Podcast, James, setting up the Austrians at top left.  The Austrians have to hold on the road intersection for 12 turns to win.  In all the photos that follow, two bases placed together indicate a single cavalry or infantry regiment or battalion.

The two French players put both of Murat’s cavalry divisions and both his batteries of horse artillery on their left, with Lanne’s corps on the right.   The French tried to get off to a fast start, realizing the clock was against them, but had trouble coordinating their advance in the centre.

One of the Austrian players sees a chance when the French rashly push their horse artillery forward and attack with a regiment of hussars, still in column.   The Austrians suffer terribly from canister, but remarkably the survivors close, and in the melee that follows, the French gunners manfully stood by their guns and saw off the chargers.  It was one of several remarkable upset results.  Charging is always a bit of an uncertain business in GdA, it’s a two-edged sword indeed. 


In another case of a surprise result, the Austrians throw their horse at Lasalle’s hussar brigade that is holding Lanne’s right flank, and despite their advantage of having one regiment of cuirassiers, they are thrown back.

James realized that the key to survival was aggression, and pushed his infantry forward.   A fortunate volley drove the French light foot out of the north half of the village (the church square) and that reversal seemed to perplex the French players, who never used their four veteran grenadier regiments to full advantage after that.

On the Austrian right, Murat’s two dragoon brigades are slowly and relentlessly pushing forward, but they are too far away from the intersection and it is too late in the day for this to be a disaster.

With the Austrians firmly holding the centre of the table, and only a few turns remaining, the French players conceded defeat.

I had worried that the game would be a one-sided affair, with the French cruising to an easy victory, but in fact it was a close battle and the Austrians, ably and aggressively handled, had a convincing victory.   Most importantly, the players had fun, I gained enough confidence to run another game at another event, and I got to know the rules much better.

Perhaps I’ve made the same fudge that the designers of the Command and Colors Wertingen scenario did by giving the Austrians more units on the table than the historical battle would suggest - from what I’ve been able to gather, the French had a 3-1 advantage.  Perhaps I could adjust that by taking away one of the Austrian cavalry regiments, but I’d like to play this though again with some other players to see if there’s a different encounter.    Hopefully I’ll write up this scenario for one of the magazine.

Cheers, thanks for reading, and blessings to you die rolls!

MP+

Sunday, February 13, 2022

Some Thoughts on Sam Mustafa's LaSalle Rules

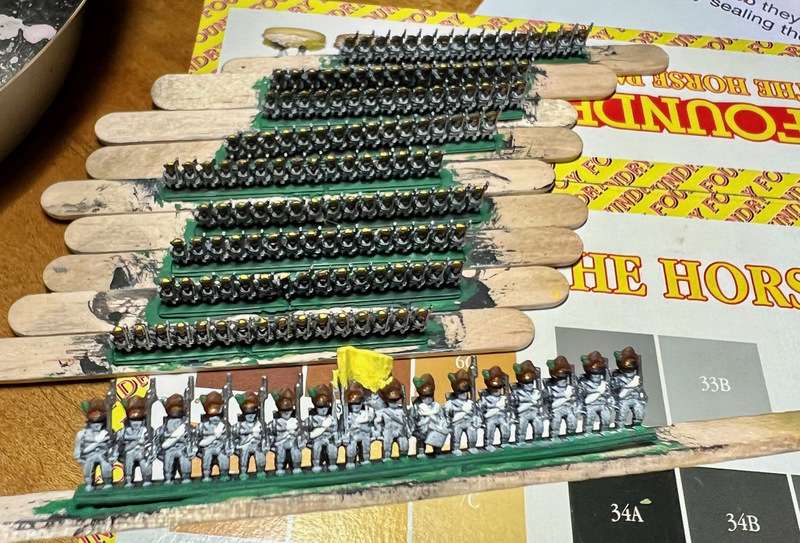
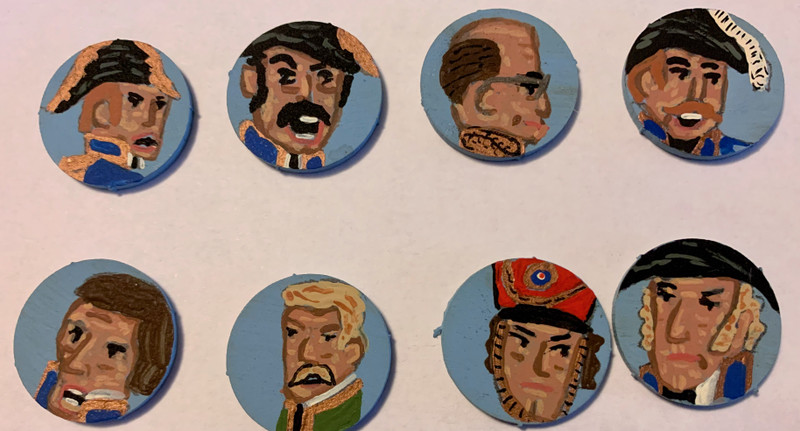
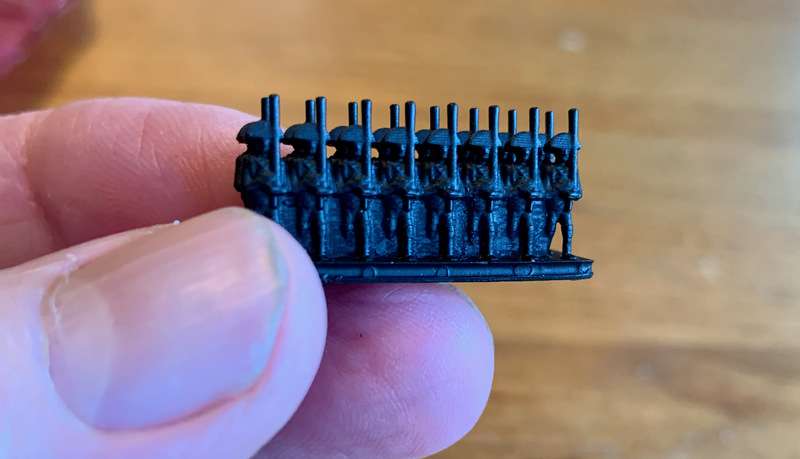
Hello friends and welcome back to the blog, which appears to have drifted unhelmed into the second week of February.   Th usual apologia of being preoccupied, particularly with painting some entries for this year’s running of the Analogue Hobbies Painting Challenge.    You can find my entries here (28mm Foundry Victorian civilians and 6mm Baccus Napoleonic French), here (15mm Darkest Star SF troopers shown here last month), here (Victrix ancient Germans), here (first 3D printing efforts), and here (more Victrix ancient Germans).

In the last month, my podcast partner James and I have managed to put out Episode 11 of the Canadian Wargamer Podcast (more to say on that in another post) and I’ve done some terrain work, as well as jumped into the 3D printing world, of which, more at another time.  So it’s been a productive month, at the cost of my blogging.

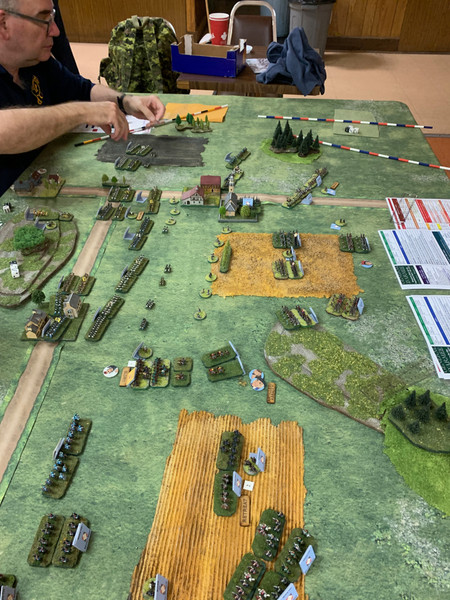
During this last month, I was introduced to Sam Mustafa’s LaSalle (2nd ed) Napoleonic rules, which could be described as the tactical cousin to Sam’s operational rules, Blucher.   I think that’s a reasonable comparison of the two.   After a brief play of a few turns at the local FLGS, I decided to try them at home as an excuse to spend more time with my 6mm Naps collection.  I decided on the first scenario in the LaSalle rules, “Les Avant-Gardes”, a shortish (10 turn) meeting engagement game.


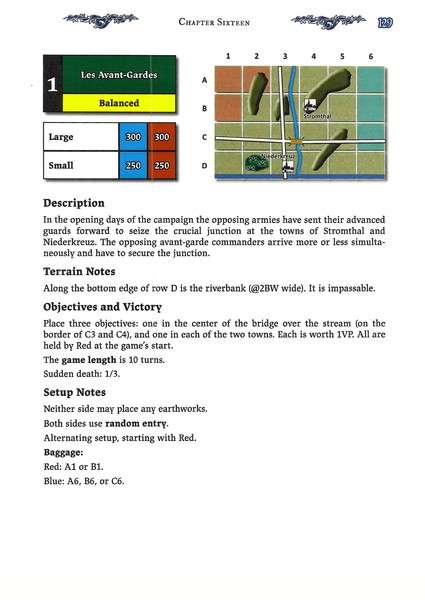
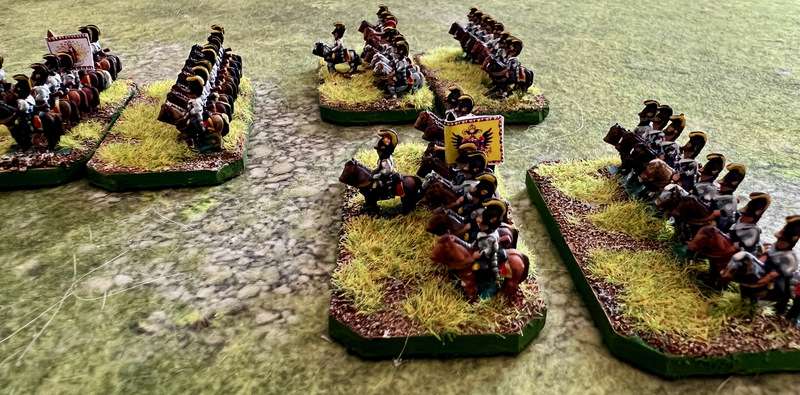
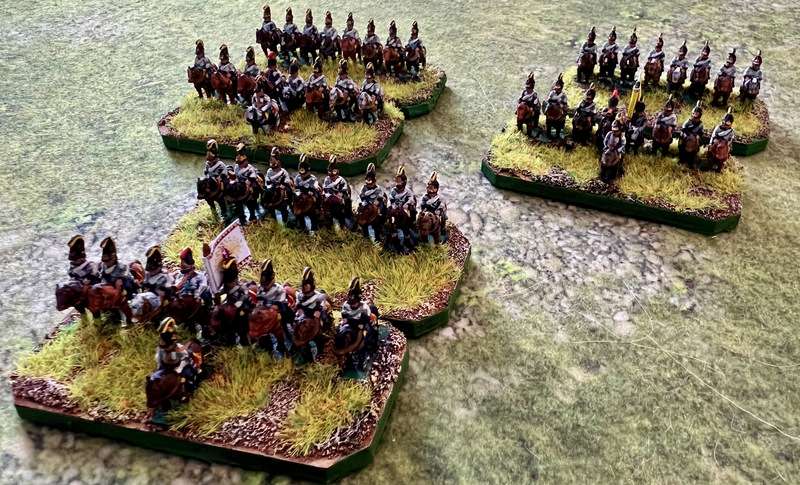
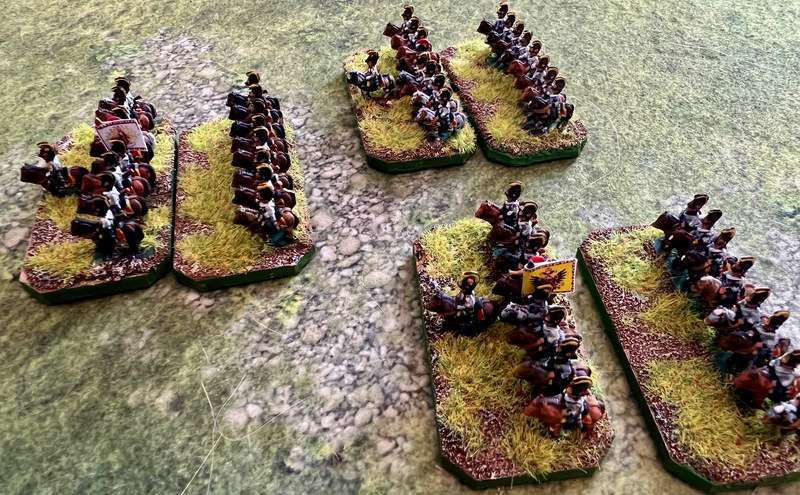
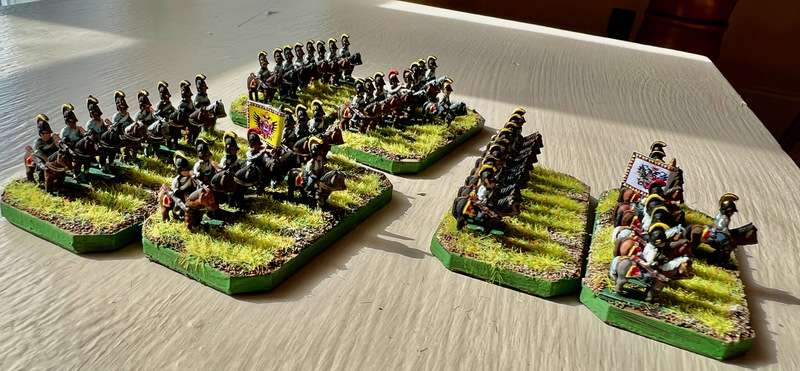
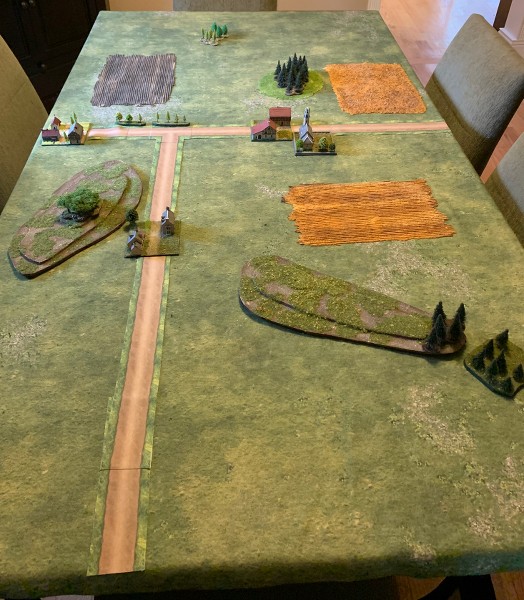
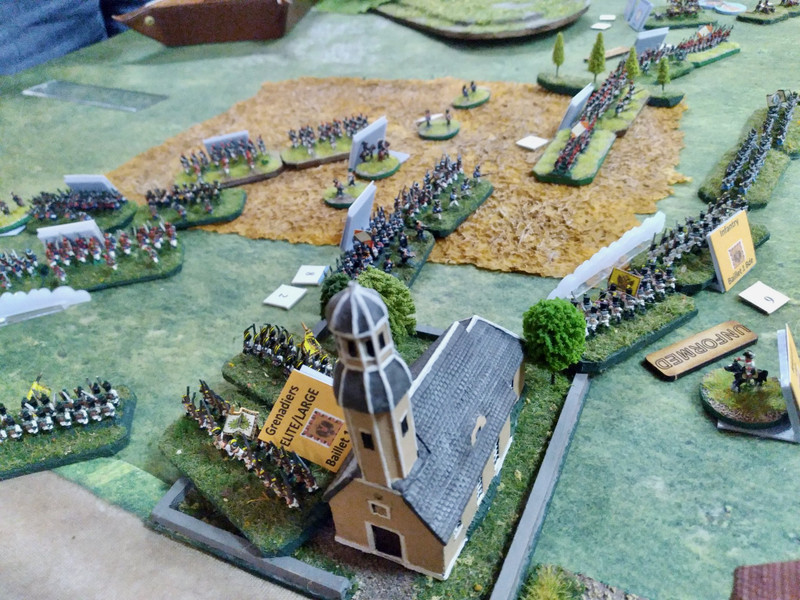
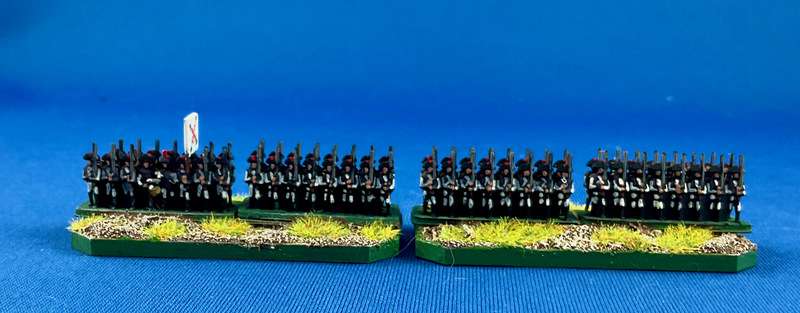
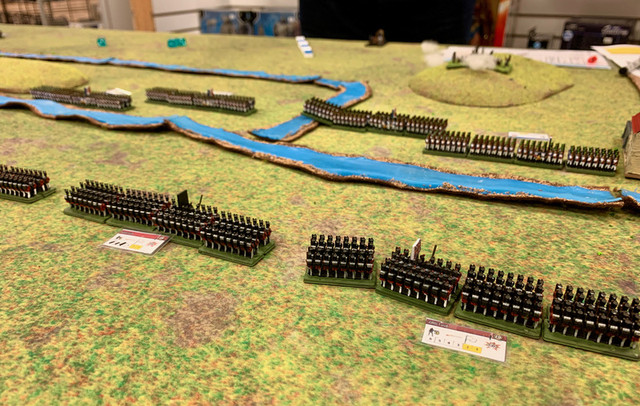
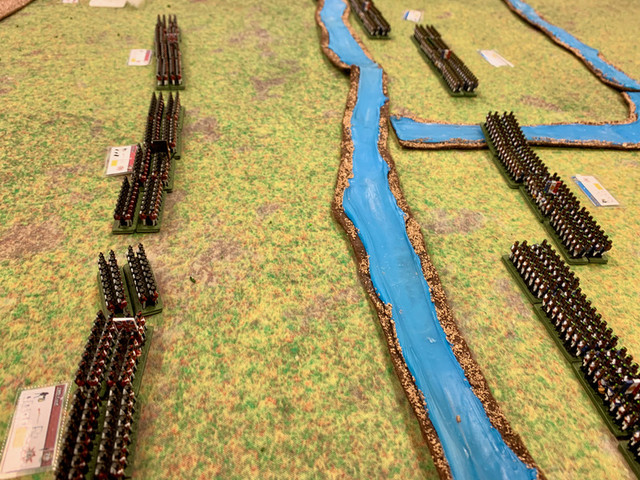
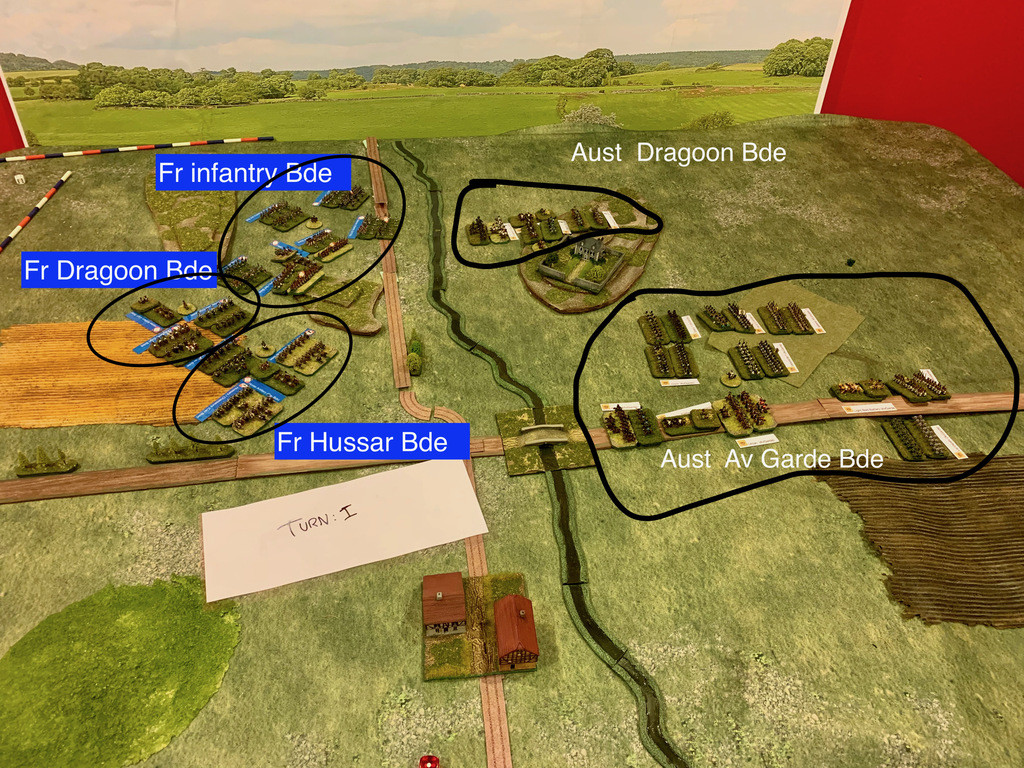
Here are the opposing forces at en Turn 1.  I chose two 300 point forces.  Austrians (right) have a large Avant-Garde brigade featuring two light cavalry units, one horse and one foot battery, and 6(ish) infantry regiments of mixed quality, and a second brigade of three dragoon (shock or heavy cavalry) regiments along with a horse battery.   The French (left) have a light cavalry brigade of three regiments and a horse battery, an infantry brigade (six regiments, mixed quality, and a foot battery) and a second heavy cavalry regiment of three dragoon regiments.   The Austrians start by owning the bridge in the centre and the two towns of Stromthal (top) and (Niederkreuz (bottom).

The Austrians got to go first, and thus got the jump on getting to the bridge at the end of turn 1 with a Hussar and Uhlan regiment, and horse artillery coming up in support.  The large French infantry brigade realizes that it has to 1) check the enemy cavalry at the stream and 2) try to reinforce the cavalry to contain the Austrians at the bridge.

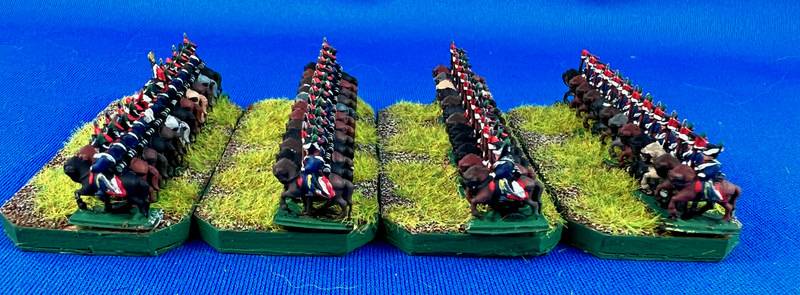
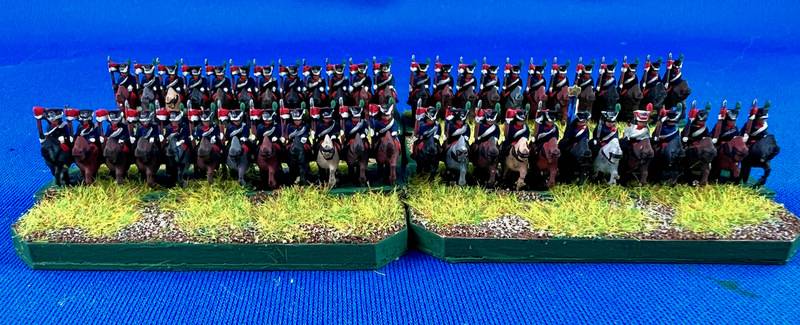
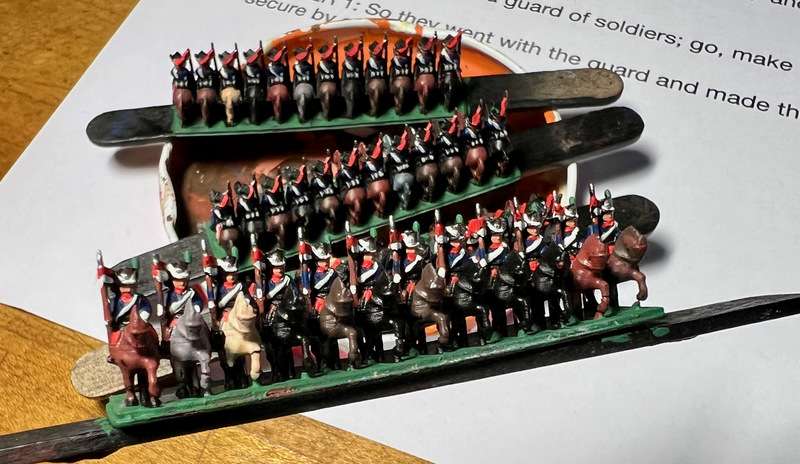
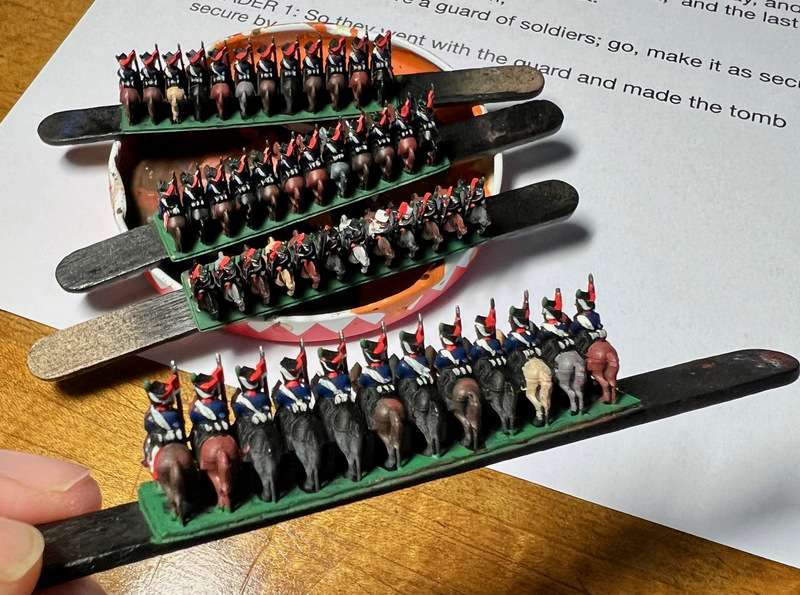
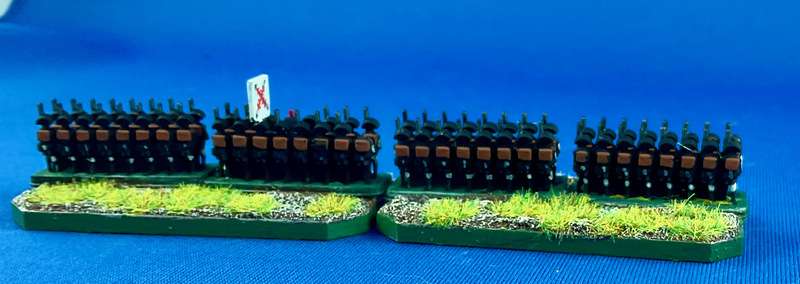
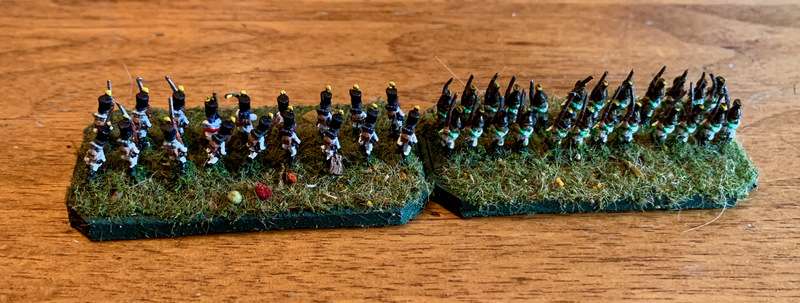
I had a slight dilemma with my basing, as my 6mm figures are all based on single stands in line formation, which works well enough in gams like Blucher or General d’Armee where one stand = one unit and it’s easy to assume that the unit is in the best formation for the situation (Blucher is especially good at this).  However, LaSalle calls for units to be composed of four stands, to represent column of march (the stands in a row of 1 wide and four long), mass (stands ranked two by two), line (four abreast) or if infantry square (two by two but each stand facing out in a different direction).  I attempted to split the difference by using two stands to represent one unit, though since all unit enter the game in column of march, I had to make notes on each unit label to determine when a unit had changed formation into the more tactically useful mass formation.   Square (back to back) and line were much easier.

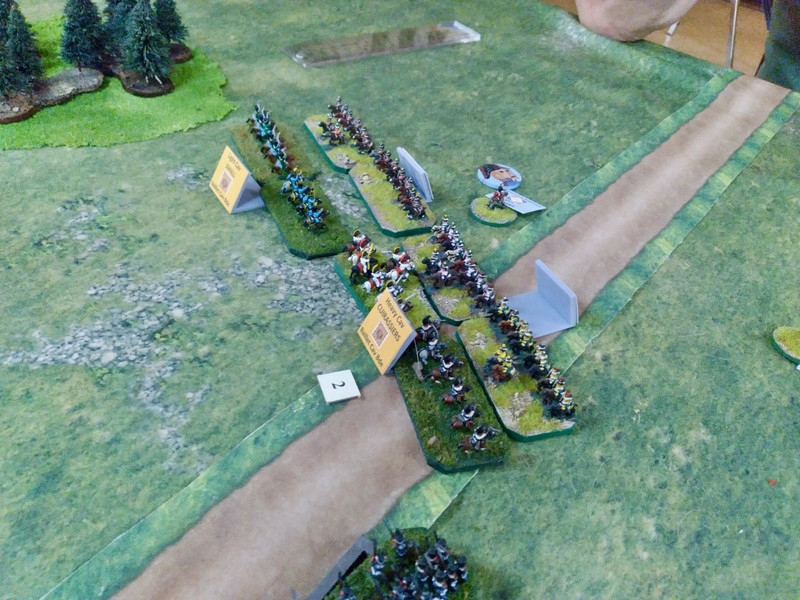
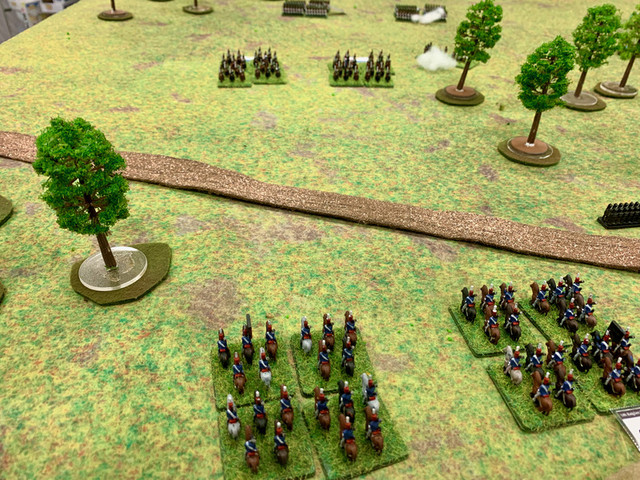
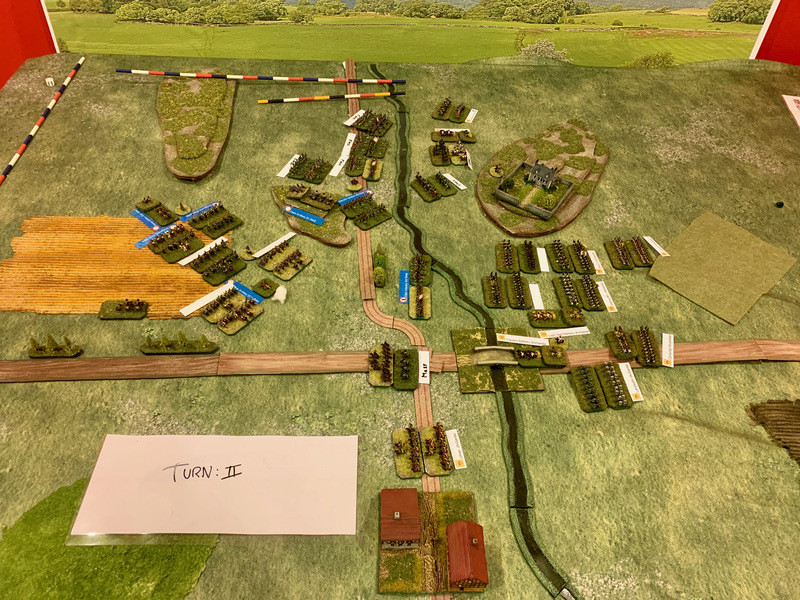
At the end of Turn II, the Austrian dragoons and French infantry regard each other on either side of the stream at the top.  The French have gotten one of their two elite infantry into line to face the advancing mass of Austrian infantry.   Austrian hussars and uhlans have made it across the stream and the French light cavalry are shaking out to meet them.

First clash, French and Austrian light cavalry slam into each other.   In this case, the melee is inconclusive, just an opening skirmish, but generally in LaSalle cavalry units in melee seem to have a much better chance of winning decisively or breaking and being removed from play if the melee goes poorly.   It forces the player to think carefully before committing the cavalry.   All of these stands except fo the one on the right are Baccus figures, painted by me in the last few years, and I’m quite pleased with the result.


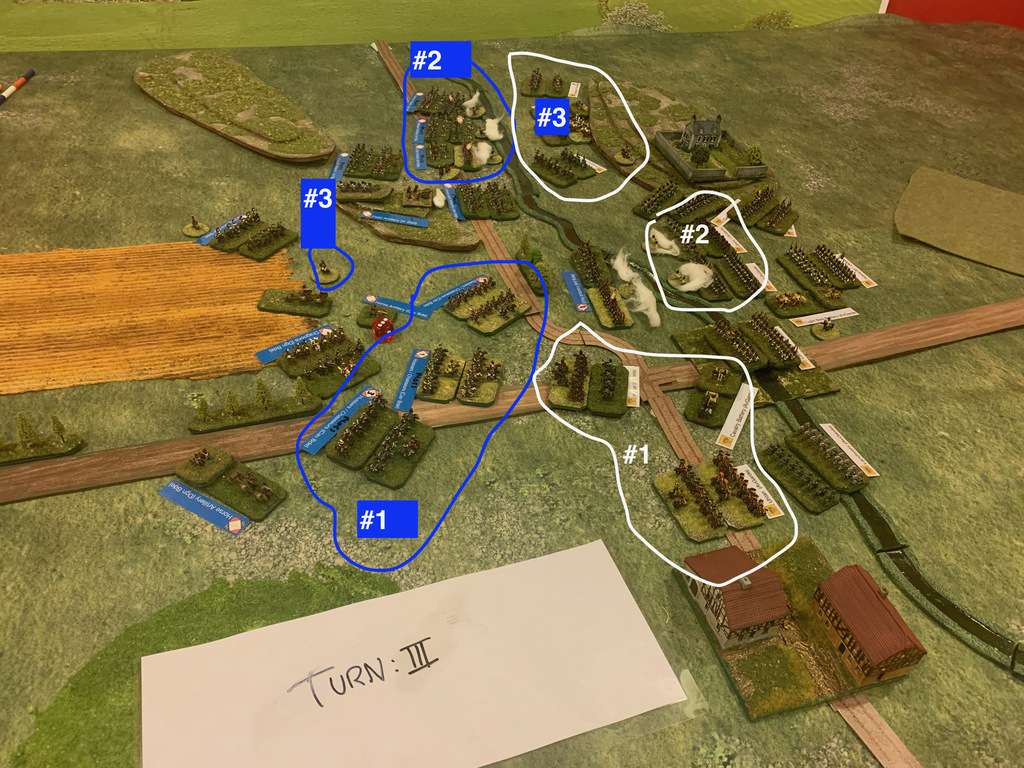
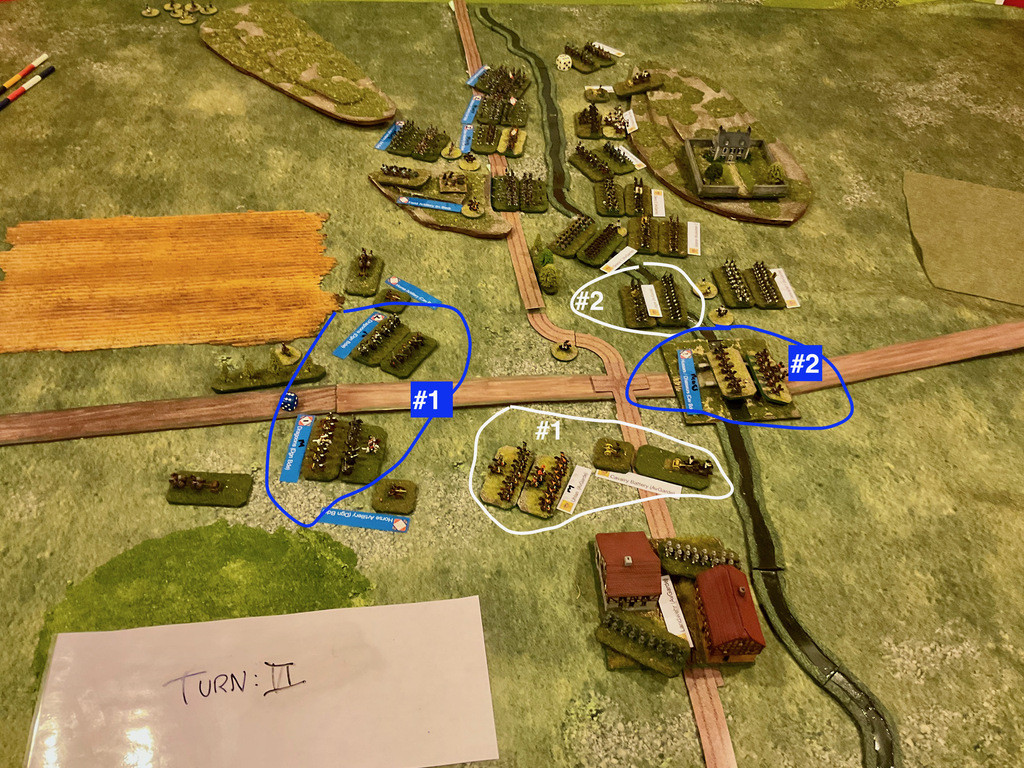
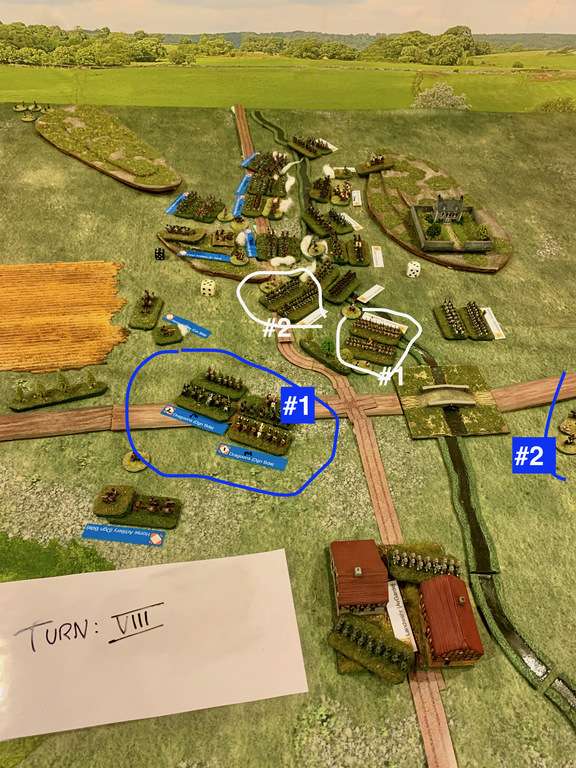
At the end of Turn 3, on the French side (blue circle), note:

#1 All three regiments of the light cavalry brigade are now deployed against the Austrian bridgehead after the first inconclusive clash.  This should give the French a melee bonus for outnumbering the enemy in the next turn.

#2 Three regiments of the infantry brigade are now in square.   This was a special formation change chosen at the start of the turn in the Intervention Phase.  Players at the start of their turn can choose to set their commander aside to intervene on the battlefield and make an emergency formation change for any friendly unit within 4 base widths of the CinC figure.   The upside is that this formation change does not cost a Momentum Point (MP), which in Lasalle is basically an initiative point, one of a limited amount of credits which allow you to do things during the turn.   If the CinC isn’t set aside for the Intervention Phase, he can be used to generate between 1-3 MPs for use during the turn.

#3 You’ll se a single figure circled here.  That’s a brigade commander, but in light of what I just said in #2, I discovered that in the Basic Lasalle rules, one doesn’t need sub-commanders, their function is factored into the number of MPs you get per turn.   Each player starts wit 1 MP for each brigade on the table (representing the initiative of sub-commanders, I guess), then 2 MPs for the HQ (the base area behind each army, not represented in this battle) and then between 1-3 MPs (1d6 roll) if the CinC is not set aside in the Intervention Phase.  

On the Austrian side (white circles), note in the photo below:

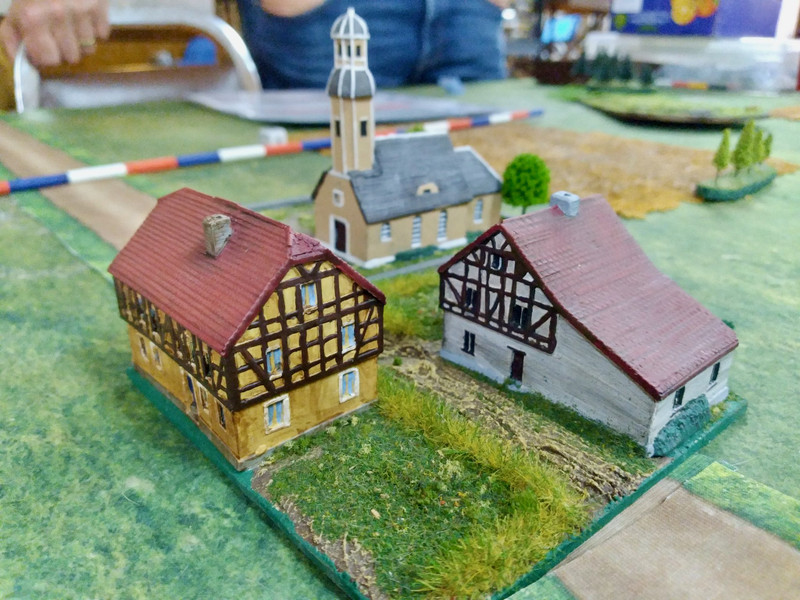
#1 Light cavalry of the Austrian Avant-Garde Brigade, Hussars at the top and Uhlans below, and their horse artillery moving into position.    The unit crossing the stream behind the Uhlans is the Av-Garde Landwehr infantry regiment, which has orders to get into the village of Nieuderkreuz and get comfy there.

#2 Lead infantry regiments (Grenz and Jaeger) regiments of the Av-Garde brigade are in mass formation and are trading volleys with th French elite infantry regiment holding the far side of the crew.   Note that all three regiments have little circular stands in front of them.   These are skirmish stands.  In Lasalle, an infantry regiment in Line or Mass formation can deploy skirmishers, which have a variable value (all French skirmish stands have a value of 3, Austrian Grenz and Jaeger value 3, Austrian line value 2).   During the Skirmish Phase at the start of each turn, both players total the value of their skirmish stands and roll d6 = total skirmish value, counting “6s”.  Players get a Momentum Point for every 2 sixes rolled, and the player with more sixes gets the initiative next turn.  The French were doing fine with skirmish points until their regiments started going into square and lost their skirmish capability.  This is a nice feature of the rules, that the ability of infantry to dominate the battlefield can be denied in the face of a cavalry threat.

#3 (white circle, blue number, top) the three Austrian cavalry regiments face off against the French infantry across the creek in what will become an ongoing standoff.    The Austrian horse artillery have unlimbered and are bombarding the French, but in LaSalle artillery is not overwhelming.  It can chip away a target’s cohesion over time, but it’s just one tool on the battlefield.

On the

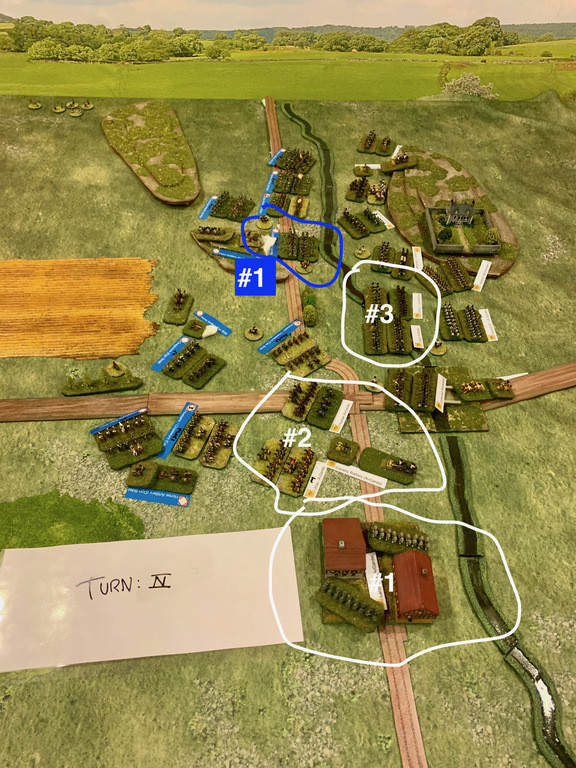
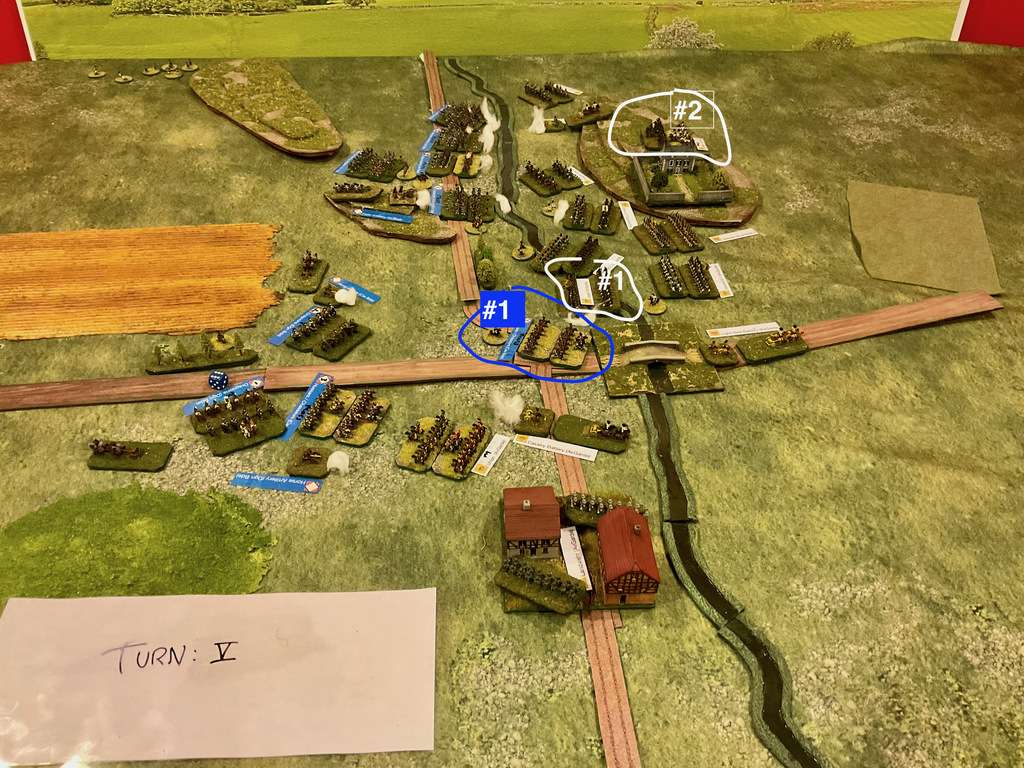
 Turn IV was rough on the French, seeing the Austrians draw first blood.  In the photo below, note:

Austrian (white circles):

#1 Landwehr regiment gets comfortable in Nieuderkreuz, finds the tavern, and settles in.  No one will trouble them for the rest of the battle.  This cements 1 VP for the Austrians, assuming that the sudden death victory (five units lost on either side) isn’t invoked.

#2 Austrian Grenz and Jaeger units charge across the stream into the French elite infantry regiment in line, and rout it in combat, removing it from the table.   In combat units get an advantage if they outnumber the enemy, but troop quality doesn’t enter into the combat factors, which are based on the modified strength of the unit plus a 1d6 die roll.  Here the French just rolled badly.   Another illustration of Momentum Points:  it costs the Austrians 3 MPs to make that charge - 1 MP to move a Force (the Avant Garde brigade), 1 MP to charge, and 1 MP for a complication (crossing the stream).  So 3 MPs out of the average total of 5-7 for each side per turn doesn’t leave a lot left over to do other things, but it worked out well for the Austrians.

#3 The Austrian Hussars and Uhlans team up to charge and route the centre French hussar regiment.  French have now lost two units - they lose there more and it’s an Austrian Sudden Death victory.

French (blue circle) #1: a fourth infantry unit has to go into square versus the Austrian dragoons.   These are mere conscripts, but they will (spoiler alert) turn out to be the stars of the battle.   The conscripts are supported by the Foot Artillery battery on the hill behind and above them, which help anchor the French centre.

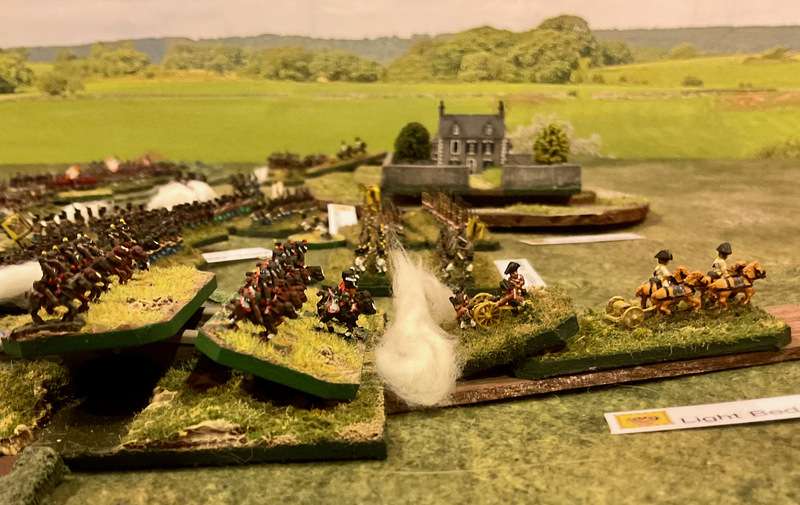
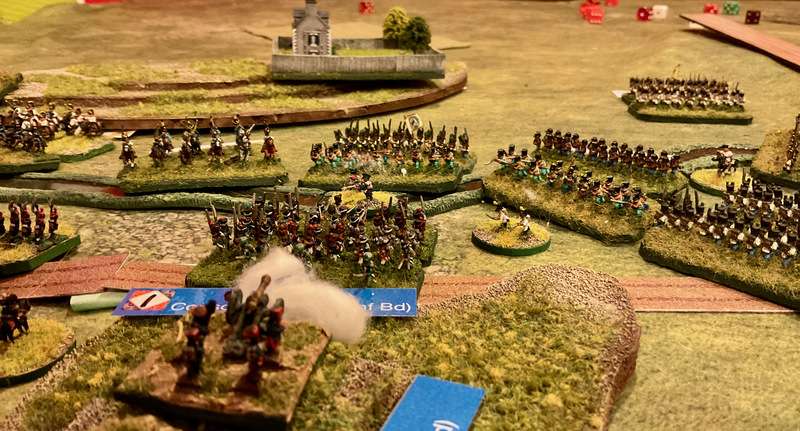
Action shot of the Austrian infantry charging across the stream to rout the French.  In the foreground, another regiment of the Avant Garde brigade is crossing the bridge to expand the Austrian foothold on the far bank.  It all looks rather grim for France.

 At the end of Turn 5, French fortunes are restored somewhat.  In the photo below:

French (blue circle) #1:  The French hussars are also seeking MVP status.  After being charged by their Austrian counterparts and handily defeating them, they are themselves free to charge the Austrian infantry crossing the bridge.   The Austrians, alas, are caught in Mass, so they face a terrible Combat modifier for being in a Disadvantageous Formation and are annihilated.   In LaSalle, infantry in square are surprisingly resilient in melee, provided that they aren’t exposed to too much incoming fire, which is how Napoleonic battles should work, I think.

Austrian #1:  Now it’s the turn of the Austrian infantry to be pinned.   With the victorious French hussars (Fr #1) on their flank, the Jaegers have no choice but to go into square, depriving their cohorts of the firepower they could bring to bear on the French centre.

Austrian 2#: As all the smoke along the stream in the centre top attests, the French squares are putting out as much musketry as they can.    This fire, combined with that of the French supporting artillery, is starting to hurt the Austrian dragoons.  One of the three dragoon regiments has withdraw to the top of the hill north of Stromthal to rally.   In LaSalle, units start with varying numbers of strength points, which can be reduced by fire and melee combat,  Units will break and rout if they run out of strength points, but the owning player can attempt to rally units, which offers a chance (better if the unit is better quality and better still if they unit is removed from musket range (4 BWs).  A die is thrown for each strength point lost (LaSalle calls them Disruption Points, I think) and these can either be regained or permanently lost if the roll fails.  However, a Rally attempt for a Formation (brigade) costs one of your precious MPs, so there’s an opportunity cost to rallying.

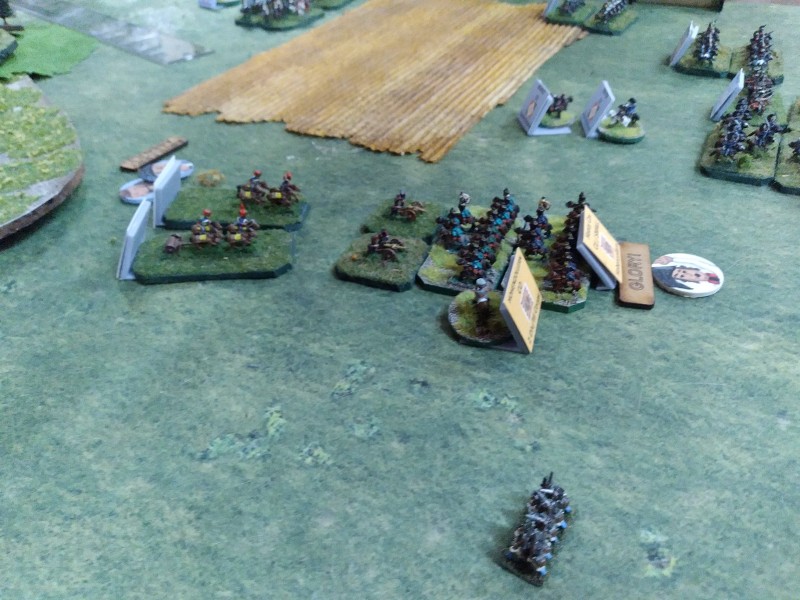
Went the day well for the Austrian battery now defending the bridge alone against the French hussars?

 Not really.  They got off one shot, then tried to limber and evade, failed, and were ridden down, taking the Austrians to three units lost.


End of  Turn 6 and noteworthy below:

Austrian #1 The doomed Uhlans of the Av Garde Brigade gallantly face two French Dragoon brigades, which will sweep the Uhlans off the table in Turn 7.

Aus #2 The Jaeger regiment could be pushing hard in the centre, but having learned from the bridge debacle that infantry not in square are delicious morsels for enemy cavalry, it now finds itself in square, where its superior musketry only gets one d6 per facing of the square, meaning that it can do very little.

Meanwhile, the two Grenz regiments and the dragoons take turns battering the French squares along the stream at top centre, with little to show except for slowly mounting casualties.

French #3 The French hussars, the surviving unit of the light cavalry brigade, find themselves across the river, having annihilated an Austrian infantry regiment and a foot battery.  They’re a little depleted but they’ve done well for themselves.

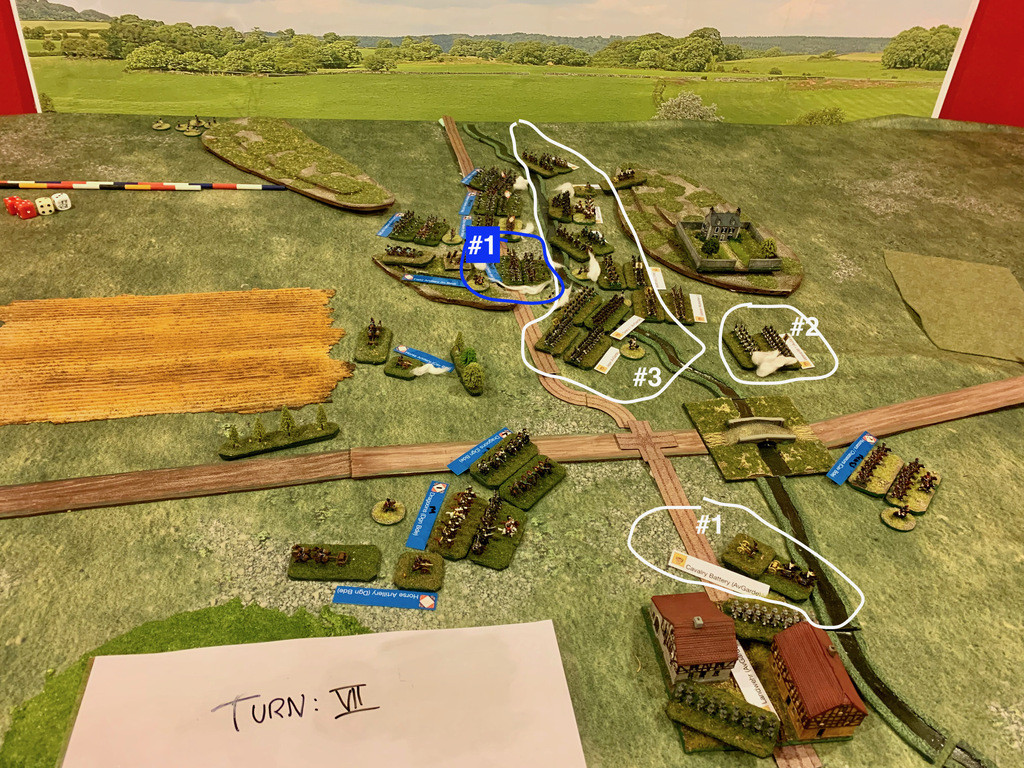
End of Turn 7 and noteworthy below:

Austrian #1: After the demise of their Uhlan colleagues (outnumbered 2-1 by the fresh French dragoons, they didn’t really have a a change, the Ave Garde Horse Artillery battery has limbered up and is bugging out.  Now ith 4 units lost, the Austrians lose the game if they lose a fifth unit and that battery is easy prey for the two FR dragoon regiments facing it.  The French hussars on the far side of the river have moved away to rally and regroup, so the horse gunners might have a chance of escaping.

Aus #2:  The reserve infantry of the Av Garde brigade is now uselessly in square, facing the threat of the FR Hussars that have crossed the river.

Aus #3:  Momentum points are being burned as the Austrian dragoons throw themselves at the French squares, and the two Grenz units vainly try to dislodge the (FR #1) conscript square in the centre,  It just won’t budge!  Meanwhile, the FR artillery on the hill in centre is steadily chipping away at the weaker of the two Grenz regiments. Finally, the Jaegers on the bottom of the #3 circle have gone back into Mass formation and have moved forward, hoping for a shot at driving the French artillery off the hill in the centre.

FR #1: Fighting off charge after charge, their ranks thinning but unbowed, the French conscript infantry in square in the centre continues to defy the odds.

At the end of Turn 8, things are very tense and it’s going to go well or poorly for the Austrians in the next turn.

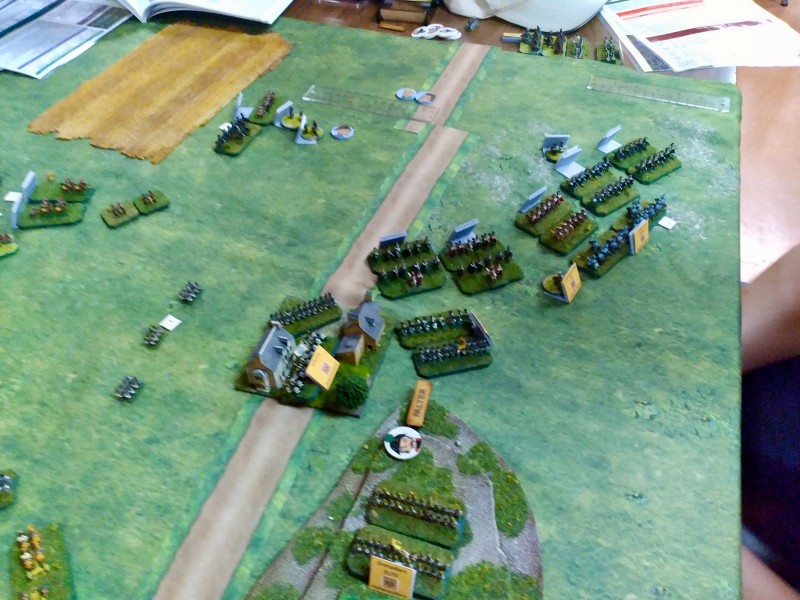
Aus 1: Hoping to contest the bridge, a regiment of conscripts from the Av Garde brigade crosses the river and forms square facing the French horse.  Meanwhile, the Austrian horse artillery has safely escaped and is out of the fight.  The Landwehr in the village are just happy someone else is fighting the battle.

Aus 2: The Jaeger regiment, in mass formation, is heading straight for the French battery on the hill.   They are within the 4BW charge range of the French dragoons to their left flank, and if the French charge first, the Jaegers are kaput.  It will depend on who goes first.  Meanwhile, the mass of Austrian dragoons and the two Grenz units are hoping to finish the French conscripts in the centre, which, if the Jaegers do their job, takes the French to 5 units lost and sudden death.

Fr 1: The French dragoon brigade has wheeled and is ready to charge.

Fr 2: The hussars, out of frame, are rallying this turn.  With all the nearby infantry in square, they might just make a run at the village of Stromthal behind the Austrian centre and take the Victory Point.


Austrian disaster!  With the initiative, the French spend a MP for a volley command, and fire the artillery across the heads of the conscripts and into the weaker of the two Grenz regiments directly to the front of the French guns.  Three hits and each one a kill!  The Grenz regiment only has three strength points left, and it’s gone.   French victory!
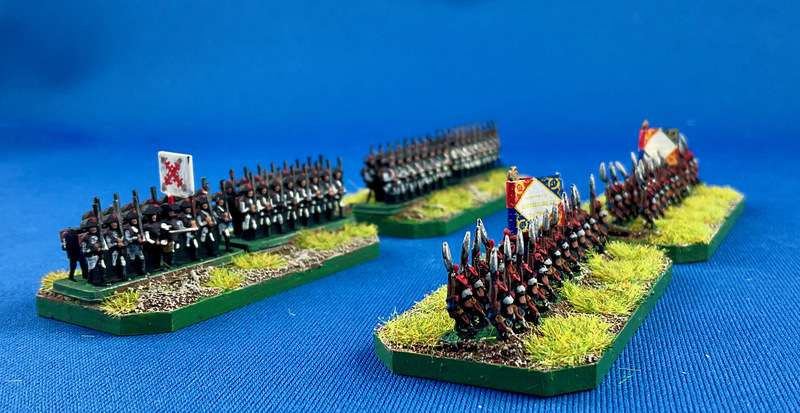
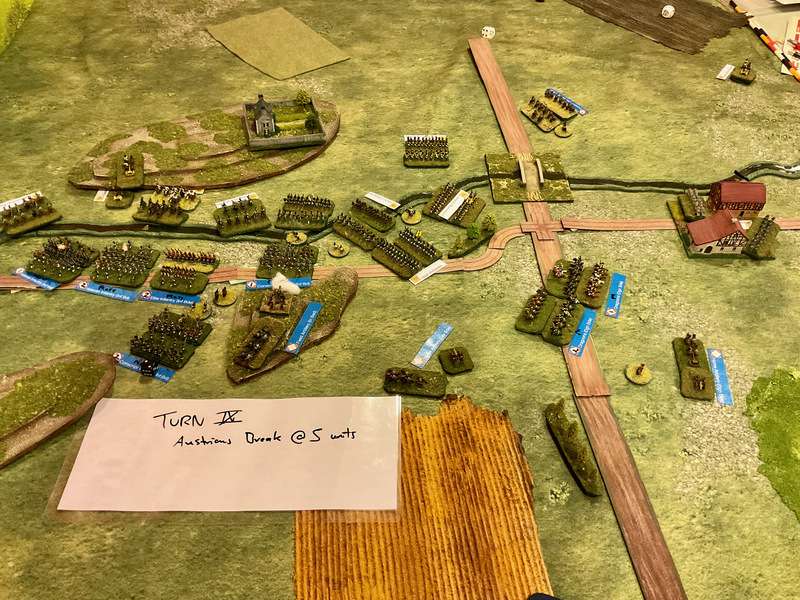
Final dispositions.

I ended the game with a very favourable impression of these rules.  As with other Sam Mustafa rules I’ve played, the mechanisms aren’t overly complex, and the game feels playable and yet realistic enough and sufficiently “Napoleonic”.  There is that “rock/paper/scissors” feel that you want with infantry vs cavalry, and as I noted earlier, artillery can have an impact (it was the cause of the French win) but is not overwhelmingly powerful.

What I enjoy most about it is the turn sequence.  The opportunity to “interrupt” another player, which usually happens when units are within 4BWs, would require players to think hard about the best use of their Momentum Points before committing to an action that would give the opponent a riposte.    The first time I played Lasalle was head to head and it certainly felt very tense.

Having just played the Basic game, it is several notches below TFL/Reisswitz’s General D’Armee in complexity.   I will definitely try the second scenario in the rules along with some of the Advanced Rules.  An added bonus was getting my 6mm figures back on the table, and that felt like a victory in itself.

Tell me how you liked this format for an AAR - did the numbers in the photos and the explanations in the text help you follow the battle?

Cheers and blessings to your die rolls.

MP+


Tuesday, January 4, 2022

More 6mm Napoleonics: Baccus French

On the heels of my last post about 3D printed 6mm figures, here are some “old school” (do we call them that now?) cast metal 6mm Napoleonic French from Baccus that marched off the painting desk just before New Years.


The figures are Baccus code NFR02 French Elite Infantry 1806-1812.   I’ve painted them all with red hat plumes, cords, and epaulettes to make them easily distinguishable on the table top as an elite or veteran unit.  Flags are likewise from Baccus.

This is my standard base for 6mm foot or horse figures, and is the Base Width that I use for measuring if using Sam Mustafa’s LaSalle or Blucher rules.

I have a considerable stash of Baccus figures yet to paint - Bavarians as well as Revolutionary era French in bicornes, so I have lots to work on while I get the teething issues with my Elegoo Mars 3 printer sorted out.  Elegoo thinks the machine shipped with a defective LCD panel, which means the light came out everywhere and the print pattern was impossible.   They’re sending me a replacement part from China, so I may order a second machine to play with while I wait.

Cheers, and blessings you your brushes,

MP


Sunday, January 2, 2022

6mm Napoleonics 3D Print Update

Happy New Year friends:

I hope that the year is off to a good start for you and yours.   Joy and I had plans for NYE which had to be sadly but prudently cancelled.  Here in Ontario the spread of Omicron is so rapid that the provincial health authority has given up on testing and contact tracing for the general public.   While we both have our three doses of vaccine, we decided to cocoon at home and have a low key start to the year, which meant that I got some figure painting done.

Several weeks ago I described here getting some 3D print 6mm Napoleonics from V, the owner of the local gaming store.   V really wants people to play LaSalle in 6mm with him, and while I have a large collection of old school metal 6mm Naps, I was intrigued to see how these figures would paint up.

They didn’t paint up badly at all.   Since these figures all have bicornes I painted them as Spanish.   As a painting guide, I used the Spanish 8th Regt. de Soria from The Wargaming Company’s Campaign Guide, To Assure My Dynasty: 1808 in Iberia, which is an excellent resource to b featured in another post. The 8th’s Fusilier uniforms are white, though there is some purple facing on the cuffs and tunics, but I doubt anyone will notice that on the table top.   

Front:

Back:

They are very well equipped and uniform for a Spanish army, but again, the 3’ rule applies, and is especially true of 6mm.  If one wants historically accurate and ragged individuals, 28mm is the place to go for that.

I’m rather proud of the handpainted flag.  As you can see from the rear stand below, the second rank of figures in each stand has very little detail on the front face, so other than the two figures at either end, I contented myself with painting the muskets, red hat cockades, and flesh for the faces.   Otherwise only the rear of the back rank figures required painting.

Just for fun, here’s a comparison shot of these two stands facing off against two stands of recently painted metal Baccus French figures.

If you didn’t know better, you might think that just from this shot, these two forces were from the same manufacturer.   Because the Baccus figures are cast in strips of four, they have 360 degree detail and can be painted individually, but again, looking down at the table while standing, I think the differences are minimal.

While I’m not sure that I would want a whole army of these particular printed troops, there are definitely producers out there who are doing 6mm 3D files in luscious detail.  I have my eye firmly on Turner Miniatures, for example, and hope to get some of their sample figures printed as soon as I get the teething issues with my new machine sorted.  That’s another post, so for now I’ll wish once again wish you a happy, and happier, new year.

May God bless and keep us all in what lies ahead, and give us good gaming and friendship.

Cheers,  MP

Saturday, December 18, 2021

Playing Lasalle with 3D printed 6mm Naps

“Hey, Mike, want a free army?”   That wasn’t how I’m usually greeted by V, the owner of my Friendly Local Gaming Store, and I was immediately suspicious, as V is a canny operator who has managed to stay in the retail hobby business for decades.   

“What’s the catch?”  I asked warily.

“No catch”, V said cheerfully, “you just have to paint it.”    V, who is a tireless (and sometimes cranky ball of energy), is an historical gamer at heart, even though the bulk of his business is a carefully balanced supply of action figures, GW kit, Airsoft gear, and Eurogames.   He’s also a born again 3D printer, has just bought a ton of .STL files, and proudly showed off a mass of 6mm figures that he’s recently stamped out.  Here is a stand of Spanish infantry in their distinctive bicornes.   As you can see, they are designed in the same block style that Warlord uses for their 18mm ACW and Napoleonic range, though less detailed.

And from the back.   The legs are not terribly distinct, and they are very well equipped for Spanish troops, but shouldn’t be that hard to paint.   

The .STL files also include a command stand (front left in the photo below), not terribly say to see in the black primer that V has used.   A command stand and three rank and file units make up a unit of foot in Sam Mustafa’s LaSalle rules, which V wants to use to play large battles.

Here are some photos of a LaSalle battle that V and I played this last Monday, an Anglo-Dutch army below facing off against the French.  V has painted enough figures to have a decent battle, and at 6mm, seen while looking down at the table while standing, they look perfectly acceptable.


LaSalle was new to me, though I’ve played Blucher and the concepts are generally familiar to anyone with some experience of Sam Mustafa’s games.  The game allows some tactical choices, while the fluid turn sequence, in which players can pass the initiative back and forth while spending momentum points (of which there are never enough) keeps things interesting.

The cavalry in V’s STL files print singly and look good enough when based, though they are all guys in shakos and swords, so it’s rather generic.

I agreed to take four of the Spanish stands home to test paint.   My own 6mm collection is single based, which work well for games like Blucher and TFL’s GdA.    Forunately they are about the same length as V’s bases in mass formation.

And two bases of my figures placed end to end equal’s V’s four bases formed in line, so our collections are roughly compatible.   V is quite pleased that I have large, ready painted French and Austrian armies (and apparently the makings of a Spanish army) so I think our two collections are generally interoperable.

I can happily foresee some H2H 6mm gaming in the new year, barring another lockdown.  It’s looking rather grim here a the moment.

Blessings, my friends.

MP+

Blog Archive

Followers