Three Ages of Rome (3AoR) is written by UK wargamer Philip Garton for the Helion Books war-games series (published 2022). Garton has a number of ancient and early modern rules to his credit. Even though it is written with massed armies in 6mm and 15mm in mind, I found 3AoR an easy and quick way to play an Ancients battle using my 28mm figures, using the recommended adjust of +50% to movement and ranges for 28mms.
Friday, May 17, 2024
A Battle In Germania: Playing Three Ages of Rome
Three Ages of Rome (3AoR) is written by UK wargamer Philip Garton for the Helion Books war-games series (published 2022). Garton has a number of ancient and early modern rules to his credit. Even though it is written with massed armies in 6mm and 15mm in mind, I found 3AoR an easy and quick way to play an Ancients battle using my 28mm figures, using the recommended adjust of +50% to movement and ranges for 28mms.
Thursday, March 28, 2024
An Estate Sale Rules Haul and a bit of Memento Mori
Where do wargamers go when they shuffle off this mortal coil?
That's a question that I won't attempt to answer. Even though I am a wargaming vicar, I will leave theology for my other blog. However, I think most of you, gentle readers, know by now that when our wargaming friends pass away, they tend to leave a lot of stuff behind.
Last Saturday I took advantage of a lovely and sunny early spring day to drive the two hours from Collingwood down to Stratford to visit Hot Lead, ably run by my friend James and his redshirted cohorts. I only had a short window of time, so it was all about saying hello to old friends, scanning the games in progress, and of course shopping.
The bring and buy was picked over and offered nothing of interest. I did buy some lovely painted scatter terrain from a local fellow named Dale Jardine (sorry, I don't have his business' name or website), including these overgrown ruins ready for fantasy games or for pulp heroes like these ones to explore:
Fallen trees and stumps! Perfect for fantasy or for my ACW gaming, where stumps around a homestead or in a second growth forest battle like The Wilderness would be common. What a clever idea!
Other than these purchases and a handful of specialty dice (including average dice, necessary for Keith Flint's Honours of War rules), there was nothing I really wanted, but then I met some fellows I know who were selling off the wargaming collections of two chaps as a kindness to their loved ones.
I wasn't interested in the figures on offer, but I was keen to stock up my rules library. Can one ever have enough Napoleonics rules?
I never did learn the Fire and Fury systems in their heyday, so I feel I should have a look at them. I've also heard good things about Shako.
Finally, I succumbed to this old school Phil Barker classic, because I love the enthusiasm of people like Barker who enjoyed a hobby before it became an industry. Coincidentally on social media today, somebody saw this photo and said he'd just received an Easter card from the Barkers, so good to know that Phil is still around.
Why does the elephant on the cover look sad? Because nobody ever borrowed this poor book! Either Templeton SS didn't even have _one_ nerd, or the nerd stole the book from the school library.
So while old wargamers may die, they sure leave a lot of stuff behind them. I admired my friends for managing these little hobby estate sales; it is an act of charity to get rid of a friend's kit and hopefully pass some money back to their widow or survivors. Buying these books seemed the right thing to do, even though it was an intimation of my own mortality.
Perhaps, as one of my friends said to me, our stuff will keep circulating in ever decreasing circles as our generation drops off, and eventually there will be only a few us left standing, at which point the last of us should agree that we will be cremated atop a giant pyre of wargames toys.
I have a friend who I've asked to be my hobby executor if I predecease him, and maybe I'll do the same for him, you never know. What plans have you made for your hobby gear when you fall of your twig?
MP+
Monday, March 25, 2024
First Thoughts on Henry Hyde's Shot, Steel and Stone Miniatures Rules
Not that they are especially new, but I've spent the last few weeks learning a set of horse and musket rules by Henry Hyde called Shot, Steel and Stone (SS&S). I've been looking for a good set of rules suitable for the Seven Years War period, and added SS&S to my shopping cart when I was buying some books on the Caliver website. They are also available on the Wargames Vault webstore, and are fairly inexpensive.
My first impression of SS&S was that the subtitle, "The Bare Essentials", described it well. The black and white book weighs in at about twenty-ish pages but was attractively bound in a soft cardboard cover. The B&W photos show ranks of the old school figures that Henry unabashedly loves, and help give these rules their nostalgic feel. However, Henry's been busy augmenting these rules with a whole set of "how to" videos on his You Tube channel, done in his loquacious and enthusiastic style.
Since I had my Turkish 18th century army on the table (see my previous post here), I decided to put my Russian troops down and have a go. This may have been a mistake, as it's always better to learn a new set of rules with fewer units, but I couldn't resist the visual appeal. As you can see, I didn't put any terrain down, as I wanted to focus on the core mechanics.
Here are four things I especially liked about these rules.
1) Limited Friction. Commanders and subcommanders can have three ratings, basically Good, Average, and Poor, which determine their command radii and the bonuses they can give their troops. However, at the start of each turn, each commander's ability is checked by a die roll, meaning that even good commanders can have a bad moment, and vice versa. This effectiveness check imposes a limited friction on the battle, so that a bad roll means that a commander's units will move more slowly and be less reliable in melee, or (again), vice versa. Thus, a wing of the army will not lose a turn, as in some other rule sets where initiative rolls are required, but that wing might perform erratically to the good or bad.
2) Basing Agnostic. Like other rules sets, bases don't have to be of a certain size as long as the size is standard, and movement and range is measured in base lengths (my bases are generally 2 inch squares, so that's easy to work out). Unit strength is measured by a number of bases. Bases can be removed by shooting hits or by melee results. Large units have better morale than smaller ones, and generally when a unit gets to half its original strength, it's basically spent and will retire. Each base gets so many dice for shooting or for melee.
3) Morale System. In SS&S units have three levels of quality, A (elite), B (line) and C (poor). Morale checks are taken before charging, when being charged, after melee and after shooting hits are taken, etc. The quality of the unit and its size are among a range of factors that determine the morale check modifier, including: unit posture (eg, advancing or retreating), hits taken that turn, current size vs starting size, formation (eg, skirmish vs close order), threats to flank and presence and proximity of supporting units.
That sounds like a lot to calculate, and will remind older players of WRG rules sets and the days of yore, but Henry's supplied a clever little matrix that makes the process fairly easy to work through.
Of course, the dice will be perverse. Here my Elite (A Class) Russian grenadiers caught a unit of Poor (C Class) Ottoman skirmish bow in a charge and amazingly the skirmishers held their ground and fought the grenadiers to a standstill, with casualties tied on both sides. Of course, two of those grenadier bases were newly painted and having their first outing, so the new unit curse naturally applies.
4) Disruptions
Wednesday, December 1, 2021
Getting to Grip with Honours of War
Hello friends:
As I’ve said here recently, the SYW painting muse has captured my attention lately, and her sister muse of SYW gaming paid a visit recently. As I’ve been slowly painting Prussians and rebasing a rather old collection of Russians, I’ve been slowly getting to know Keith Flint’s Honours of War SYW rules, published a few years ago by Osprey.
SYW was one of my early gaming loves, and back in the day the group I hung out with had two favourite rules. The grognards all liked Phil Barker’s Wargamer Rules 1685-1845 (WRG), while the young turks preferred Tod Kershner’s Warfare in the Age of Reason rules (Emperor’s Press). Both were hugely influential rules in their day, and I suspect most people would point to Black Powder as their most prominent heir and successor. I confess I’ve only played BP once and didn’t find it terribly compelling, but can’t offer a fair and comprehensive opinion.
I had been following Keith Flint’s wargames blog for some years and so was tracking his own SYW rules and even received a playtest copy, though at the time my life was complex and my gaming time quite limited, so I put it aside, I was also discouraged by the fact that the National Characteristics didn’t include the Ottomans, as for some reason I’d found myself with a Turkish horse and musket army.
Recently I’ve been rebasing my Russian SYW troops from their WRG-era bases and putting everything on standard size bases, since most rules these days seem basing agnostic and I can’t be bothered cutting fancy and precise bases for skirmishers vs heavy cavalry. I sound like a grumpy old git, but there you go. Feeling that I’d made enough progress to get some troops on the table, I divided my Russians into two forces, each of two very small brigades, just to push some figures around and get a feel for the rules.
Clearly wanting to modernize their thinking, the Russian army stages a mock battle on the drill fields outside Moscow. Both sides have a brigade of two horse units, and both have a brigade with two batteries, a light infantry regiment, and a line regiment. All units are rated as Standard and all commanders are rated as Dependable, just to make the test drive easier.
In some of the reviews I’ve read, people don’t like the initiative and command and control,system, and others like it. I'm in the latter camp. I liked the uncertainty of which brigade gets to move first, which breaks up the chess-like feel that SYW games sometimes have. I also liked the fact that an average or good commander might get two moves in a turn, vs another brigade’s none, which introduces a very fluid feel.
As others have noted, the game uses the same results table for Fire and Melee combat, which combined with fairly few factors makes it a quick study. Units are rated as Inferior, Standard, or Superior, depending on their troop type and national characteristics. Units suffer degraded performance once they take thee hits from shooting or melee, must retreat at four hits, and are removed from the table at five hits. Here hussars (Front Rank) and my newly painted cuirassiers (Foundry), each already with two hits, collide, each deals three hits, and both units are done. It’s all quite bloody and fast. I might have rated the hussars as Inferior and the Cuirassiers as Superior, just to make it more interesting.
You'll see a bit of a WRG hangover in these bases, as the hussars on the left are based on larger bases to depict light cavalry, while the figures on the right are on the generic 40mm square base that I now use for all my stands.
Another feature about the Fire and Melee table is that it uses average dice. I had to beg some off a kind friend, as I'm not mentally agile enough to adjust the dice AND the modifiers in my head. As my friend warned, don't let those average dice get mixed in with your regular d6 dice or you could have poor luck rolling sixes when you need them!
What keeps units on the table is their ability to rally if not closely threatened by enemy units, and especially if close to their Commanding General (a clever mechanic is that each turn players can relocate their Commanding General, which can aid a key part of the battle by increasing a brigadier's performance and helping units in the Rally Phase at the end of each turn. Units with four hits must retire from the fight and reform, which takes time, provided that they are protected by fresh units, which is another nice mechanic.
The line regiment on the right in this photo will lose the fight because it’s being whittled down by one of the guns to the left and by the fire of the light infantry. As some players have noted, light infantry can seem unduly powerful in this game, unless one remembers that they should usually be fielded as small units and as Inferior troops, so they shouldn’t be left in the open. Here I had meant to retire the lights through the line infantry on the left, but at the key moment discovered the rule preventing voluntary interpenetration of units if they begin their move within 20cm of an enemy unit. This is why we train, to learn things like this.
Luigi the Catbeast of Muscovy declares ENDEX and all troops return to barracks for extra vodka while their officers must attend a long and tedious AAR conducted by the Observer/Controller staff.
People have been writing reviews about HoW for a few years now so I have little to add that’s new. Quick final thoughts:
- Simple, highly playable rules that still give a convincing SYW feel.
- I like the Command and Control and Initiative Rules, very clever and they give a very fluid feel that would keep players on their toes.
- As others have noted, it’s a game that I think is best played with large numbers of units. With only 6 units a side, as I found, it’s over very quickly and the tactical choices are fairly limited. I think the simplicity of these rules makes them a good choice for larger battles. I’m starting to regret my choice of 28mm for this period, but I’m too far in to go back on that decision.
- These rules are well supported by the author and have their own forum, which isn’t true of all the Osprey blue series rules titles I’ve seen.
I’m pretty sure I’ll have more to say about these rules in posts to come as I get more units on the table.
Blessings to your dice rolls!
MP+
Saturday, September 11, 2021
My Thoughts on Absolute Emperor, New Napoleonic Rules from Osprey
(Note: I had meant to post this on my self-imposed timeline of Napoleonic Thursday, but will have to settle for Saturday evening.)
I had mentioned in a previous blog post that I had taken a flyer on Absolute Emperor (AE), Boyd Bruce’s new Napoleonic rules, published this year in Osprey’s “blue book” rules series. Thanks to my son John, who came out from the west coast to spend the last week of August with his old man, I’ve had a chance to put down some figures and take these rules out on the road. What follows is not a comprehensive review, but some first impressions.
AE does what is says on the tin: it’s a basic, highly playable set of rules for a reasonably sized Napoleonic battle in 2-4 hours, so, a club game. Individual units (called divisions in the rules) are operate within corps, each commanded by a corps commander, which suggests that these are rules written for army level engagements. However, the fact that these individual units can assume a variety of tactical formations (line, march column, attack column, square, un/ limbered, columns of squadrons) makes the game feel like an engagement of brigades, with the maneuver elements being regiments/battalions/batteries. Judging from the examples of actions given by in the designer notes, Boyd Bruce also thinks of this as a regimental/brigade set of rules.
Therefore, the first thing that I would suggest is that the prospective player abandons any thought that these are rules for big battles. I think it would be fair to say that AE attempts to provide a fast and playable war-game that conveys some sense of the Napoleonic battlefield and the tactics involved at the regimental level. How does it succeed in that goal? I would say, moderately well.
My son John put it very well when he helped me try out AE after playing several games of Sharp Practice. “After all the tactics of Sharp Practice, these rules seem very chess-like to me”, he said, which I think is a fair comment about how these rules capture what is often called the Rock Paper Scissors quality of the Napoleonic battlefield.
Here are the quick outlines. Units are rated as Veteran, Seasoned, and Conscript with “Activation” rolls respectively of 3+, 4+, and 5+ on 1d6. Early on p.9, when these Activation ratings are given, the rules explain that these are also the rolls that these troop type need to hit when Shooting and in Combat (Melee). If you miss that explanation, you will roam the rest of the rules in vain to understand how to shoot and fight. Activation rolls are necessary for most units to charge, or for foot to form square when charged by cavalry.
Cavalry are of two types, Light and Line. The only difference I can tell is that Light Cavalry don't get a charge bonus in Combat vs. Line cavalry.
Units in shooting and combat get different numbers of dice depending on their formation, thus a line veteran infantry unit rolls 4d6 in fire combat and hits on a 3+. Infantry in Combat gets 2d6 in Attack Column with a +1d6 Charge Bonus (+2d6 for non-Conscript French if between 1805-1809) so a Seasoned French unit in Attack Column Charging in 1805 gets 4d6 in the first round, hitting on 4+.
Artillery isn’t rated by quality; it generally gets 2d6 when shooting and hits on a 5+ with one dice if at effective range and 5+ hitting with two dice if in close (canister) range.
Units lose a step in quality when they take 5 hits and they are eliminated when they take 8 hits. In Close Combat, after a round of Shooting, whole units can disappear quickly, so the rules feel quick and bloody.
Commanders get varying numbers of Elan points, more Elan points = the better commander. The total number of all friendly commanders' Elan points means that the player with the lower total moves first, then the player with more Elan moves second, this giving the player with the better generals the opportunity to react to the other guys' moves. Shooting and Combat results are simultaneous. Generals can spend one Elan point each turn to either re-roll one die, allow a unit to rally, re-roll an activation, or change their Corps’ orders (more on that later).
That’s a quick overview of the rules, and most of what you need to know to play.
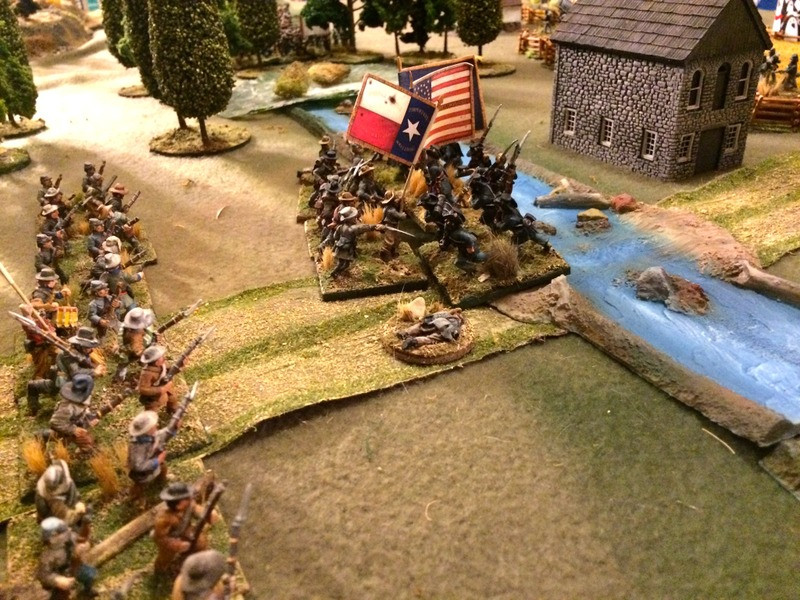
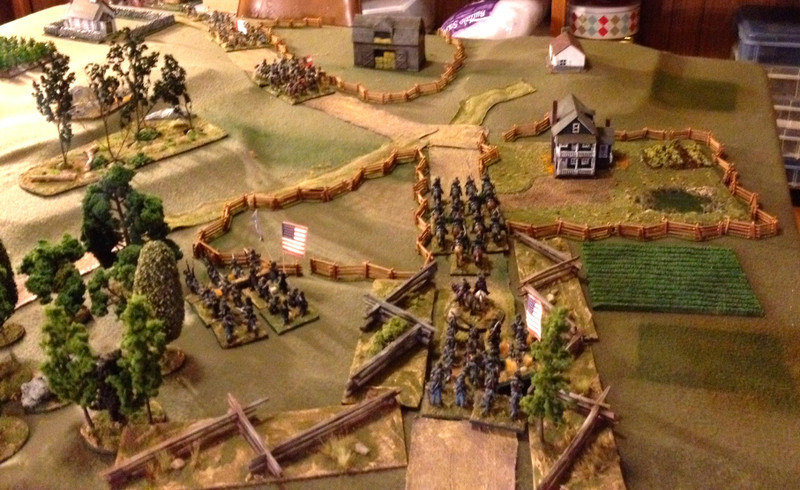
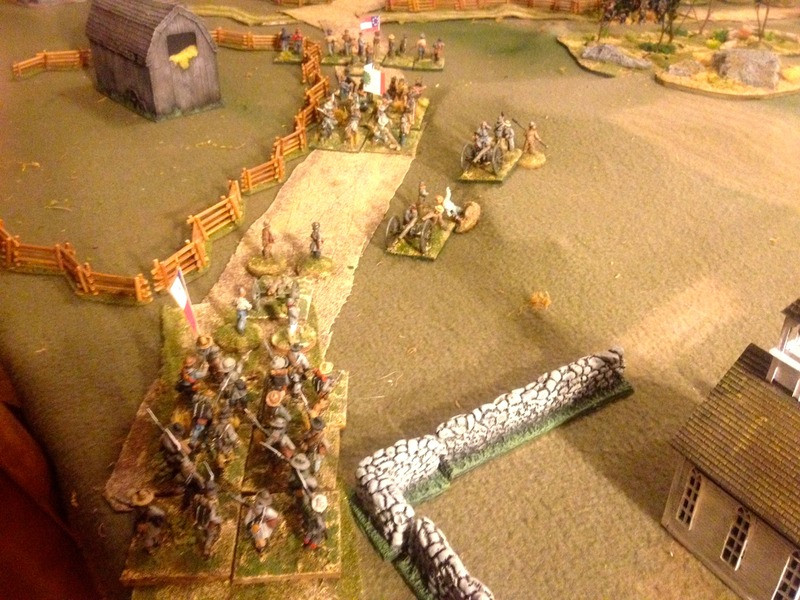
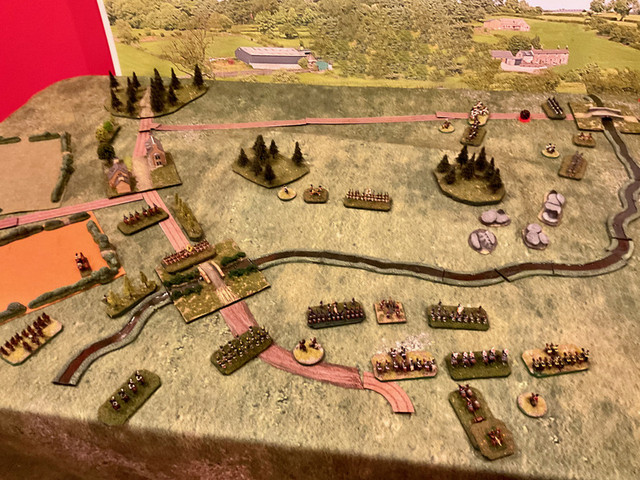
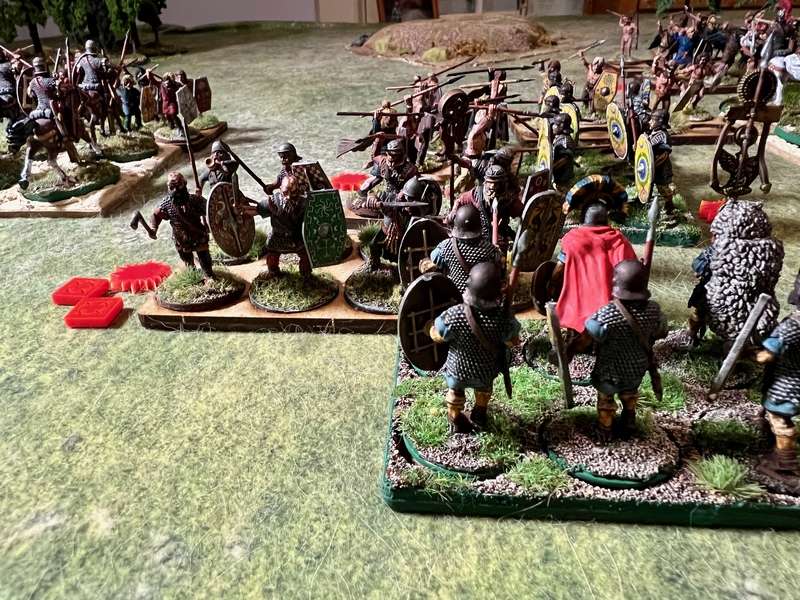
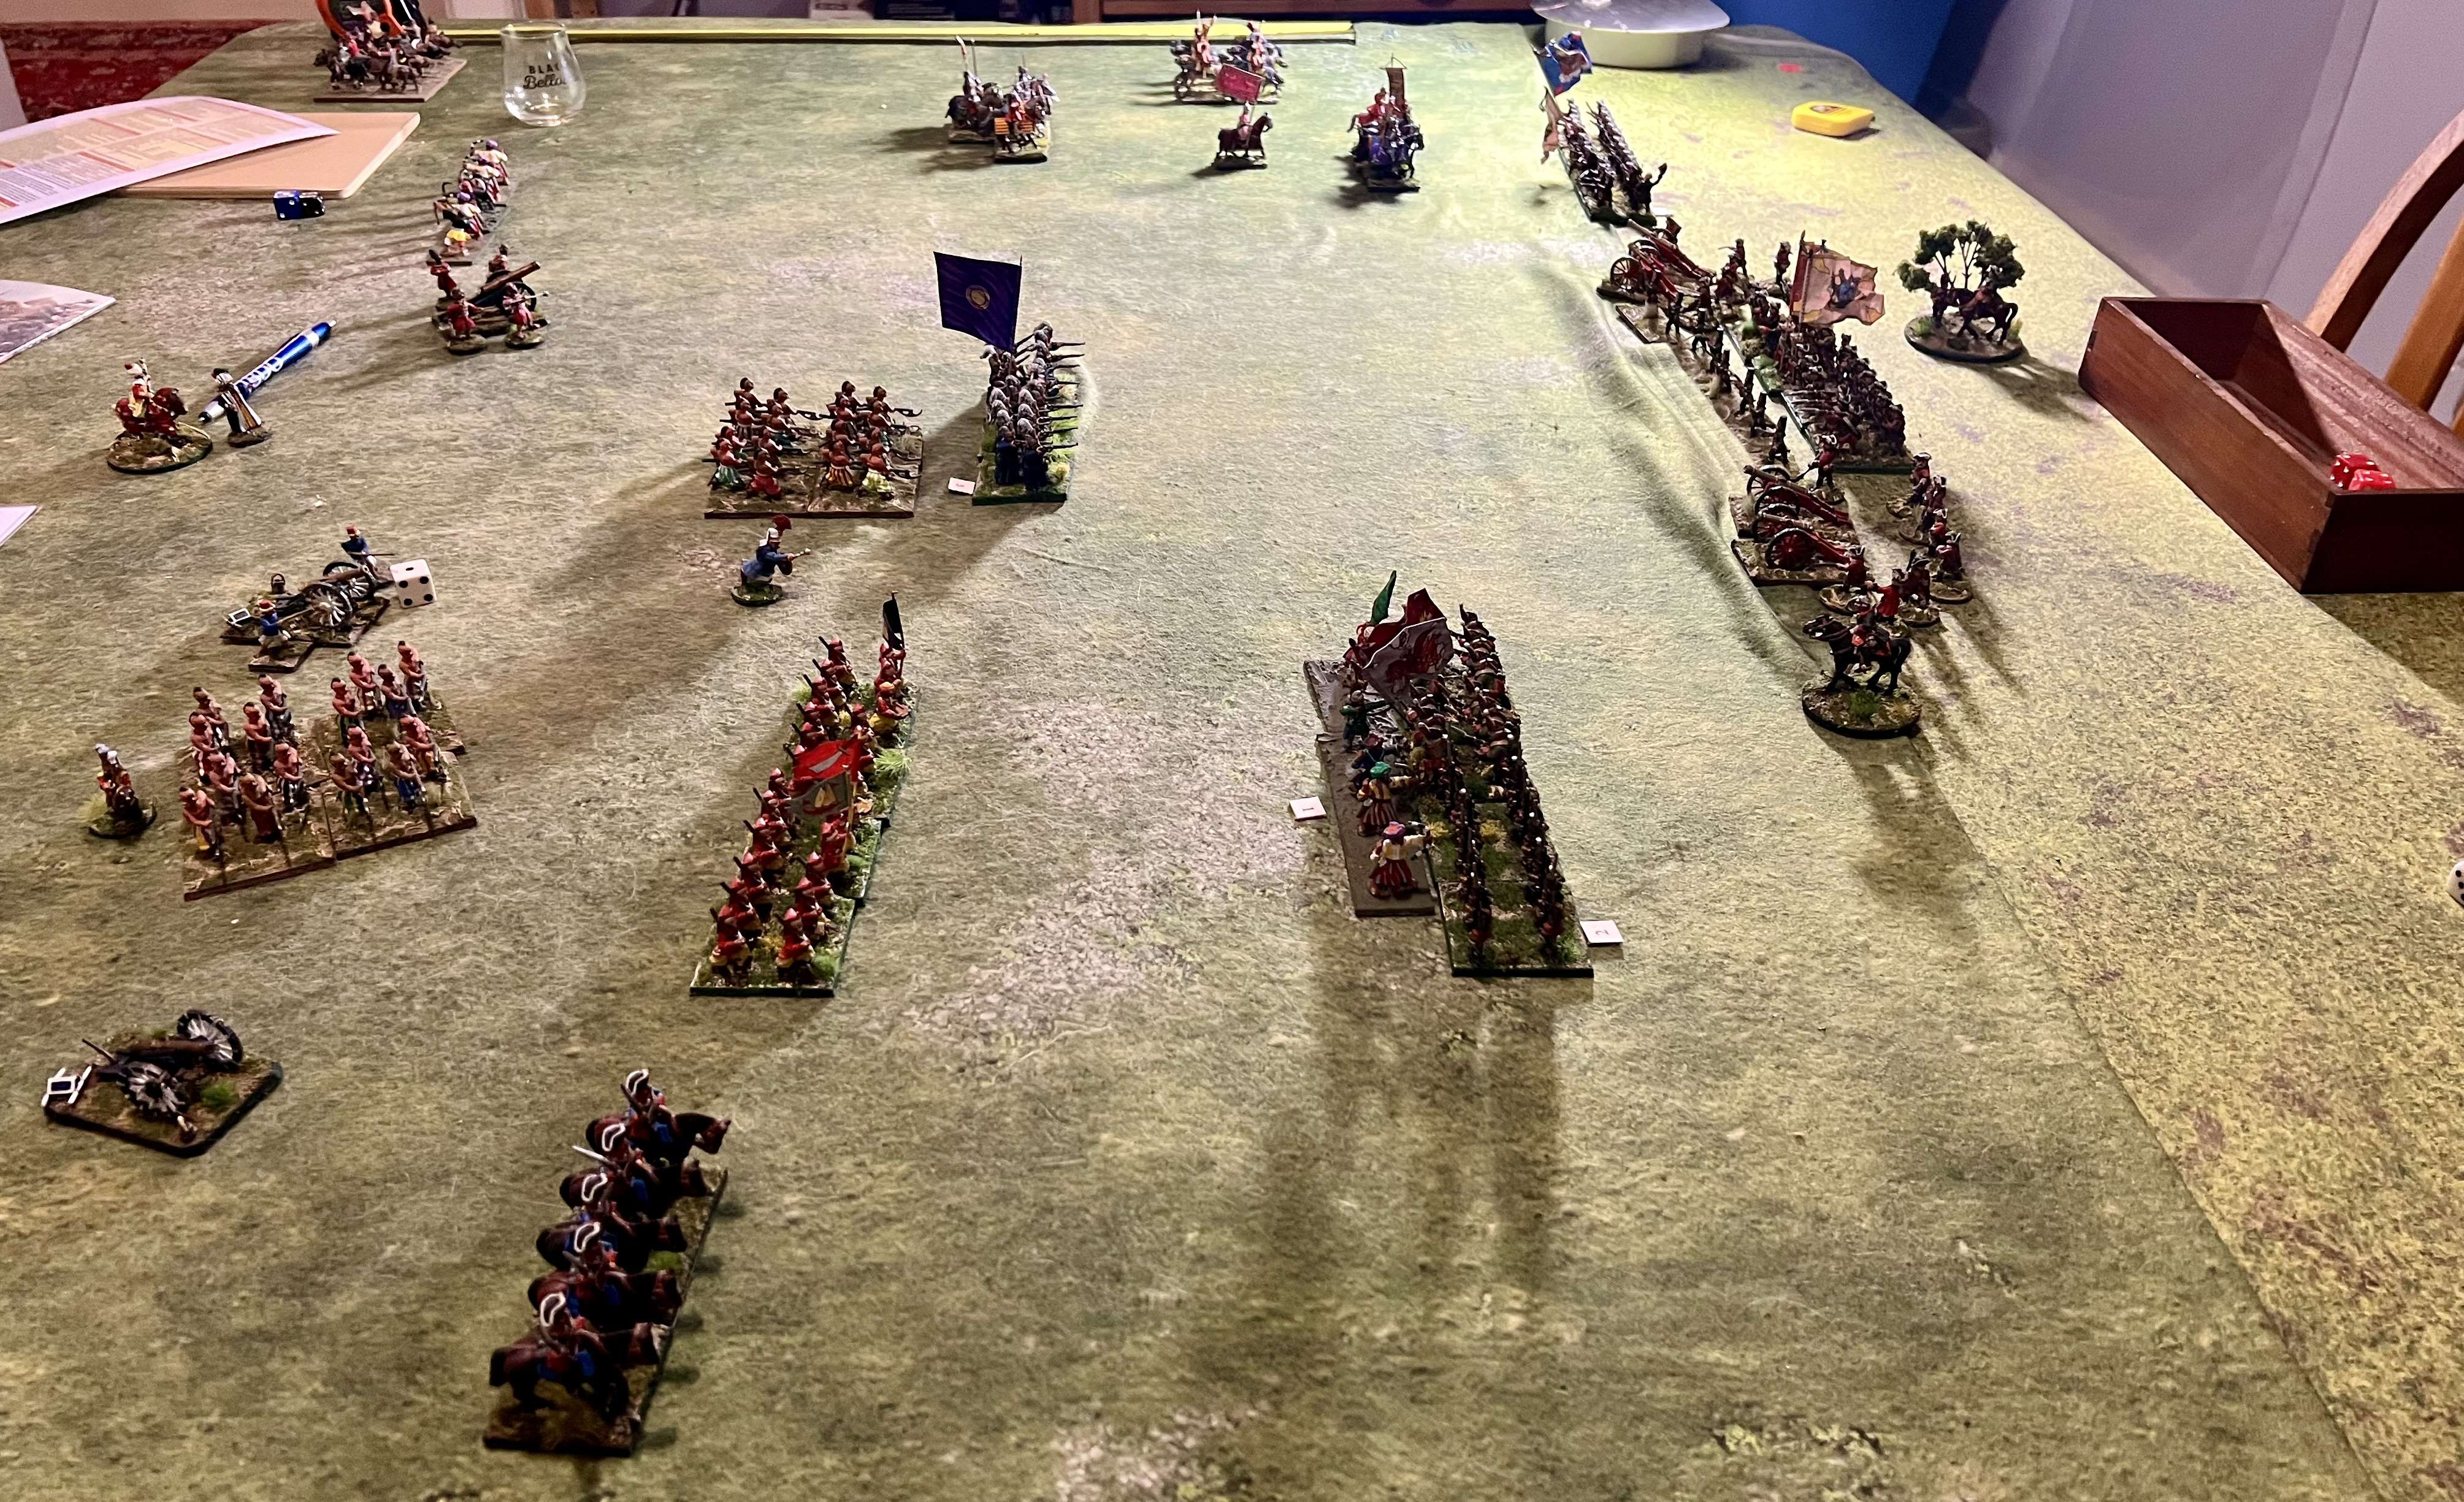
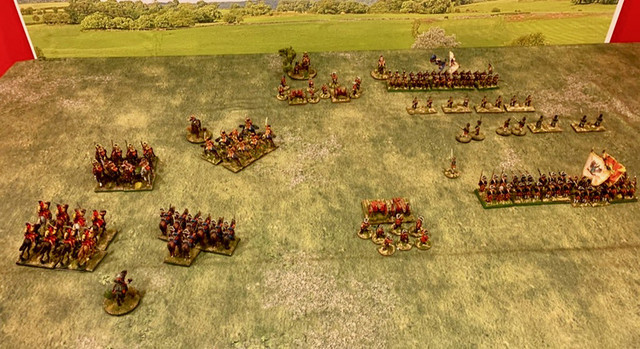
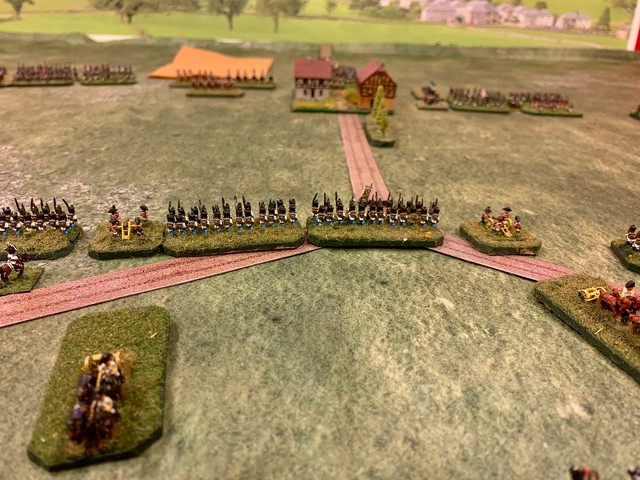
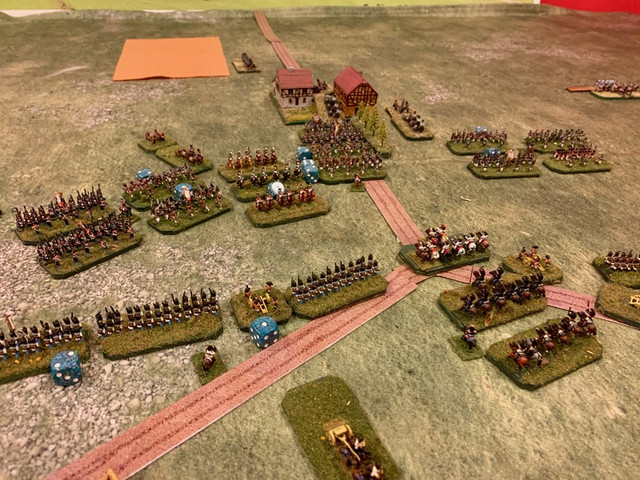
In this photo, John and I are trying out the third of the teaching scenarios included in the rule book using my 6mm figures. My French are on the right, John’s Austrians are on the left. Using the 6/10mm distances for AE, we began with the French just within artillery range (12”) with three batteries forming a Grand Battery (allowed for in the advanced rules), two units of high quality infantry, and a light cavalry unit facing one Austrian battery, one low quality (Conscript) infantry unit, two medium (Seasoned) quality infantry units, and one line cavalry unit. The Austrians have the advantage of defending a Built Up Area, and the French only have 12 turns to win, so it’s an interesting match up.
We had a decision before 12 turns. John deployed his better infantry parallel to the BUA, exposing it to the devastating fire of the Grand Battery, while my infantry and cavalry approached, forcing his infantry into square to hasten they destruction from th French cannon. My other infantry checked John’s cavalry by forming square, thus allowing the rest of my force to drive the Austrians out of the town. We had the rules figured out reasonably quickly and there were some interesting choices to be made, so a tidy game experience.
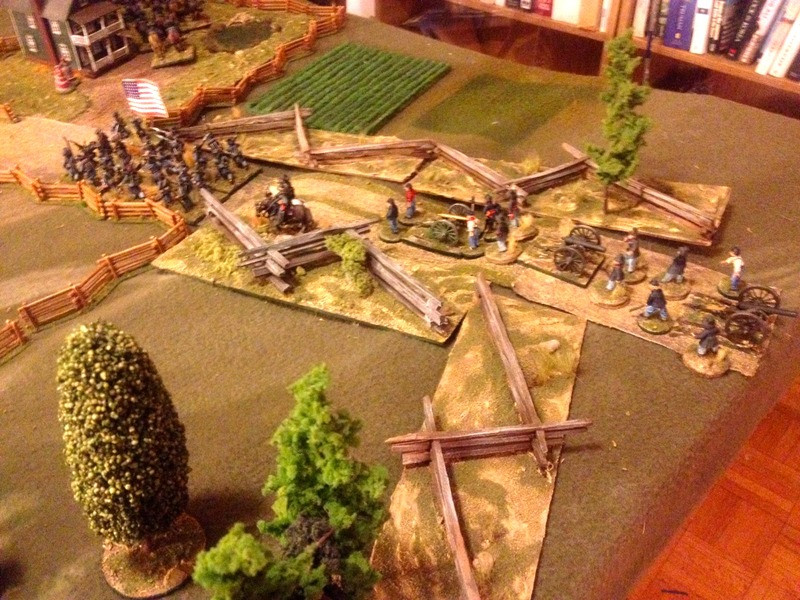
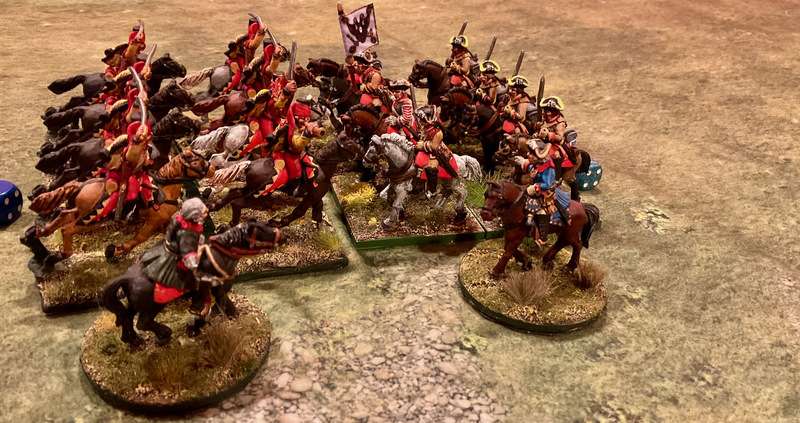
You’ll notice in this first photo that each unit has two bases, one in front of the other. This represented our initial attempt to follow the rules for tactical formation, so that doubled the frontage of foot units when they went from column to line, and then put the two foot bases back to back when forming square. The next time I played the rules in a solo game, I just used single bases to represent each unit, and mentally kept track of the formations (march/attack column, line) without any trouble. The extra stands on the table didn’t really add anything to my experience of the game so I binned it.
In the second game, I used AE's point system to create a smaller Austrian force (two divisions of infantry, one division of light cavalry and one of line cavalry) versus two larger French infantry divisions and one of French light cavalry. The points system uses some national characteristics - French generals are generally better than Austrian generals, which mean that they can command larger divisions. When building my divisions, I immediately noticed that there are no requirements for a player to select poor quality units, no ratios limiting the number of veteran/elite vs seasoned/conscript. Thus, two players could just fight with small numbers of crack units if they wanted to.
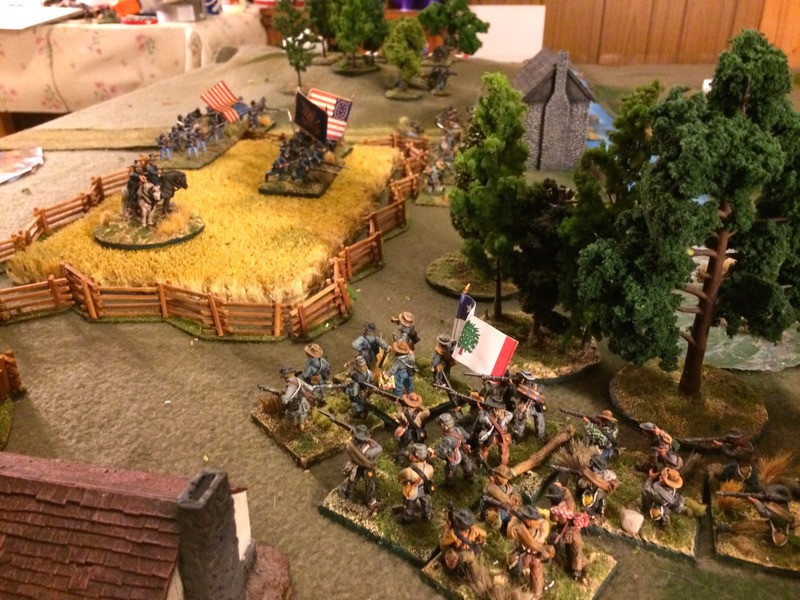
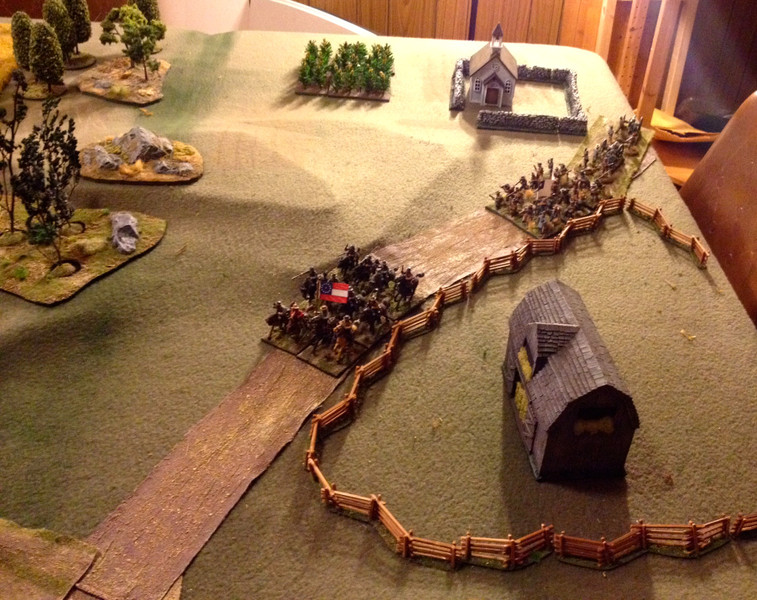
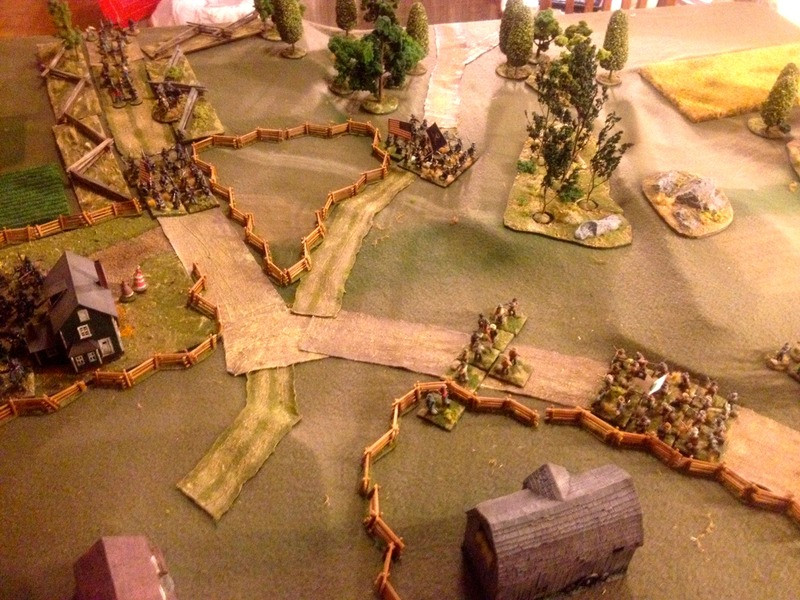
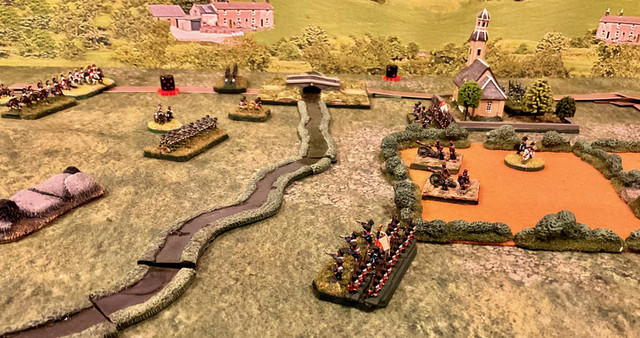
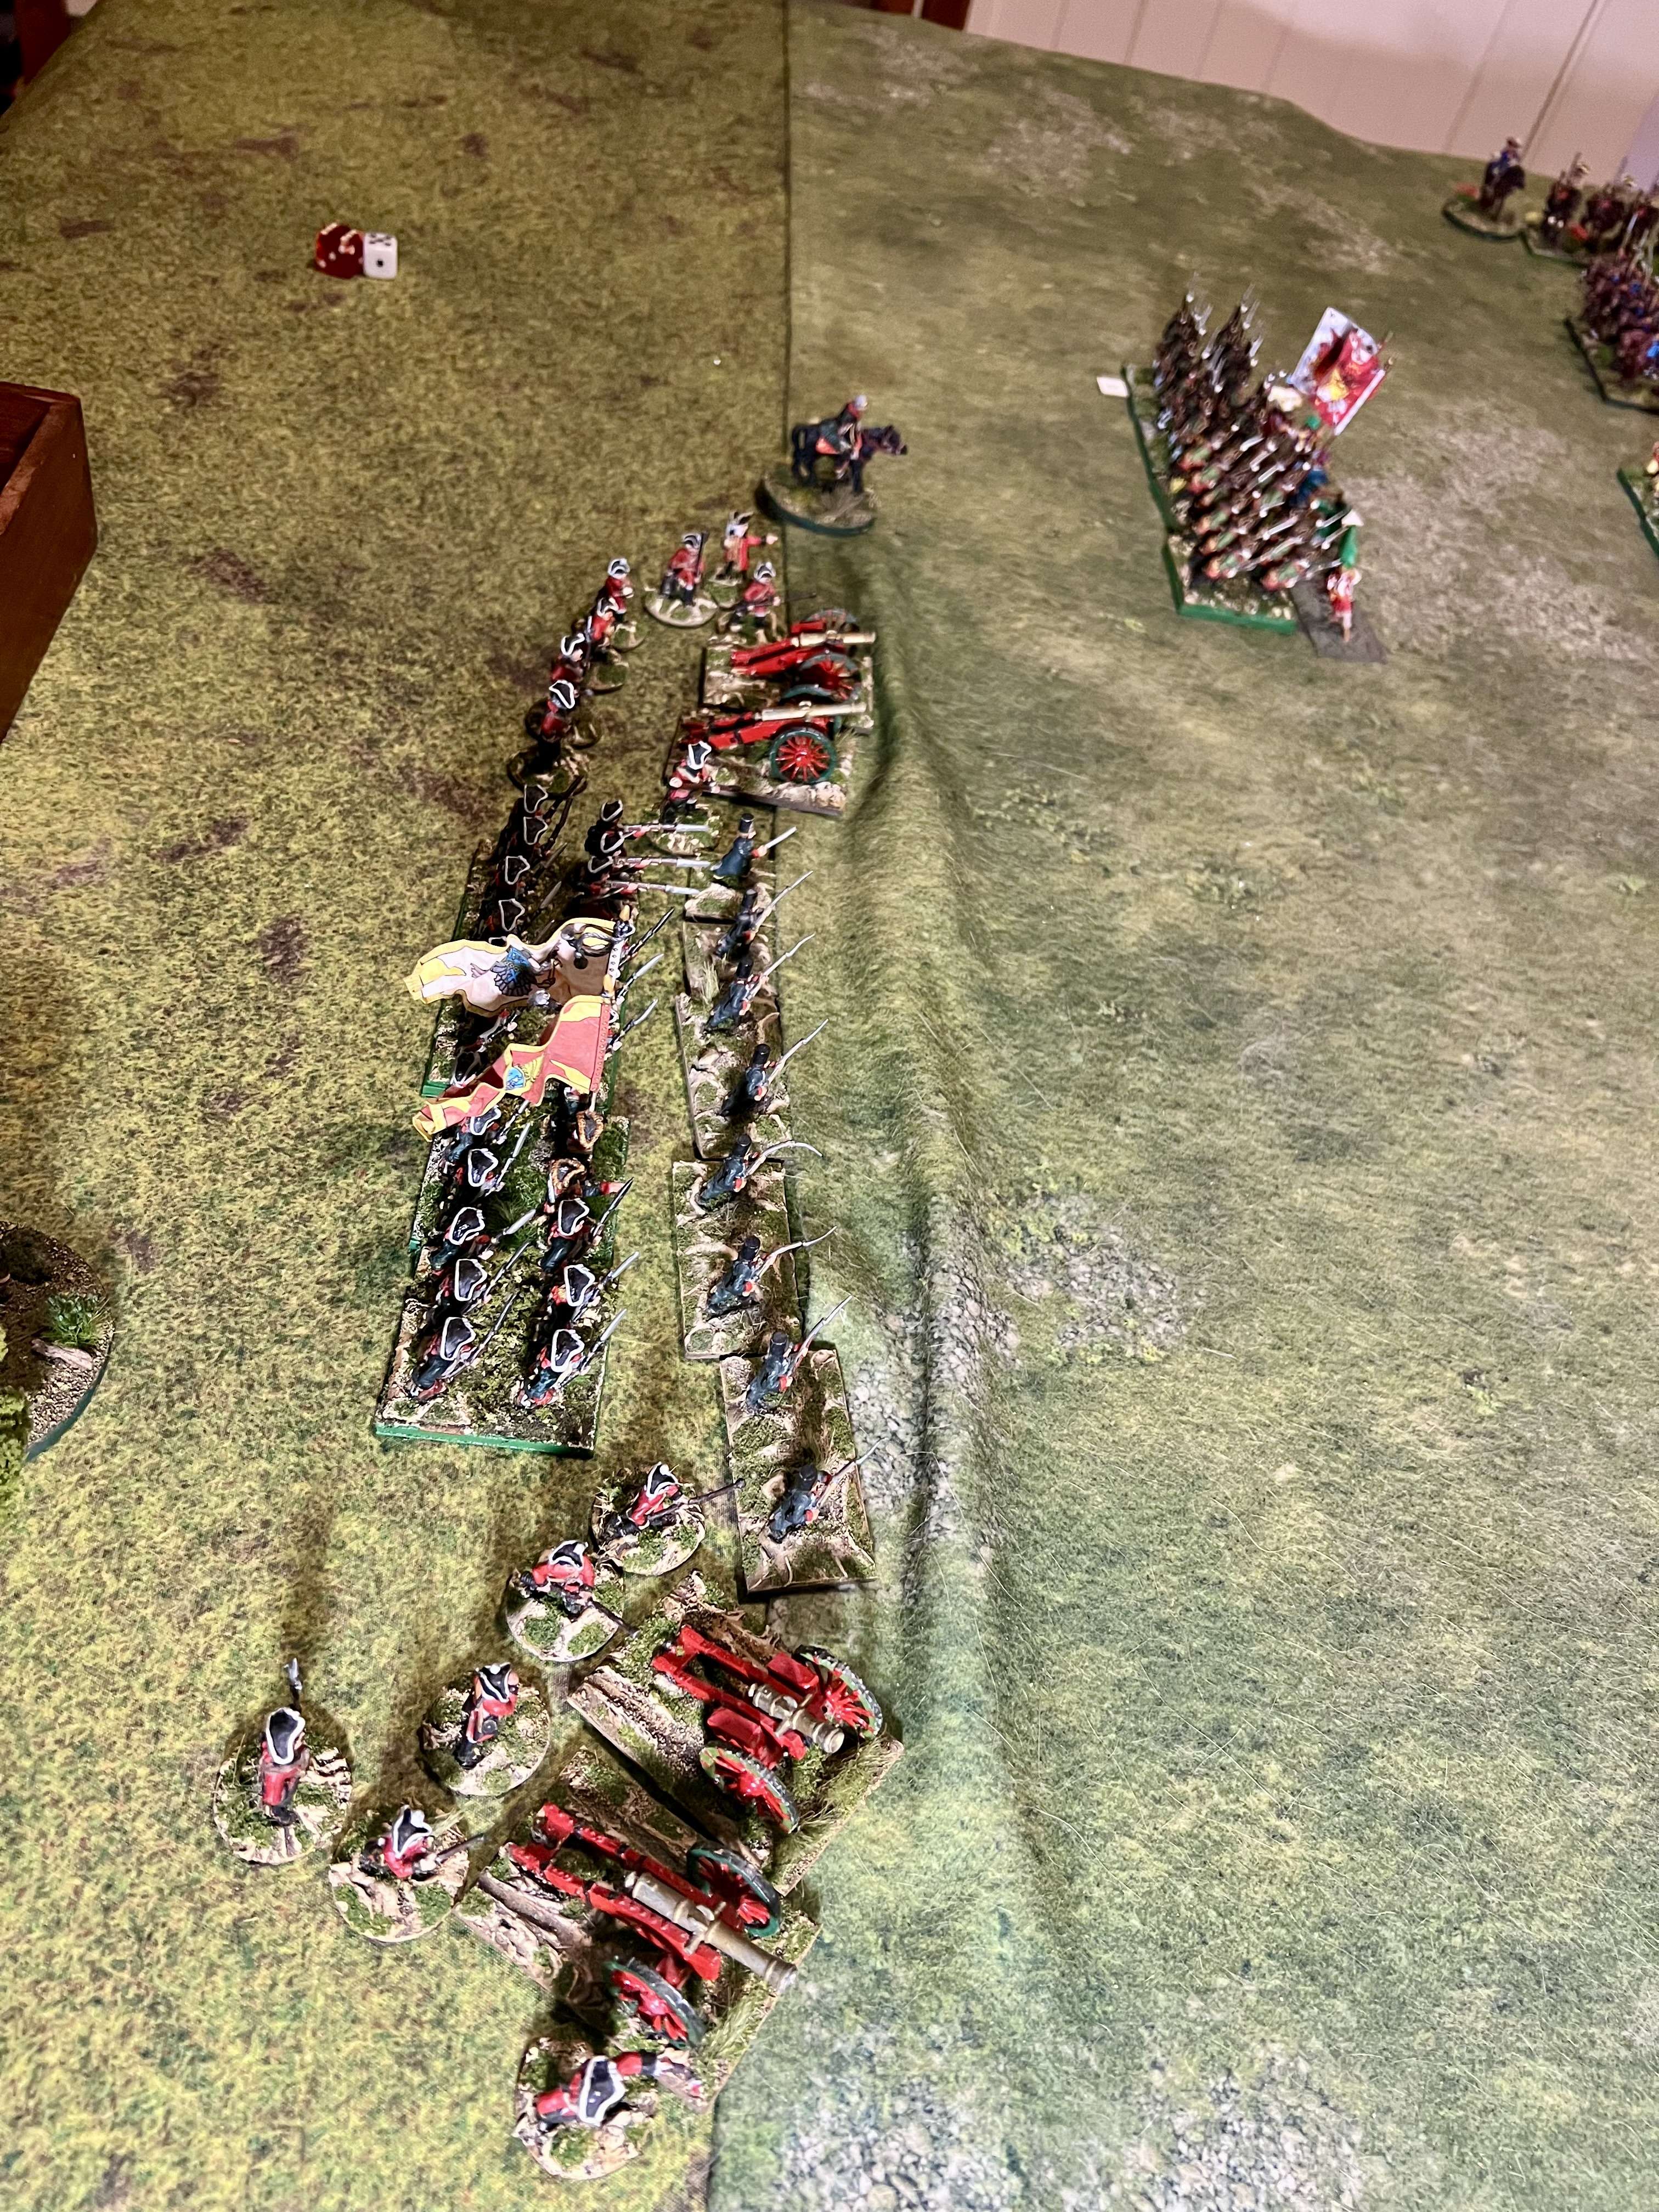
Here is the setup for the second game. At first I wanted to make the stream impassable except at the bridges, but that would make for a dull game fought over two chokepoints, so I just made the stream difficult terrain (takes a full turn to cross). The central hill has impassable terrain on the right (shown by the rock markers) but the centre/left can be climbed. The Austrians set up first, holding the stream with their two infantry divisions and the cavalry in reserve to address any breakthroughs.
I gave the French on the right two batteries to hasten the chances of a breakthrough and tie up the Austrian cavalry, while the main French effort is on the left wing where the cavalry will support the infantry attack on the hill.
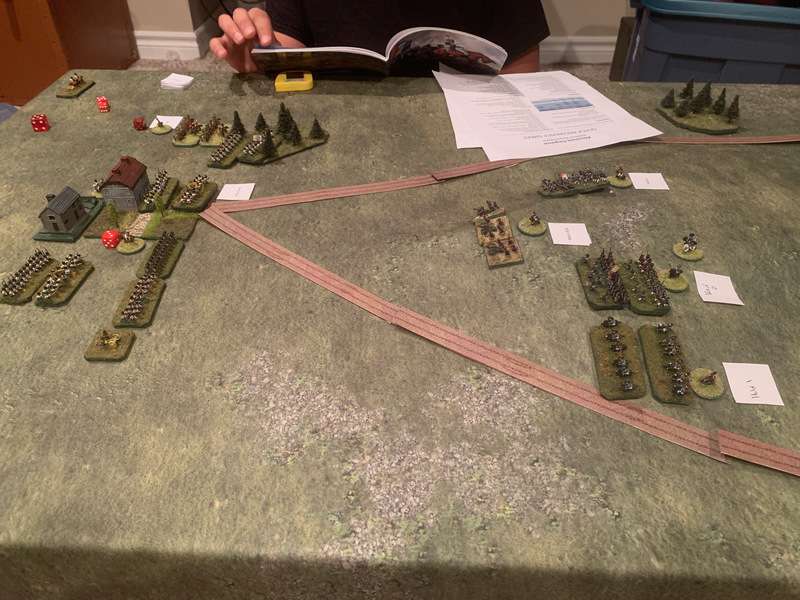
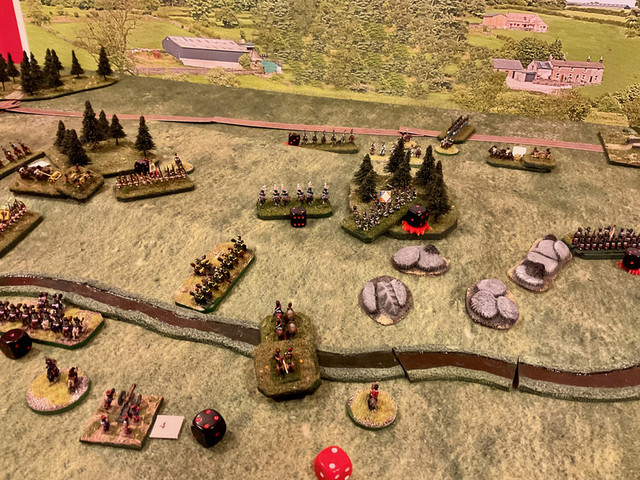
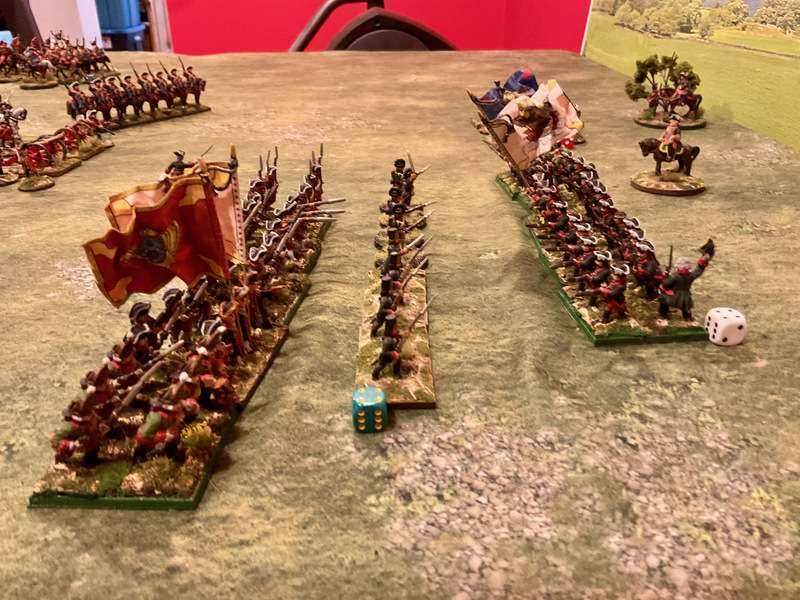
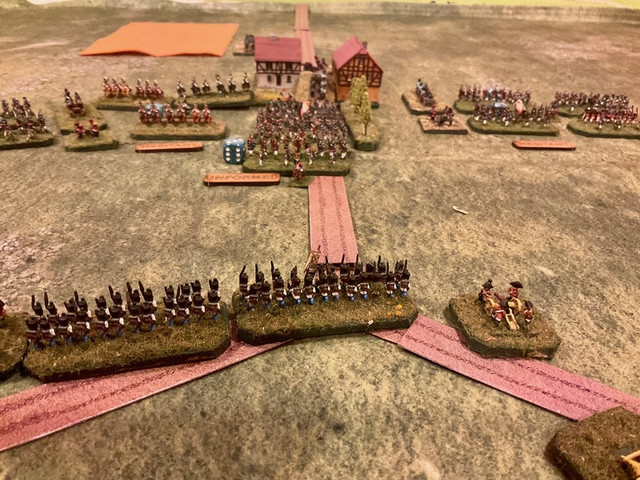
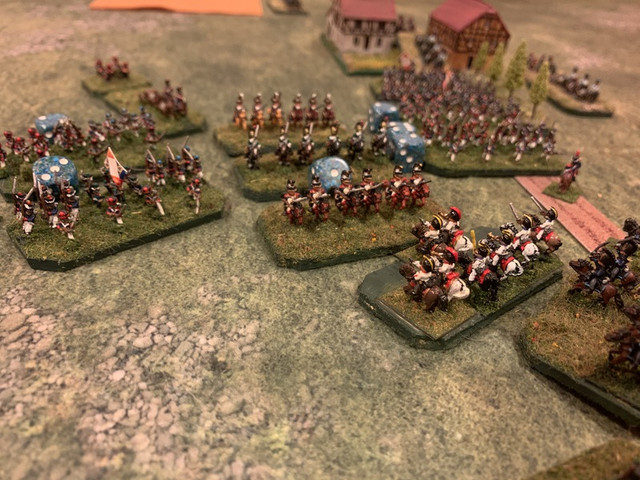
By turn three the game is well underway. In the photo below, the black dice behind the French unit crossing the stream shows hits from the Austrian battery at the top. Two hits in one turn will cause a unit to Halt, preventing it from charging and closing to combat in that turn, unless its commander wants to use a point of Elan to rally it so it can charge in the Combat phase.
You’ll also notice a numbered chit beside the French battery at bottom centre. I like the optional rule in AE giving batteries ammunition limits (4 shots at full strength, 4 shots at half strength and then the battery is removed from play). Otherwise, there is no incentive for the stronger player to not just smash the enemy into submission before going in for the kill, which is essentially how I used my Grand Battery in my first game with my son John.
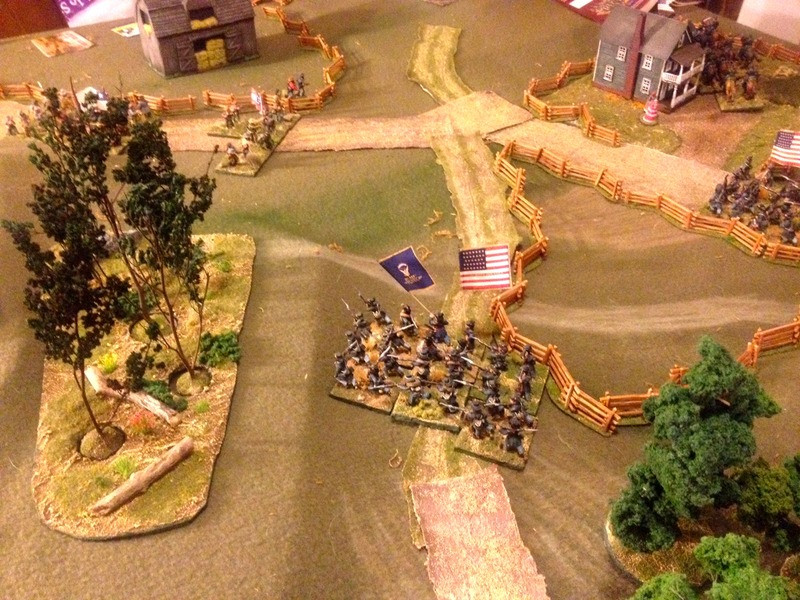
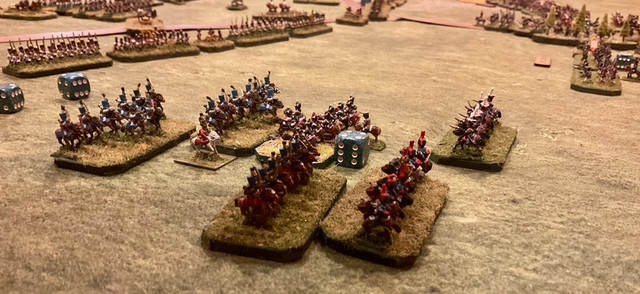
Also notice the French infantry which has crossed the stream and will then CHARGE the Austrian line cavalry which failed its Activation roll to charge the French foot. Say what? Yes, the rules make no prohibitions against infantry charging cavalry, the deterrent being that if infantry not in square loses a combat with cavalry, then the infantry is destroyed. Well, this is a test game, so I tried it, and the French foot won! True grognards might shake their heads at that.
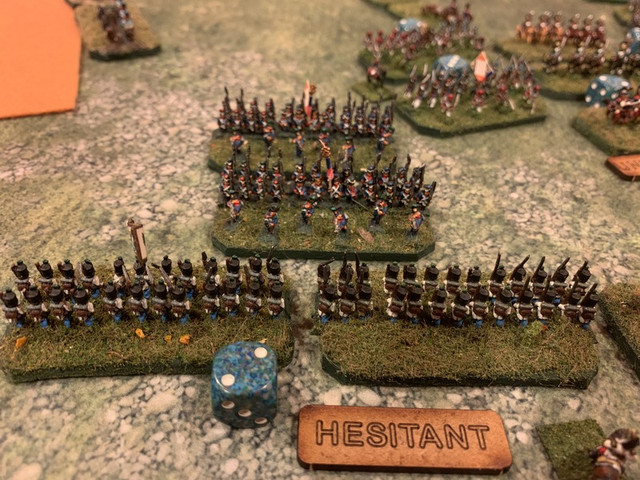
Having won the Combat, the French infantry sidesteps into the wood on its next move, and allows the lancers behind to move up and finish off the Austrian horse in the next turn. Lancers are Light Cavalry, so don't get a Charge Bonus vs Line Cavalry, but the rules didn't say anything about them getting their Lance bonus in the first round. Therein is seen again one of the contradictions in AE, that a game for Big Battles still gives certain cavalry a weapon type bonus, but I guess the counter argument is why paint lancers if you can't have some fun with them?
With the centre shattered, the Austrians concede the game and begin their withdrawal. Thus, a decisive result within an hour of play (plus another hour of reading and head scratching), which is in keeping with AE’s ethos of a fast game, a laugh, and a pint afterwards.
As you can see from these two battles, it doesn’t take long to figure out the basics, and AE delivers a fast result with a minimum of complexity. I could certainly see it working for a quick game on club night.
What didn’t I like about AE? First, the rules feel hastily written. I’ve already mentioned how the centrality of the Activation numbers is very quickly explained. There are likewise some situations where I could find absolutely no guidance from the rules, particularly in Combat (Melee). What happens when both sides score the same number of hits in Combat? The rules say that if three hits are scored on a unit in Combat, it Recoils from Combat 1” and becomes Disorderd, so if both sides score 3 hits each I guess they both bounce back, but what if both sides only score 1 or 2 hits each in Combat? I scratched my head in vain.
Some people on Twitter defend the author and blame Osprey for a bad job of editing. That may be, but the author does spend a lot of ink on design notes, often beating a straw man of overly complex rules that have burdened Napoleonics in past, and touting his simpler is better philosophy. I would rather he have spent the ink making his rules clearer.
The Orders system likewise is interesting but ultimately seems unnecessary to me. Corps can be ordered to Attack or Defend (fairly obvious), Hold (sit tight a set number of turns until they Attack something), Flank March (one order per side per game), or Retreat. First, in a game system that boasts of being easy to play, an Orders system that hearkens back to the Naps rules of the 1980s and 1990s feels like a wrong turn. Most of these Orders are obvious, and if one wanted to write overly specific orders (eg, attack the woods to the north of the village), that would be more detail than the spirit of the rules would seem to tolerate. Again, there are also some ambiguities. Does a Flank March automatically succeed once the specified number of elapsed turns is reached? Do the units in a Flank March appear anywhere on the specified flank of the table? The rules suggest yes, the flankers appear where you want, when you want, as long as the turn number is written down ahead of time. That would have made Grouchy’s life easier at Waterloo!
Finally, I wanted to like the Elan rules, and while it can be useful to take a re-roll or allow a unit to ignore a Halt result before a critical charge, I sometimes found myself forgetting the commanders altogether. One could make them more vital with a house rule saying that units can only move if within command range of their Corps Cdr or their CinC.
I don’t want this review to seem harshly critical. I commend Boyd Bruce, and anyone for that matter, for writing a set of rules and then for getting someone like Osprey to publish them. AE would be a quick way to get a player new to Napoleonics into their first game and have some fun doing it. It’s thus a useful entry into Naps wargaming, and could b adopted for fast pickup games when players can’t decide on more complicated rules systems.
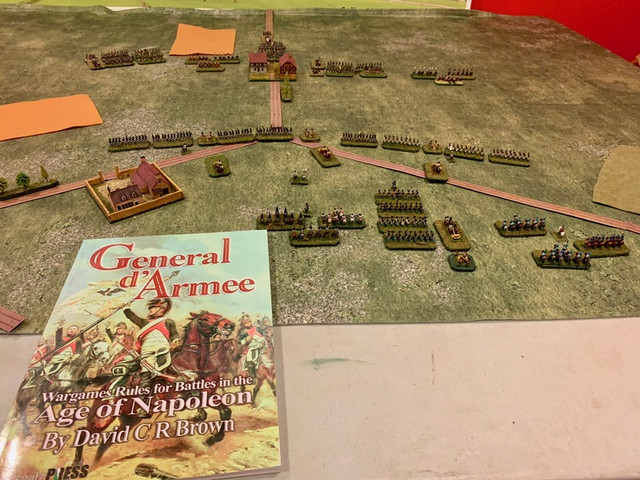
For me, I found AE to be less than fully compelling. If I wanted a crunchier rule system with some tactical considerations, with more experienced players, I’d consider Sam Mustafa’s LsSalle or Dave Brown’s General d’Armee. If I wanted a set of rules for big battles where the units truly were Corps and Divisions, I would probably choose Mustafa’s Blucher.
All that being said, Absolute Emperor gets half a Mad Padre blessing.
There are lots of blog posts on AE out there: here’s another perspective.
Cheers,
MP+
Monday, April 12, 2021
Revisiting 6mm With General D'Armee
There was a while back around 2012 when this blog was buzzing with excitement about my foray into 6mm Napoleonics. I had purchased a large collection of painted Austrian and French figures, bought some new figures from Baccus, and was learning to paint them. I had picked up Sam Mustafa’s Blucher rules and had played a few games with them, and was generally happy with my progress. Then a move, my wife getting sick and dying, a new duty assignment, retirement from the military, remarrying and starting a new life. A lot of things got in the way, and I think the resurgence of my interest in this period and scale has to do with being in the happiest place I’ve ever been in my life. Funny how it all works.
This Easter seemed like a good time for a wargaming vicar to live out the resurrection by raising my 6mm collection out of their boxes and taking Dave C. Brown’s General d’Armee rules for a spin. I had previously played Dave’s ACW rules Pickett’s Charge (PC) and liked them, and found the mechanics similar enough that GdA was fairly easy to pick up.
I decided the the best way to learn the mechanics was to take two identical forces, thus, a French division of three infantry brigades, four batteries, and a light and heavy cavalry brigade faces its Austrian mirror image. All units were rated as Line for simplicity’s sake. This force selection seemed to promise enough complexity to get a sense of rules that claim to be scaled from Divisional to Corps level.
The Austrian force of General Albert Kurvi-Tasch (dubbed by Archduke Franz Joseph “More moustache than brain”) defends the key crossroads south of the village of Schlumpen and watches as the French of General Theodore d'Ordure, dubbed by Napoleon as “the Grossest of the Gross”, comes into view. The backdrop is not 6mm, sorry about that.
The battle began with the light brigades of cavalry scrimmaging on the Austrian right. Dave’s charge procedure rules were basically familiar to me from PC and are fairly simple to administer in horse on horse actions, where there is no defensive volleying to complicate things. At first things went fairly evenly, with the two brigades somewhat battered and retiring to reorganize. When the went at it again, however, the Charge dice went disastrously for the French: their “2” vs the Austrian “12” on 2d^ (it’s all d6 based) saw the French light horse simply dissolve. Charges can be exciting and tempting because you never quite know how they’ll go.
The French reserve advances through Schlumpen in a brigade column, hoping to punch a hole through the Austrian centre with the support of the heavy cavalry to their left and the two flanking infantry brigades. As you have noticed by now, I am using small dice to keep track of casualties, though am not happy with the look. Perhaps I need micro-dice? I’m now wishing my unit stands had little slots for casualty dice like the cool kids have.
Artillery can be deadly in these rules. The two Austrian batteries in the centre have savaged the lead unit in the assaulting brigade, and checked its advance. Ordure moves his heavy cavalry forward to open the way, and the Austrians respond. It’s still anyone’s battle.
Austrian cuirassier and French dragoon trade blows, largely ineffectually, and the two brigades basically repel one another like bumper cars at a fairground. For me this is where 6mm really shines as a visual scale with the clash of massed units. I would never paint enough larger figures in my remaining lifetime to achieve the same effect.
Speaking of visual appeal, I’m quite happy with the table. The game is being fought on a Geek Villain 6 by 4 fleece Grasslands mat, the roads are from Paper Terrain (glued to cardboard and then cut out) and the buildings are by Timecast which I really like.
In the final clash of the game, the French columns advance on the Austrian lines. I’m very happy to say that the two French infantry units in the centre are the first 6mm figures I ever painted, almost a decade ago now, and I’m very happy with the way they look. At this point you may be wondering how I portray formations. Good question.
All my units are based the same, in lines, though with French units I usually put some skirmishers in front. However, because in my world a single base represents a single unit, I don’t have any way to represent the formation changes that GdA and other rules call for. My core assumption then for this game is that each unit is currently in the formation that makes sense fir the situation and for its army doctrine. Thus, here the French are in column and the Austrians are in line. Infantry, if charged by cavalry, would go into square if they made the appropriate test. Cavalry are generally in column. I have enough limbers (another benefit of 6mm) to portray artillery either limbered or unlimbered. It seems to work so far.
\\
With the repulse of the French infantry (as in Dave’s ACW rules, defensive fire from an intact foe is pretty deadly), and with the destruction of the French light horse, the game seemed to be done and an Austrian victory.
One of the features of Dave’s rules that I especially like is command and control. As in PC, GdA uses a varied number of Aides de Camp each turn to help ensure that your brigades do what you want them to do, and reduce the chance that they might go Hesitant and spend a turn dithering in uncertainty. ADCs can help you salvage wavering brigades, can direct artillery in intensive bombardments useful to prepare for a charge, etc. In this game the French could have 5 ADCs a turn to the Austrian 4, but you then have to roll for their availability each turn, so you seldom have enough, which adds some uncertainty and friction - no wonder Richard Clarke and TFL rep Dave’s rules, they are a natural fit with the TFL philosophy.
I look forward to revisiting GdA soon, preferably using an historical battle as the template. I just finished using CCN to fight Wertingen, the Austrian defeat at the start of the 1805 Ulm campaign, and that seems a manageable sized battle to fight.
Thanks for reading. Blessings to you tiny soldiers!
MP+
Tuesday, October 4, 2016
Awaiting Pickett's Charge, Or, Do I Need Another Set of ACW Rules?
A lot of this going on at my games club lately. Would it be better with another set of rules?
I noted with interest this recent interview by Sidney Roundwood, one of the Too Fat Lardies braintrust, with Dave Brown, the designer of the forthcoming Pickett's Charge rules.
PC, as I will hence refer to it, is being published by TFL under their new imprint, Reisswitz Press. As TFL's Richard Clarke explains it, Reisswitz will allow TFL to support the work of other rules writers who share what one might call the Lardies philosophy of ''a large dollop of Clausewitzian friction and an emphasis on command decisions ''.
While I am exited by this news and always happy to support one of Big Rich's projects, I suppose a fair question would be, ''Does the hobby really need another set of ACW rules? Now I am not a tyro in this genre of gaming, but I'm not exactly a grognard either. I started 25 years ago playing Johnny Reb II and found it somewhat maddening. One worked through long lists of modifiers, which gave the impression of realism, but units could charge and strike like summer lightning, in a way that seemed profoundly unrealistic because it didn't seem to reflect any command and control issues or any tactical limitations of the period. I vividly recall having my mouth drop open when I closed in on an enemy formation from its rear, only to see the unit about-face and charge me before I could get a volley off. I suppose one could pivot a tank like that, but not a line of 600 men in the midst of a battle.
Since then I have dabbled in Black Powder and find it somewhat generic. The activation rules are a attempt to model friction, but they seem essentially a random element. Readers of this blog will know that for the past two years, Sam Mustafa's Longstreet has been my ACW drink of choice. I will go to great lengths to defend these rules - they are simple, they force difficult decisions on players at every step of the way, and they capture the narrative arc of the war, so that there is an appreciable difference between a fight in 1861 and one in 1865. In the campaign game we are currently playing at the club, I can assure you that it is more fun to be late war Union than it is to be the early war Union, as the faces of our Reb opponents get grimmer with each battle!
There are other established ACW rules out there which I don't know at all. Fire and Fury is probably the most well known rules set I have never played, which is odd, because Regimental F&F is probably ideally suited to my 28mm collection. I noted with interest the late John Hill's Across A Deadly Field rules, published by Osprey last year, but felt committed to Longstreet and didn't buy it. Beneath these two titles lurks a veritable iceberg of other ACW rules.
Briefly, TCHAE shows the influence of TFL's popular WW2 rules, I Ain't Been Shot, Mum (IABSM), in that it uses a system of blinds to bring hidden units into the battle, and uses a card activation system to determine the order in which commanders are activated. Once a commander is activated, he gets a number of commands, or pips, determined by an average dice with some plus or minus mods depending on how skilled or wretched the commander is. Commanders use their pips to achieve tactical effects: moving and changing the formation of units, rallying them, etc. Also, the IABSM influence is seen in the random termination of each turn when the Coffee Card (shades of the Tea Break card) is drawn. Units that have been given pips to reserve their fire can shoot on the Coffee Card.
Not everyone liked TCHAE. One review noted the occasional ambiguities of the rules and some frustration with the TFL philosophy that the rules are as much a toolbox as they are a complete system.
Last week I sent Richard Clarke a message on Twitter, asking him if he could say how TCHAE differed from PC, and he was honest enough to say that it was years since he had played Elephant and didn't remember much about it. I suppose I shouldn't have been surprised by this answer, since rules publishers need to publish new product to stay in business, and hopefully each iteration brings improvements from lessons learned. In terms of TFL's evolution, one hopes that PC is to Elephant what Chain of Command is to IABSM, a natural development of concepts and mechanisms.
What I see in PC from the Roundwood interview is a more nuanced approach to command and control than the pip system. I like the idea that brigade commanders see their degree of control start to degrade as the battle wears down their troops. I also like the idea of the commander sending staff officers to try to keep units on task. I suspect that PC has jettisoned the idea of blinds, which I never felt worked very well for the ACW in the scale (28mm) that I play it in, though perhaps in 6mm.
So, while I am curious to get my mitts on PC, I am going use this Thanksgiving Weekend to put some ACW figures on the table and see how TCHAE plays after five or six years.
In the meantime, blessings to your die rolls!
MP
Sunday, March 13, 2016
Dux Bookstorum
This little souvenir is coming home with me from Boston today. I was strolling around Harvard Yard yesterday, taking in a beautiful early spring day and trying not to get into the selfies taken by (mostly) Chinese families. I was sort of hoping I wouldn’t stumble across the Harvard University Bookstore, and I didn’t, but off a little side street I came across Raven Used Books (23 Church Street if you’re ever in Cambridge, Mass) and this jumped off the military books shelf. For $6.95, I thought it a bargain. It can sit on my rules shelf and perhaps help inspire by Dux Rohirrim project. Nice to have for the illustrations if nothing else.
The running trails and the Charles River were both busy.
The object of my visit, the beautiful Anglican monastery of St. John the Evangelist, a 1920s era Romanesque building that brings back happy memories of Italy.
As a word of advice to those thinking about visiting a monastery, try and make sure that you stay when it’s pizza night. The cauliflower and goats cheese pizza was heavenly.
Blessings,
MP+
Sunday, April 5, 2015
Sunday Painting Bench and Weekend Roundup
A very happy Easter to all. I hope this weekend was restful and pleasant to you all, and holy for those who needed it to be so.
Here’s the state of the Padre’s painting desk this weekend. I’ve been cracking on with my 6mm Napoleonics project lately, and finally have enough French and Austrians based that this coming week I can dive into the Sam Mustafa Blucher rules and give them a test drive. However, I am woefully short of scenery, and I’ve pushed this project to the front of the queue. The church is a Timecast model, and quite a lovely one too. The other buildings are GHQ, purchased at the Hot Lead bring and buy a year ago. My plan is to get them onto some scenic bases that can also accommodate a stand of infantry figures to represent a village being held by one side or the other. Hopefully I’ll have them finished and pictures up later this week.
Speaking of Sam Mustafa, Friday I had James M over for Indian takeout and a Civli War bash using the Longstreet rules. Poor fellow needed a rest after organizing another triumphant Hot Lead, and I figured that in his fatigued state I might get a win in. We were going to try Blucher but James noted my look of perplexity when reading the unfamiliar second half of the rules book, about army lists and so forth, and so we decided that we would try Longstreet instead, which I know fairly well now.
The Battle of Bloody Creek centred on this little ford. Two symmetrical brigades, each of three seven base infantry regiments, three bases of artillery (2 six pounders and 1 howitzer) and a seven base cavalry regiment, met to determine ownership of the ford, and the resulting struggle gave the name Bloody Ford, by which locals still remember the action. We rolled randomly for the year, and got a battle in 1861, so all units were classed as Eager Recruit. My Texans and Mississippi boys under Colonel Eusebius (Seb) M. Letchworth were looking forward to their first battle of the war, having never seen the elephant.
Here James’ Wisconsin volunteers charge across the ford and put my Texans to flight. Fortunately I had a regiment of Mississippians ready to counter-charge. Two lessons from this episode. One, in Longstreet, Eager units always have an advantage in melee combat so charge with them when you can, even when they’re recruits, and two, reserves are always useful.
My suspicions of Longstreet were well founded, it is more fun than a camp full of drunken Zouaves when played with a real live opponent. The cards provide quite a few tense moments and a few enjoyable opportunities to play dirty tricks on your opponent, like the time I rashly pushed my infantry forward into canister range and James played a card giving his three base battery an extra die each, making for a nerve racking nine dice in the roll to hit. Very exciting stuff, and yet the cards, while they seem gimmicky, do a good job of simulating the vagaries of ACW combat.
Here James’ commander points in alarm as my third regiment rushes forward in column, trying to get on his flank. This was a risky move, as James was about to hit my column with his two uncommitted units, a cavalry and infantry regiment, but I had the satisfaction of shutting him down with the dreaded Pinkerton Intelligence interrupt card, which basically casts a hesitate spell on the Union when they declare a Combat (charge as opposed to movement) round. Now some will say that this is overly gimmicky, the equivalent of magic, and that’s fine, but in Sam M’s defence the card is only given to the Rebel player in 1861 and 1862 scenarios, and if he is lucky enough to draw it he can only play it once per game, so you could say that this is a little bit of friction which models the indecisiveness and inexperience of many early war Union armies. In later scenarios the cards available to the Union player become more plentiful and more effective than those given to the Rebel player, so it is an effective way of modelling the shifting qualities of the armies during the course of the war.
One of the things some people might not like about Longstreet is that command figures are essentially immortal and quite irrelevant to the battle. All the command and control aspects are modelled in the cards. Some commanders have personality attributes which can influence play (allowing re-rolls on to hit dice, for example) and there is a risk in using these attributes, in that it can lead to “wounds” which reduce the number of cards a player can hold in his hand during the game. Having your hand reduced by even one card to a maximum of only three cards in the hand for multiple wounds when your opponent has six cards in his hand would be quite disastrous and quickly lead to a defeat.
James put up a cracking good bat rep here, complete with a photo of yours truly gloating. He says it was gloating, I say it’s proof that these rules are cracking good fun. The Union side was forced to retreat, leaving the Confederates in control of the now renamed Bloody Creek. We both went through the post-game steps of the Longstreet Campaign Rules, figuring out how many troops came back to the colours after the battle, how many died of flux in camp later on, and what reinforcements we acquired. Both of us did well in different ways. Both of us got an Epic Point for showing up, I got one for winning, and we awarded me a third for two successive successful charges by my Mississipians. Seb Letchworth got promoted after the battle, which is really only useful for bragging rights. In the reinforcement stage, James got a fourth regiment, I got a fourth artillery base, and we now have a variety of unit sizes and experience levels in our commands, so you may see a re-match at some point.
Wishing you all a good week, with blessings to your brushes and die rolls!
Tuesday, January 6, 2015
First Time Playing Longstreet: Battle Of MacGillicuddy Corners, Part One
I’ve been meaning to give Sam Mustafa’s ACW Rules “Longstreet” a try for a while now, so this series of posts will be a kind of initial impressions / review / demo game.
First, it’s a bit of a mystery to me how I gravitate to some rules systems over others. When I first started playing ACW miniatures in the late 1980s, the group I hooked up with was using John Hill’s Johnny Reb Two, which is what I started to build my own collection on, using JRII base sizes (still follow them today, for consistency’s sake). I found Johnny Reb a little gamey and somewhat complicated, and didn’t really stick with it over the years, though I dutifully bought his Third Edition. Too Fat Lardies seemed a logical next point, and I like their rules for larger battles, They Couldn’t Hit an Elephant, and their skirmish rules, Terrible Sharp Sword. I’m also aware that there are a multitude of other rules out there, and it seems to me that Regimental Fire and Fury is a popular title. I believe Hill has come out with a new title, Across a Deadly Field, which seems well supported with scenario books. However, I ended up deciding on Sam Mustafa’s Longsteet. Other than the fact that I liked his SYW rules, Maurice, I have no explanation for why I ended up here.
The first thing that might put some off Longstreet is that it is card driven. I like card driven rules myself, and find them eminently suited for solo play, which I do a lot, but not everyone likes them. The second thing that might deter people is that to play Longstreet, you need two decks of cards, one for each player, so it could be $60 before you can get started. however, the cards are well produced, so some may feel that they have gotten their money’s worth. About two thirds of the cards regulate play of the game, while the others provide a randomized system for terrain placement and for commander’s personalities.
Something else which may put players off the Mustafa way of wargaming is his decision to use Base Widths (BWs) rather than standard units of measurement such as inches. One of the advantages of Sam’s systems is that he is agnostic about base sizes - provided that your bases are either squares or 3:2 rectangles, they should work fine. Since most of my infantry stands are on two inch square bases, I decided on two inches as the basis for a BW. Since I found it a little annoying to mentally convert my tape measure into BWs, I spend a dollar at the DIY store on a four foot piece of dowel and after a little bit of work with some painter’s tape and paint, I had created this masterpiece.
See what I did there? Blue and grey? Clever, huh?
Within the rule book the rules themselves take up about half the space, and the rest is dedicated to scenarios, army lists and a campaign setting. Being me, I had to try the campaign system, starting in 1861, and drew a random general to represent me on the table. I got a fellow with European service.
The little lightning bolt means that if a player uses the character’s ability in italics (the volley firing bit) there is a chance that the character can be wounded (Player Characters in Longstreet campaign games are never killed). I’m sure Messrs Stuart, Jackson, Reno and Sedgewick all wished they had that ability.
So he became Hienrich Schotz, whose family had served for generations in armies of the Kings of Prussia. Schotz had been a Major of Infantry, assigned to training recruits, but his career had come undone when he wanted to advocate for more humane ways of training. His brother Bruno had already immigrated to Milwaukee, where he had become a prominent sausage maker, so Heinrich moved to America in 1851 to join Bruno in business. Their youngest brother Otto, an apprentice in a Munich brewery, soon joined them. Together they all went into business as “The Brat Brothers” and opened an emporium that combined food, good German pilsner, buxom fraulein servers in traditional dress, and the latest sports news brought in over one of the first telegraphs in Wisconsin. Historians of the sports bar see the Schotz Brothers as founders of an American way of life. When the war came, Bruno and Otto both landed fat contracts to supply Wisconsin regiments. Heinrich, who had no appreciable business skills and was frankly a nuisance to them, was encouraged to offer his services to the state volunteers. Thanks to his political connections in Milwaukee’s old German ward, Schotz soon found himself a Colonel commanding a brigade of mostly immigrant 90 day state volunteers.
Known to his men as “Hot Schotz” for his irascible manner and emphasis on musketry, Schotz’s brigade consists of:
An assigned regiment of Kansas cavalry, “The Liberty Jayhawkers”. Not really a German speaking unit, there are some issues of communication.
Two German regiments from Milwaukee, the “Pabst Blue Rifles” and the “Schlitz Jaegers”. Of these, the former is Roman Catholic and working class, while the latter is mostly Lutheran and recruited largely from shopkeepers, clerks and other businessmen, so there is some tension between the two, largely German speaking regiments.
A regiment of mostly Irish labourers and factory hands, named after their Major, “McCleary’s Navvies”, very few of whom understand any German.
A battery of three sections of artillery (2 of 6lber smoothbores and one howitzer), “The Mikwaukee Brewers”, commanded by Ernst Engel, son of a prominent immigrant beer maker, Max Engel. Unfortunately Heinrich’s brothers reneged on an exclusive contract to supply their tavern with Engel Lagerbier, and so relations between Schotz and his battery commander are a little frosty.
All troops are rated as Eager Recruits, combining the worst of élan and inexperience. The Longstreet campaign came calls for starting units at 10 bases strength. Due to the limits of my collection and it’s size (25-28mm), I opted for six bases per unit.
Schotz’s Milwaukee Brigade was sent to Kentucky to work under the command of General George Thomas, serving alongside another western brigade commanded by Albin Schoepf, another European born officer who has served in the Austrian and Ottoman armies. Thomas refers to Schoetz and Schoepf as “my two fighting Dutchmen” and the two brigadiers get along well. In early fall of 1861, Schotz is ordered to advance towards the Tennessee border and hold the hamlet of MacGillicuddy Corners in case of a suspected CSA troop movement. In fact a brigade under CS Colonel Abner Crutch of Zollicofer’s Division has orders to take the same crossroads.
A meeting engagement seemed the best way to learn the manoeuvre rules in Longstreet, and so I chose two mirror forces reflecting early war troops of both sides, keen but not well trained.
As is my usual practice, i laid out a table that I found both plausible and attractive. This layout allowed me to use some recently competed terrain features, and some very spiffy fencerails that my friend Mike Barratt made for me, to replace the hideous older ones that I made some years back and which can be seen on the big bases at the Union entry area below.
Union force enters the table from the bottom of the picture. The 6th Kansas “Liberty Jayhawkers” lead the way, followed by Colonel Schotz, followed by the Milwaukee Jaegers. On the left, the Pabst Blue Rifles move off from their start positions towards the table centre.
Col. Abner Crutch’s brigade enters from the other table edge. A local unit, the 3rd Kentucky Rangers, a cavalry unit, leads the way, followed by the 31st Mississippi, followed by Snedden’s battery.
Kentucky Rangers and the other Confderate units benefit from the Quickstep Card which modifies the first CS movement phase, giving each unit an extra two BWs of movement.
31st MS double-times past the Primitive Baptist Church.
An example of one of the cards in Longstreet that can wreck the other player’s day. It seemed like a fun card to play as Miss Laetitia MacGillicuddy, protected by her house maid Dillsy, watch the Yankee cavalry invade their eace. As the card says, it allows the CS player to steal two cards from the Union hand that turn. The dates at the bottom indicate that the CS player can have this card in any scenario set in the years 1861-64. To simulate the initial advantages of the CS armies, Mustafa gives the CS player many such cards in the early years of the war, but mid to late war the US player starts getting cards that give an advantage, showing the gradual tipping of momentum to the US.
Union artillery, the “Milwaukee Brewers”, enter the table. I really do need some limbers.
The Pabst Bliue Rifles head for the woods on the hill. At the crossroads, the Kentucky Rangers have dismounted and formed line.
Snedden’s Battery heads for a hill near the Primitive Baptist Church, while the 31st MS move to support the Kentucky troopers. A second CS infantry outfit, the 19 Texas (Galveston Rifles) enter the table.
After saluting Miss MacGillicuddy, the Kansas troopers swing around her farmhouse with the intention of dismounting at the fencerails. They aren’t keen to charge the dismounted rebs and face the carbine fire, not with those feb infantry supports coming up behind.
Bird’s eye view of the situation thus far.
More to follow.