Tuesday, December 17, 2019

B17 and all the Trimmings

In another totally gratuitous, non-wargaming use of my time, I made some model kits to amuse myself.    This 1/72 scale B17-F sits behind my desk at work, and was made in my office during my lunch hours over the past few months.     The model is by Academy, a Korean-based company, and the service vehicles are from an Airfix USAAF bomber resupply kit.  I purchased both kits from a store in Toronto, Wheels and Wings, on Danforth Ave.   It’s a great store for plastic model fans.   I painted the B-17 in the iconic aluminum and red paint scheme rather than the more ubiquitous olive-green, though both are good looks.  There is something quite American about the silver bomber, a curious mix of arrogance and naivety.

Autocar tractor and fuel trailer.

 Chevrolet bomb service truck and bomb trailer.

 Cushman package car, perhaps delivering thermoses of coffee and tomato soup before take off?

Like I said, no wargaming value that I can see in these models, but I greatly enjoyed putting them together and they make a nice display grouping.  Also a bit of a tribute to those brave men who got into these planes day after day to go bomb the Reich.

Cheers and thanks for looking.  Blessings to your models.

MP+

Monday, December 9, 2019

Picking Up Pickett - 3 of 3

Here is the last of three descriptions of a very leisurely conducted game of Reisswitz Press' ACW rules, Pickett's Charge, in which I think I've learned how to do charges more or less correctly, think I've understood the brigade morale rules, and think I'd like to keep trying these rules.

On the rebel right, the time seems opportune for an attempt to try and gain the hill which is the key to victory.  Unfortunately, the lead Confederate unit is more than 3" ahead of its friends to the rear, so it doesn't get the rear support bonus in the charge resolution dice, but the Mississippi boys gamely rush the hill.


However, in these rules, defenders usually get to fire a volley before the chargers close, which the Yanks on the hill do, decisively.  The attackers take three casualties, and the result is enough to force an Elephant (morale) test, which is not guaranteed but which usually happens at the deadly (hi rolls) end of the fire combat table.  The attackers are no up to five casualties.  Normal size units (five bases) disintegrate when they reach 12 casualties.


As a result, the Mississippians roll poorly and are Whipped (not quite as bad as Routed but nearly as bad) and fall back a long ways, unforming (basically disordering) the rebel unit behind them as they skedaddle through it.


Things get worse for the rebs.  On the Union right, the reserve regiment stood steady while the Whipped yanks passed through and sheltered behind them, giving the battered regiment a change to resume.  There partners in front have exchanged volleys with the rebel regiment which had previously charged and won the centre.   The rebels lose the firefight, taking four casualties and failing their "Elephant Test" from the incoming fire enough to go unformed.


  Now the Yanks charge, and the rebs roll very poorly on their defensive fire volley.  The rebel regiment behind the shooters is unformed as a result of passing through the rocky ground visible behind them, where the rebel skirmishers evaded to.


The Texans are thrown back, Whipped, when the Union regiment decisively beats it in the charge dice comparison.  The Yanks elect to halt, Formed, to face the rebel skirmishers in the rocks.  Another Union charge next turn could drive the skirmishers back if they evade.


With two regiments Whipped, the Rebel brigade is now considered Faltering, which is one step away in the morale rules from its complete collapse.   It is possible to bring a Faltering brigade back to its normal state (called Obeying Orders) through the application of an available Staff Officer and some good die rolling.   Just for fun, and to test this mechanic, I was in fact able to get my brigade to stand, but in surveying the odds, the Union defenders were too strong and relatively unscathed, and with the rebel units mostly battered, I called it a day.

In this simple fight, described over three posts, I've essentially learned the easy part of the game (movement, formation, and fire combat).    The turn sequence is fairly simple - IGO/UGO, but the mechanics are not overly complex.  I like the fragility of units - seeing a brigade get chewed up relatively quickly felt right from what I know of Civil War combat.   The harder parts of the game are charges (though I conducted enough of them to feel that I'd understood it) and brigade/divisional morale.  Next time, I'll try several brigades a side and give the Command and Staff Officer rules a workout.

Blessings to your hardtack,

MP+

Sunday, December 1, 2019

Canadian Troops for The Rockies Ablaze Project 2 - Specialists

Good evening friends.   Finishing up my last post on the Gorgon Studios minis which will make up my interwar/ear war Canadian platoon for an ongoing pulp projects.  Again, I have lots of praise for the Gorgon sculpts, los of detail and character, and the variety of specialist figures allows for a well rounded platoon with supports to be fielded.

Here a Bren gunner and his assistant get to wok in the snow.  The rifle of the assistant is separately cast, which is a nice touch.


Bren gunner and No. 2 moving, both in leather jerkins, which adds some variety to the rest of the sculpts in greatcoats.


Snipers/sharpshooters.

Sniper and spotter set up behind a snowy log.  Let’s hope they have silver bullets for that SMLE!

Forward observer with field telephone and map.

“Hello, I’d like to order a pizza delivered to the following grid reference."

Signaller team.  The fellow on the right carrying the No. 38 manpack wireless set doesn’t seem very happy.

Perhaps they’re calling HMCA Timber Wolf for pickup, or to send down some hot rum.

Major John Maynard holds his briar pipe and ponders while Platoon Warrant O’Malley chivies the lads forward.

Major Maynad consults with the local Mounties while his native guide looks on.

Thanks for looking.   Now that I have a significant number of minis finished for this project, I think I need to start gaming with them!

Blessings to your brushes!

MP

Saturday, November 30, 2019

Canadian Troops For The Rockies Ablaze

I’m ridiculously happy to have finished this project, a platoon of troops for my late 1930s Rockies Ablaze pulp project.   I bought these minis from Gorgon Studios this spring and just finished painting them and finishing the winter bases.   My project assumes that the forces of good will need to call upon the Dominion of Canada for support, so I needed troops in winter coats with an early WW2 look. These sculpts would be at home in a Norway 1940 setting, but they serve nicely for Canadian troops in the late 1930s.  They could either be Permanent Force troops from Canada’s minuscule regular army in the 1930s (perhaps from the 1st Air Service Battalion, assigned to HMCA Timber Wolf) or more likely militia troops, possibly the Calgary Highlanders called out from Currie Barracks, which is almost in the foothills of the southern Rockies.  

 First section led by a sergeant with a Thompson.  He and some of his troops are wearing grey wooden gloves, which seems sensible.  As my dad used to say about his time in the army, there are no prizes for being uncomfortable.

Second section led by a corporal (far right).  

The paints used are mostly Vallejo, with a bit of wash and some basic highlighting, Buff on Canvas for the webbing, German Cam Brown Violet on English Uniform, and Citadel flesh paints.

Third section led by a fearless subaltern, who actually seems to know where he’s going.

On patrol.

 I’ll save the rest for another post, as this is getting a bit photo heavy.   Thanks for looking and blessings to your brushes!

MP


Thursday, November 28, 2019

A Dangerous Duo for The Rockies Ablaze

Hello friends.

My pulp project set in Western Canada in the 1930s needs some baddies, and I found the perfect pair in two of Bob Murch's Pulp Figures sculpts, from his "Mad Trappers of Rat River" set from the Yukon Peril range.

On the left, Phil Turcotte was never the same when he got home from Passchendaele, and doesn't say much except "Get off my land!"    On the right, Sven "The Hatchet" Olsen shows up in the trading post once every three months with a sack of furs and a baleful stare.  According to local legend, he once killed a man in Pincher Creek for suggesting he needed a bath and a haircut.


As always with Bob's figures, these were a delight to paint.  As I see it, besides being ornery, smelly, armed and barking mad, they will have some special abilities, like possibly being able to turn into wolves or bears, which is why the German zeppelin might be looking for specimens.   I am sure there will be wild doings afoot.


The frozen Canadian north needs as much scenery as a table will hold, so here are four terrain stands made of Christmas village trees on old CDRs (remember them?).


I discovered this white texture gel at a local art supply shop, which being white, takes paint and Woodlands Scenics snow quite well, for a pleasing final effect.


They look like trouble.

Fortunately there are some good guys to show off soon.  Thanks for looking.  Blessings to your brushes and stay vigilant, chaps.

Sunday, November 24, 2019

An Alternate Airshop for The Rockies Ablaze Project

Geetings, friends.   I hope this finds you well.

Here’s a bit of nonsense.  I said a while ago that I had an airship in mind for my Rockies Ablaze project, and in my mind it was going to be some sort of Zeppelin.   I had acquired Revell’s 1:720 scale Hindenburg model and some of Bob Murch’s Pulp Figures Zeppelin troops, which seemed like the perfect villains fo my stalwart Mounties and mountain men.   But things got a bt out of hand and this thing appeared.

 On Twitter there is a bit of a fictional airship community which mostly exists to tell silly stories about implausible airships, with some blog spin-offs, like this one.  I played along for a while, creating a Twitter account, @hmcawolf, dedicated to telling the story of the Royal Canadian Airship Service and is flagship, Her Majesty’s Canadian Airship, Timber Wolf.  The idea was an alternate Edwardian history where the Dominion of Canada used airships to patrol the coasts and skies, with they crews who would be a mix of sailors, soldiers, mounties and scientists.   The idea comes in part from Chris Stoesen’s Thomas Deveraux series, set in an alternate history where the Confederacy survived and the majoir powers use airships.

 HMCA TimberWolf combines the Revell Hindenburg model with bits and pieces from an Academy Models 1/72 scale B17-F model (guns, canopy, etc) with some surplus decals from Airfix 1/72 scale Typhoon kits.  I’s a bit of a dog’s breakfast but it amused me.


 I am sure that HMCA Timber Wolf will need a German nemesis and that they will do battle in the skies over the Rockies.   Stay vigilant, chaps!

Saturday, November 16, 2019

Picking Up Pickett - 2

Hey all.

A few things cooking at the Mad Padre’s Painting Chapel, but in the games room I am still noodling away at the Reisswitz Press/Too Fat Lardies ACW rules, Picket’s Charge.   As I get to know the mechanics better, I realize that there is much I like.

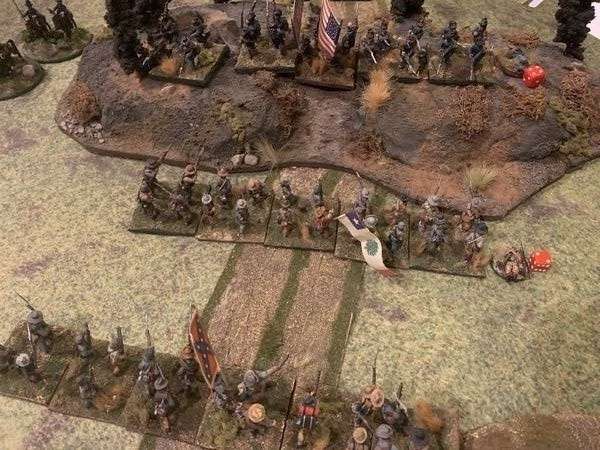
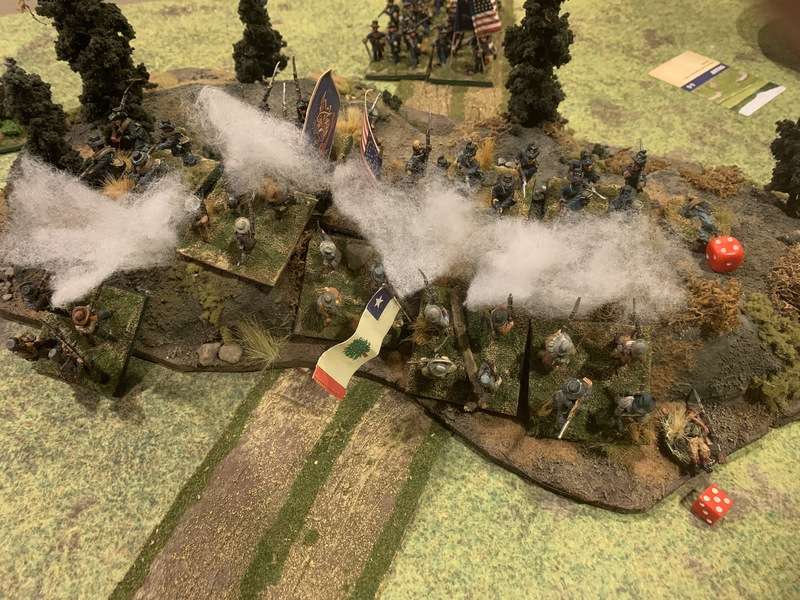
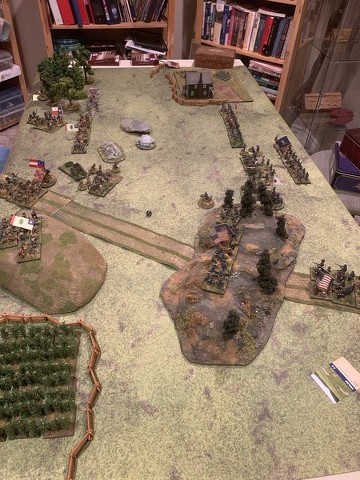
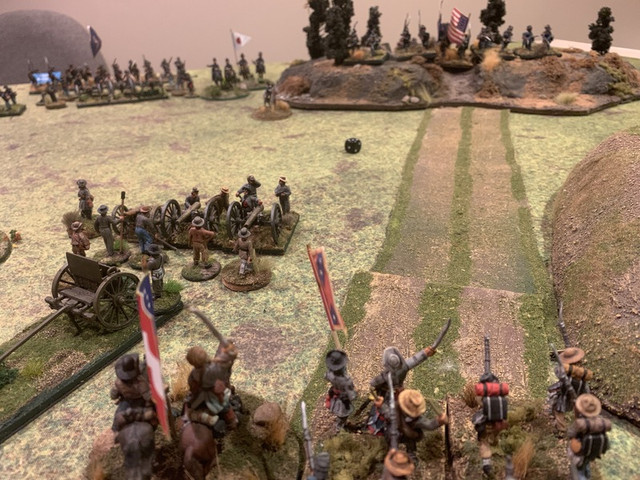
Formation integrity is really important, and that feels right.   Units can be either formed or unformed, and unformed units are less effective at shooting and melee combat.   In this photo below, the lead confederate unit moving through the rocky ground is in skirmish order, so it doesn’t have to worry, but if the column following wants to move through the same ground, it will have to test every turn it moves through that terrain to see if it goes unformed (7 or better on 2d6 to pass for ordinary troops).  it takes a whole turn of movement to recover formed status, so that risk and the ensuing time cost is something to think about when handling troops.

Units can also go unformed as a result of testing from taking fire.

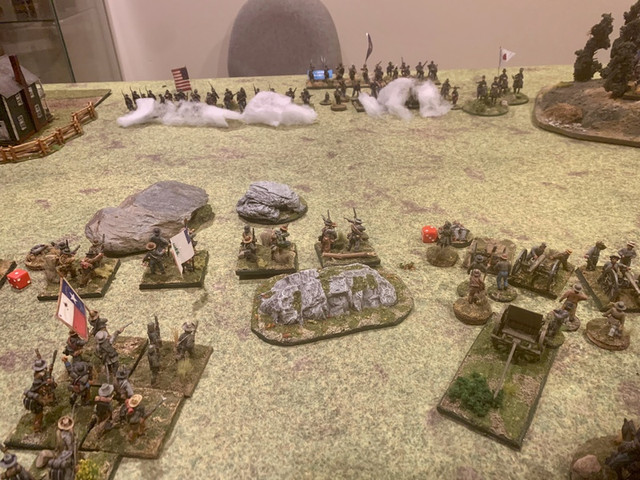
Speaking to taking fire, shortly after this photo was taken, the confederate battery in the lower centre failed a test (called Seeing the Elephant test) after taking fire from the Union battery opposite, and withdrew Whipped, which basically means routing.  The rules didn’t seem to be entirely clear on this but I assumed they meant that a Whipped battery will limber and bug out, as the Whipped/Retire move for a battery is considerable.   Makes sense I suppose.

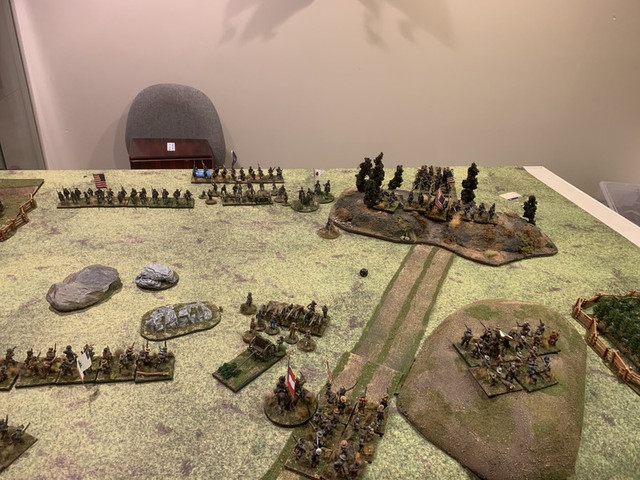
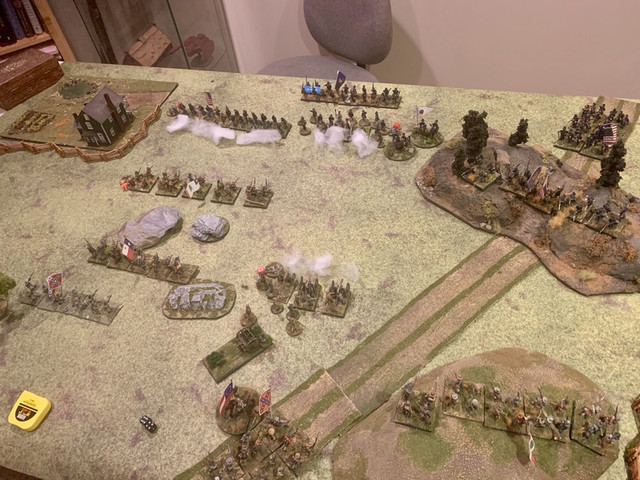
 The fire combat mechanics are clever because there is a potential cost to the firing units as well.   Roll poorly enough when shooting, as I did with the Union regiment top left, and it can lose Fire Discipline, which means that it drops a level in fire quality and needs to spend a turn of movement to sort itself out and recover fire discipline.   Likewise, poor rolls can also result in firing units potentially take fatigue casualties or run short of ammo.   Thus, one has to think carefully about blasting away at long range in the off chance of hitting something.

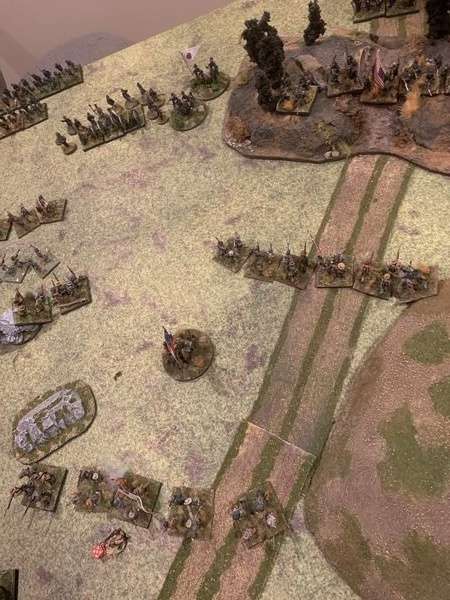
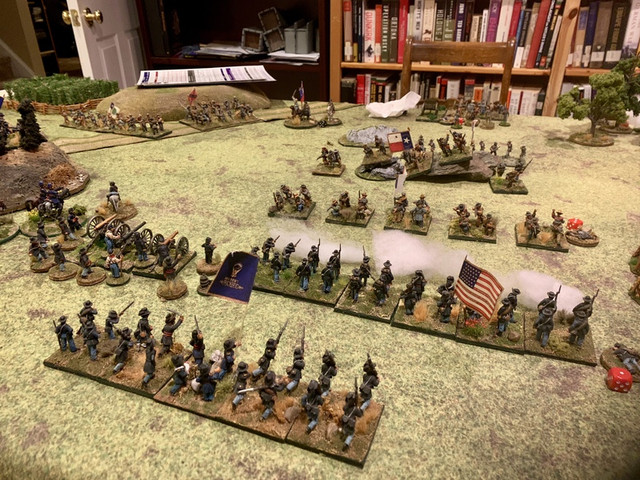
 The view from the Union lines, where there is growing apprehension about the Rebel attack building on the right wing.   The CSA skirmishers have now closed to nearly the minimum allowable distance between units engaged in fire combat, 3 inches, and are peppering the Yanks.   Skirmish fire is annoying and while not as effective as volley fire, it can cause damage, as the Union regiment will soon experience.   The red dice beside casualty  figures are keeping track of losses.  In Pickett’s Charge, losses are not removed from the table, but are tacked as the mount up.  Units become less effective at 4 and then at 8 losses, and can dissolve altogether when above 12 losses, so there is a brittleness about a brigade’s ability to sustain combat for a long period of time that seems right, another rule design aspect that I like.

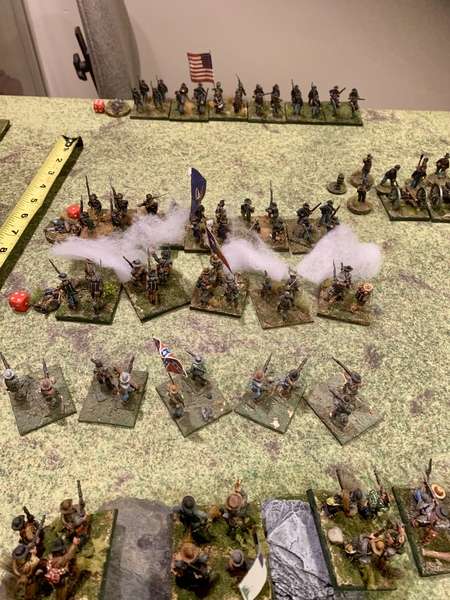
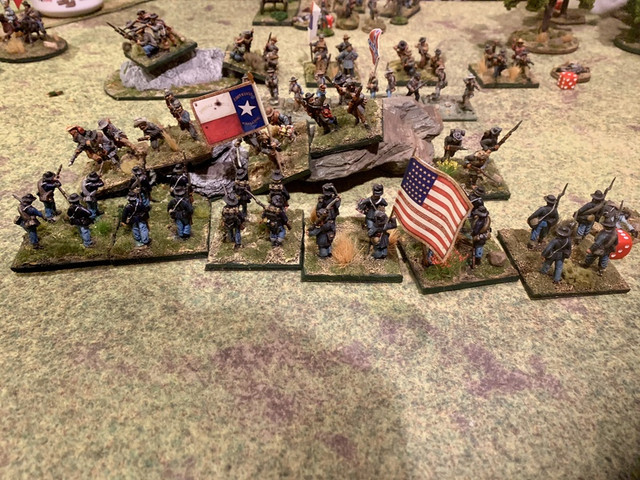
 So how to get rid of those annoying skirmishers?  Seemed like a good opportunity to try the Charge mechanics, which, as one would expect of a rules set called Pickett’s Charge, are considerable.    Well, Skirmishers get to Evade a change, automatically if I read the rules correct, so they skedaddled to the rear, passing through the units coming behind them.   I didn’t see anything in the rules about an evade move informing friendly units during the pass through, but I may have missed that.   The Union unit elected to press on the charge, and they contact the CSA line behind the skirmishers, which is Formed because it passed its formation test as it moved through the rocky ground.

The defending unit gets to fire, which, when combined with the casualties the Union regiment took from the skirmishers, brings it up to 6, no good.  Now both sides roll two dice, with a myriad of factors thrown in such as rear support, threatened/charged on flank, casualties taken during the charge, attached general, etc.  The Union rolls very badly, and the charging regiment is Whipped and retires to the very edge of the table, passing through and unforming the supporting Union regiment behind.   The situation is now looking rather dire for the Union.

Thoughts so far:  I like these rules though they often leave me with questions as to how the mechanics work.   Fortunately there is a dedicated section of the Too Fat Lardies for support, which is helpful.   I hope to take this battle to completion, a when I have some grasp of the basic mechanics, try it with 2+ brigades a side to really dig into the command and control mechanics which seem to be the heart of the rules.

I’m impressed, and it’s great fun to get out my 28mm ACW collection again.    I may need to paint some more regiments!

Blessings to your die rolls,

MP


Saturday, November 2, 2019

Picking Up Pickett


I’ve set up an American Civil War battle because I wanted to try the Pickett’s Charge rules from Too Fat Lardies|Reisswitz Press.  I’ve chosen the terrain randomly, using the Terrain cards included in the Longsreet/Sam Mustafa rules and assigning four Terrain Cards randomly per side. 

 Chosing a side randomly, the Confederates have to attack.  The key terrain feature is the ridge held by the Union (top right), so that is the Confederate objective.

 The Union are defending with one brigade of four regiments, all of average size and training, and one battery, and deployed first.  The Confederates enter the table wth five regiments, also average size and training, and one battery.   Pickett’s Charge is written for divisional or larger size battles, and the heart of the rules have to do with the management of brigades.  I’ll try that once I get the basic mechanics sorted.

 Confederate general Ginger Purrsival inspects his brigade.

 “I need more time and more men.   I could march to his flank, and get around him.   Then I could bat him around like a mouse and eat him."

How will the Confederates fare?  I hope to show you more soon.

Blessings to your dice rolls!

Thursday, October 24, 2019

Orcs, Mostly

Hello friends:

I hope this finds you well and happily busy, as I’ve been lately.  Busy and productive enough to break out my light box to capture some finished work.

Today it’s mostly beastly orcs to swell the armies of Mordor.   Here is the command pack of some Vendel orcs.  My friend James and I went in on a joint purchase of some Vendel figures when they were still in business.   I love their chunkiness, the fact that they’re lead and not the spin-cast resin that GW now uses, and that they have their own identify, independent of figures based on the Jackson LOTR films, though I have more than enough of those minis as well.

Command group.   The fellow on the left looks mean enough to be a senior NCO, probably what passes for an RSM in an orcish host.  Sadly all the weapons the Vendel figures had were spears, for the most part, so I gave him a pointy mace thing from the Oathmark Goblin box to go with his eye of Sauron shield device. The fellow in the centre looked like he needed a banner, so I gave him one from the Little Big Men Saxon/Viking set, cut and mounted on aluminum foil and embellished with a skull from the same Oathmark pack.


Another Vendel figure from the same set, with another Little Big Man flag.  I made a total hash of this flag, and had to work desperately to save it.   I figured the dragon looked suitably orcish, though perhaps too fine a design for crude orc hands.

Seeing as I was doing orcs, I thought I would also do a test-paint of these figures from a box of Oathmark goblins purchased recently.  They look a little stunted and hunched over, compared to the confident upright Vendel poses, but they do look suitably menacing.  I’m reasonably pleased with them but I don’t like the shiny final look of the Army Painter Strong Tone washes that I bought recently.

A quite nasty bunch to add some character to my orc hosts.

I have a raft of figures that I started and then abandoned when Kay entered the final stage of her illness some years ago, and I now have the energy to start finishing them.  Here is a Gripping Beast Alfred the Great lead figure, painted to be a Lord of Rohan.  The LBM shield transfer is quite appropriate for that purpose.


 Finally, from the same raft of figures, four Sash and Sabre ACW casualty figures, to mark units in trouble or perhaps just for Matthew Brady to paint.  Thinking out loud here, I wonder if anyone makes a Civil War era photographer miniature?   

Thanks for looking.   Blessings to your brushes!

MP

Blog Archive

Followers