
I said at the time, "I guess I had better start making something for them to batter."
Well, Secret Santa, I hope this makes you proud of me.

What are those orcs knocking on, you may ask?
This.
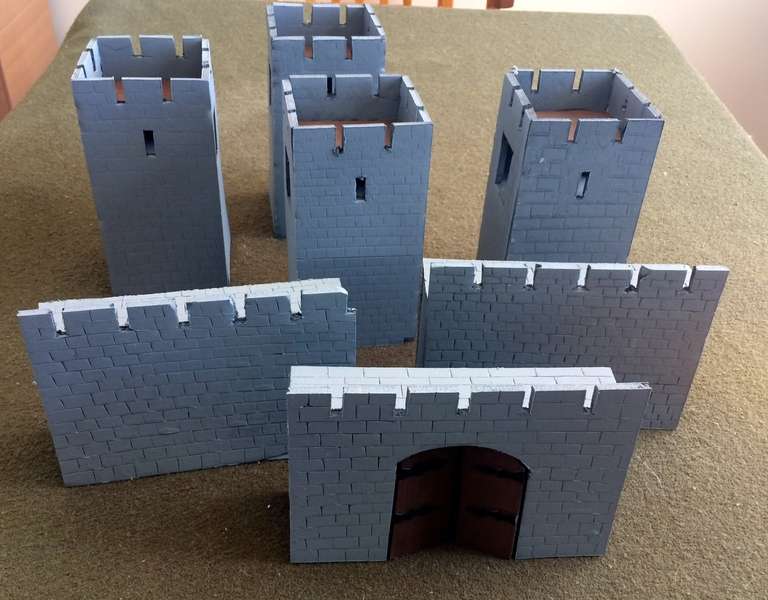
Back in November, about the time that Kay went into hospital for her long stay, I was going through some GW rule books for their LOTR Strategy Battle Game rules, and found a simple recipe to build your own castle sections. I duly bought a couple of sheets of foamcore from the local art supply store and started at it. I would do a small piece at a time, usually at night after visiting the hospital, while I was still too wired to go to bed. It was very therapeutic.
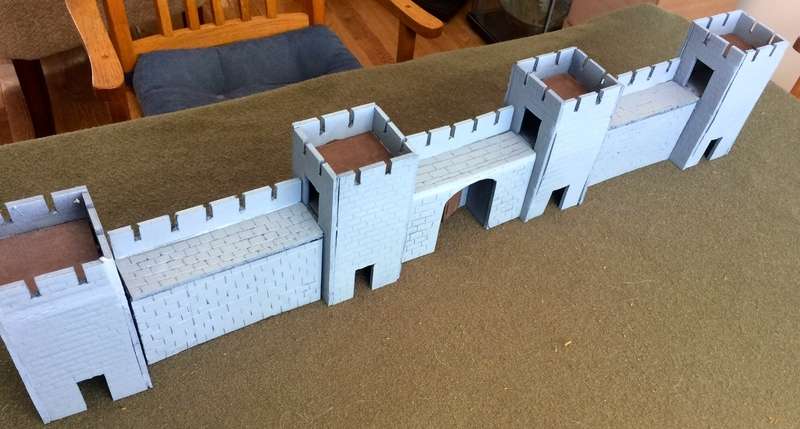
With three wall sections and four towers, the pieces measure almost three feet in length when laid out together. I am still waiting for Mordor to agree to pay for it.

I am not the most talented chap when it comes to scratchbuilding. As Ross M put it recently, I find the art of drawing lines using a ruler, cutting, and finding that things line up evenly is nothng short of sorcery. If you look at it up close, the joins are quite rough and the whole thing is rather dodgy, but from a small distance it looks ok. Once the components were glued together, I sprayed them with a gray art paint by Liquitex. It tended to obscure the scoring I had done in some sections to suggest the stonework, so I have to go over everything again with a craft knife to make sure the stonework comes through.
I got enough of this done to provide me with an entry for the "scene from a book or film" contest on this year's Painting Challenge. When I started the project, I thought I would have time to use the wall for a scene from the siege of Gondor in the Return of the King. However, I didn't have enough Gondorians completed for that, so decided that I could call this Helm's Deep and be done with it.
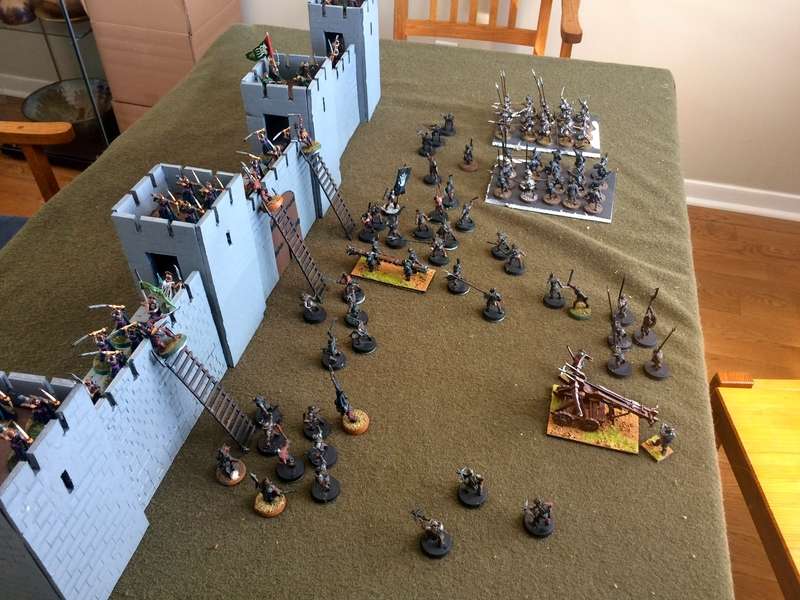
Bad chaps roll up to the wall.

Elves and men desperately defend themselves.
This project amused me and gave me the chance to acquire some lessons learned about scratchbuilding fortifications. Thirty bucks for two sheets of foamcore and a can of gray spray paint was a lot less expensive than buying a resin model from the likes of Hudson and Allen.
When the spirit moves me I may add a few more sections, enough for a game simulating an assault on one portion of a fortress, where the attacker wins by getting up and over in strength. There are siege rules in the GW LOTR rules, and there may be some homebrew siege rules for Dragon Rampant, I shall have to see.
At any rate, Secret Santa, my orcs have something to shoot at and batter down. They are happy, as am I. Thank you for the inspiration.
That is a first-rate wall to batter down, Michael! Good luck getting Mordor to pay for the wall. Perhaps Mordor does not need strong-arming to pay for the wall? Levying a foreign goods import tax might have the same result.
ReplyDeleteThank you Jonathan. I hear that Sauron is levying a steep tarrif on halflings importing jewelry into Mordor, and hiring extra Nazgul as customs inspectors.
DeleteTerrific set up.
ReplyDeleteAlan
Thank you Alan. For a few glorious minutes I felt like a kid playing with castles made from building blocks.
Deleteback in the day there used to be a wizard at scratch building in the UK, Ian weekly, who had two tips for doing what you are doing. First, cut some stone sized bits from card stck and glue them on the walls randomly. This gives the visual effect of the occasional stone that missed the smoothing touch of the stone mason. The second tip was to give everything a "tetrion wash" which I later came to discover was actually thepowder used to make spackle for walls. I imagine that even some pe-mixed spackle suitably watered down and painted over the wall surface would give the pieces a more "stony" appearance. In any case, you have done excellent work. Well done, sir, well done!
ReplyDeleteThank you sir. I am familiar with Ian Weekly, he used to run a business called Battlements if I am not mistaken. I may try the tertion / spackle approach with some future components. Thank you so much for the suggestion and for the encouragement.
DeleteHave a look at the way our very own Mr Clarke does his walls as described on the TFL blog, Mike, then combine in a way that suits you.
DeleteThis is just wonderful, a fabulous build and great to see the Uruk knocking on the door.
ReplyDeleteThank you Michael. Those Uruks won't get in without a fight, you can be sure.
DeleteMind boggling sorcery indeed! I have sheets of foamcore that scream at me to get on with making them into my Stalingrad ruined buildings, but I fear the results will end up far too demolishing to my pride.
ReplyDeleteYour walls and tower sections fit the bill Mike, very much so. Thoroughly enjoying those images you've posted with all those troops attacking the walls.
I can't remember, do you have trolls to lumber about with your orcs?
Thank you Dai. Just get stuck in with that foam core and see what happens, that's what I did. Glad you like 'em.
DeleteI do have a troll, could use some more. I have looked at the non GW trolls to augment my forces (e.g. the Warmonger label from Wargames Foundry) but they are all a little cartoony for my tastes.
Great scratch work Michael, I'm sure your SS approves ;o)
ReplyDeleteWere the gifts your handiwork, Ray? If so, Bravo!
DeleteRay, you lovely Reject, if that was you, I owe you a big kiss.
DeleteThis does look impressive!
ReplyDeleteThank you sir.
DeleteI think you've done a fine job putting this together. 2 things that I find useful to hide the gaps that result from my.....level of precision..in cutting is to use a bit of pollyfill or the house brand equivalent, available pre mixed in small pots at hardware stores. I smear a teeny over gaps and joints before painting and occasionally elsewhere, just to make it blend.
ReplyDeleteA trick for bricks, shingles etc I picked up from a Courier article years ago but rarely remember at the appropriate time, is to follow up the knife cuts with a pencil. This deepens the cut slightly and makes it harder to lose them under paint. It would probably work over paint as well.
Lastly, never mind texturing as good as that is, drybrushing with a big brush with a lighter colour will suggest texture and is quick and easy.
Nice looking set up as is though.
thank you Ross. I tried to go over the models afterwards with a pencil, but I think the Liquitex spray paint went on a little too thickly, and I contented myself with cutting the scoring deeper. I may go over all the models with a dark wash and then highlight gray again. We'll see how ambitious I feel. I appreciate your advice and encouragement.
DeleteWell done man!
ReplyDeleteNow you need a nice breached section once the orcs have smashed it.
Thanks mate. I agree, something that orcs went smash would be good. Or maybe something that one of Saruman's infernal machines blue sky high.
DeleteThat looks great, especially from someone who isn't very talenting doing this kind of work :-)
ReplyDeleteThat's a fantastic piece of scenery that can have pride of place in your collection for years to come. Particularly from someone who shares the inability to cut things in neat lines!
ReplyDeleteLooks great Michael :)
ReplyDeleteHey this does a job, it's great as it is and as above a bit of texture helps a lot for joins and overall look, what you could also do to enlarge it if you didn't want to do battle with foam board is a toy castle, I've bought one for £14 for 54mm figures which is about as high as your walls I'd say and made out of plastic, great fun anyway!
ReplyDeleteBest Iain
Next project, a broken-down wall section. Should not be hard at all to cut jagged edges and fill up with some scrap pieces and cat litter.
ReplyDeleteLove these walls, very impressive!
ReplyDelete