Wednesday, February 29, 2012

Rebel Cavalry in Progress


I mentioned The Guild webforum's build projects in my last post. Their 2012 Project competition helped me focus on expanding my 25/28mm American Civil War collection as a main focus for this year. Sounds like a good idea, but the devil is in the details, and in the deadlines.

Midnight UK time (afternoonish here in western Canada) was the deadline for the first installment, and I committed myself to producing a regiment of Confederate cavalry mounts and dismounts. These would be useful for both Lardies ACW rules I play, as well as a return to my roots with Johnny Reb.

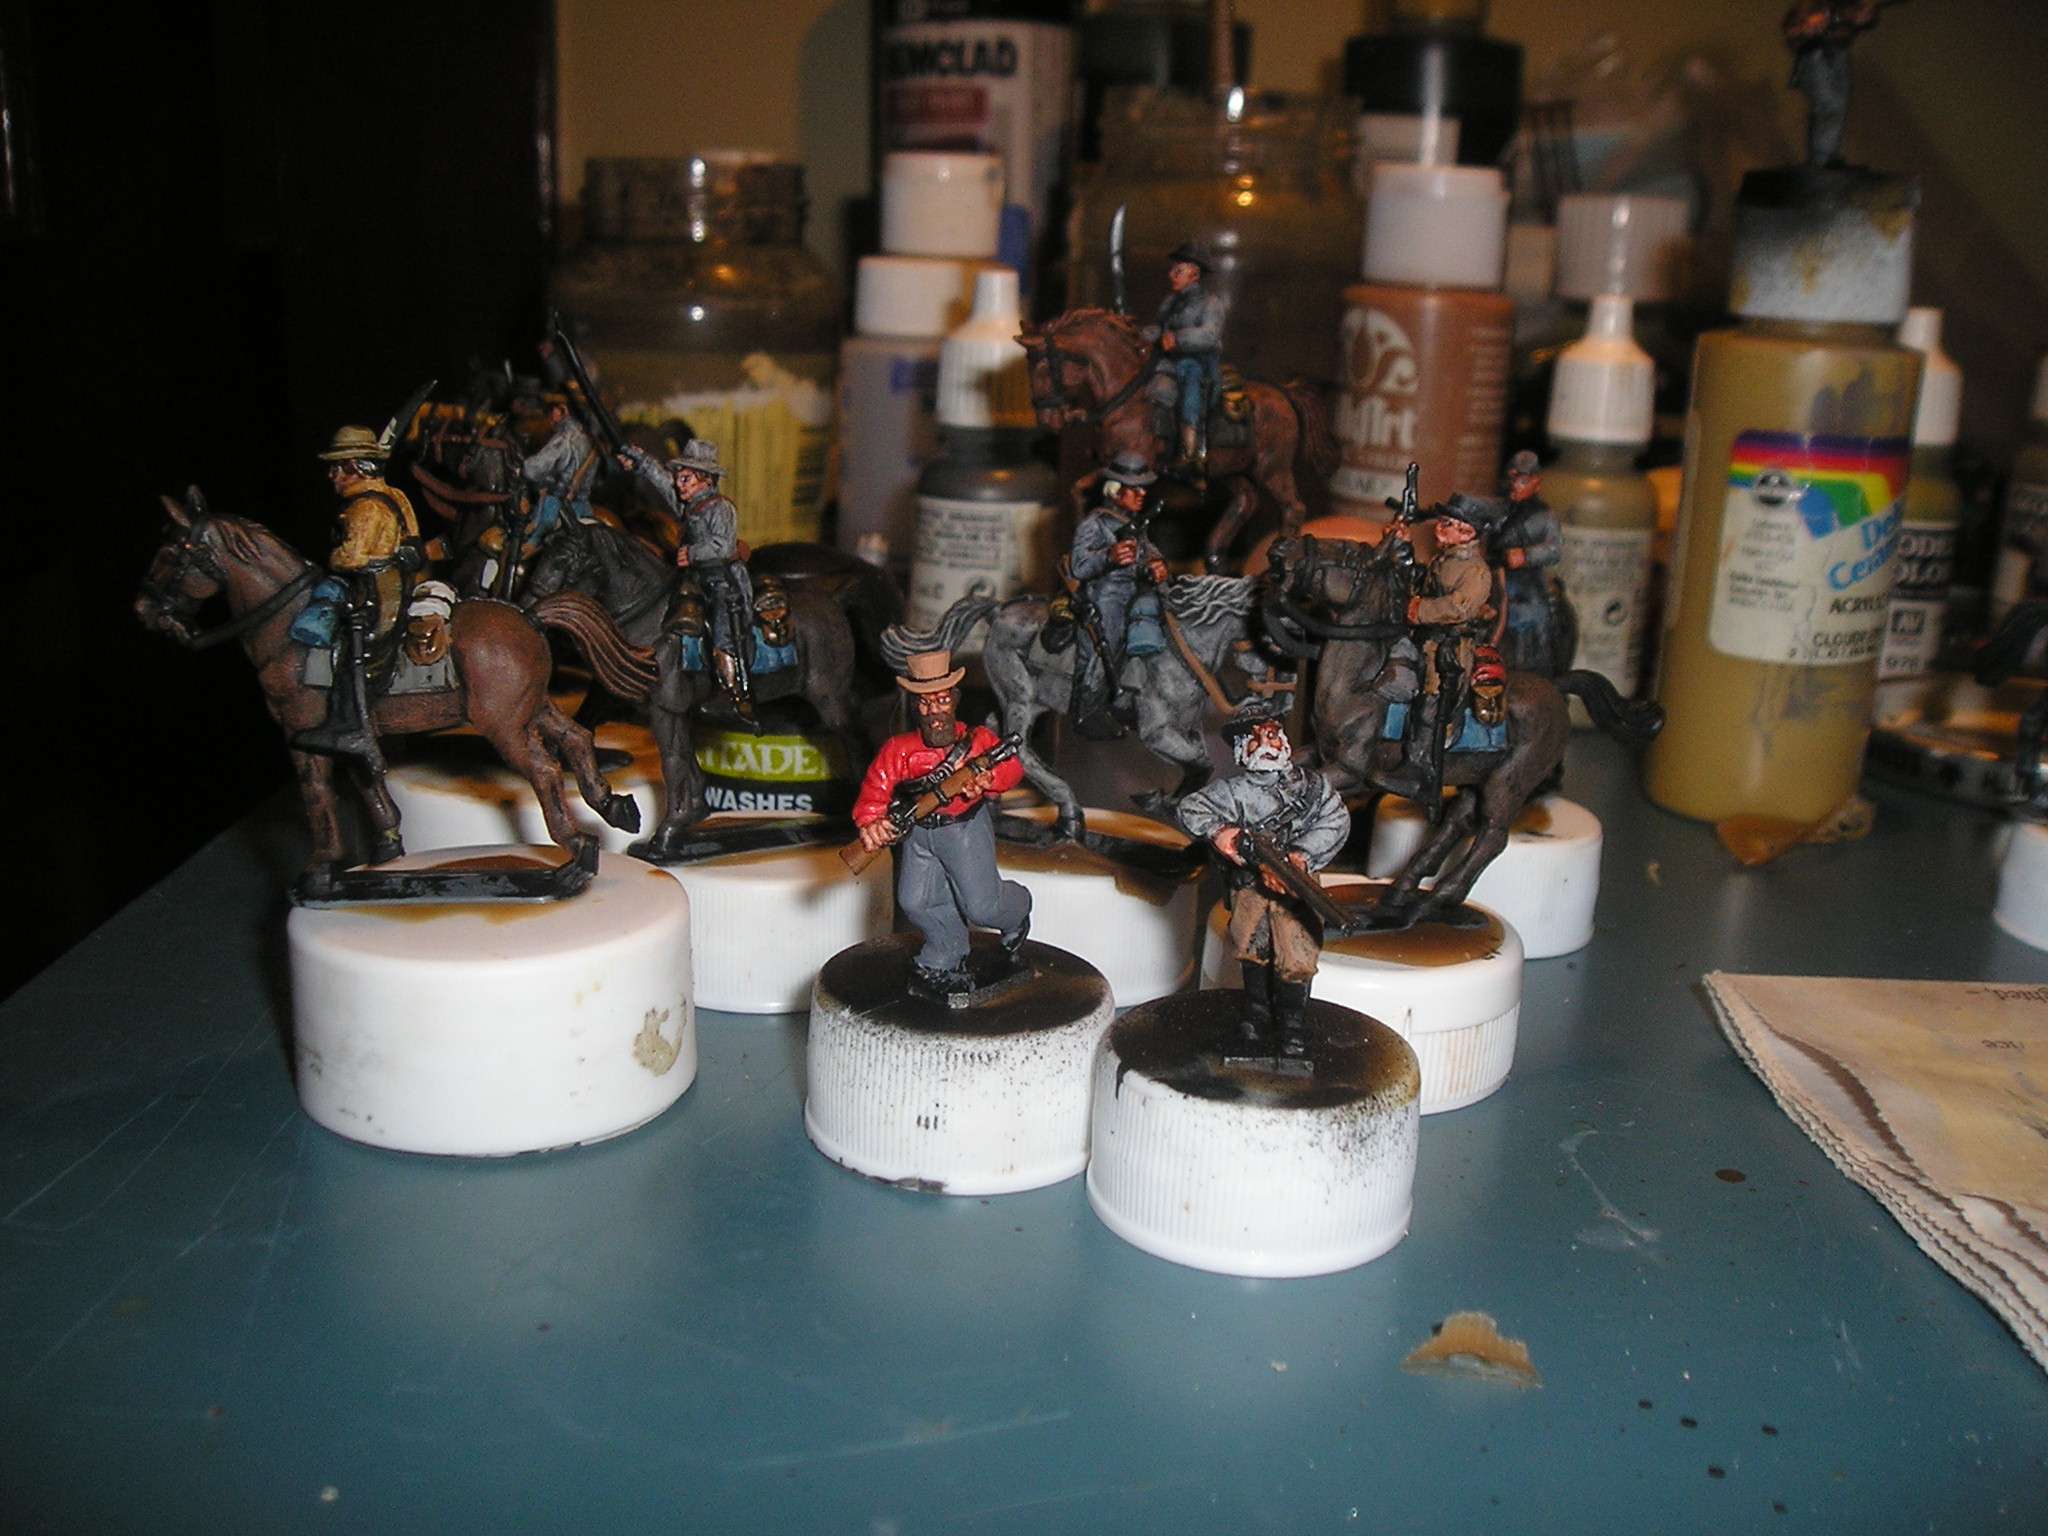
The deadline came much more quickly than I had anticipated, and so last night I slept little, painted much, cut some bases out of MDF board without amputating any digits, and got these dashing cavaliers mostly finished and based. Hopefully that counts for the Guild deadline.

The cavalry shown here are mostly Perry plastics. They are nice figures, with a variety of poses and weapons to choose from in the assembly, and look quite good when finished. I am quite happy with the finished product. The mounted officer and the bugler in the red shirt are Foundry figures, from the Rebel Cavalry Command blister, which have been kicking around my lead mountain for ages. The banner was included in the one page wargames rules included in the Perry box. It's a placeholder until I can get a proper cavalry flag from GMB.


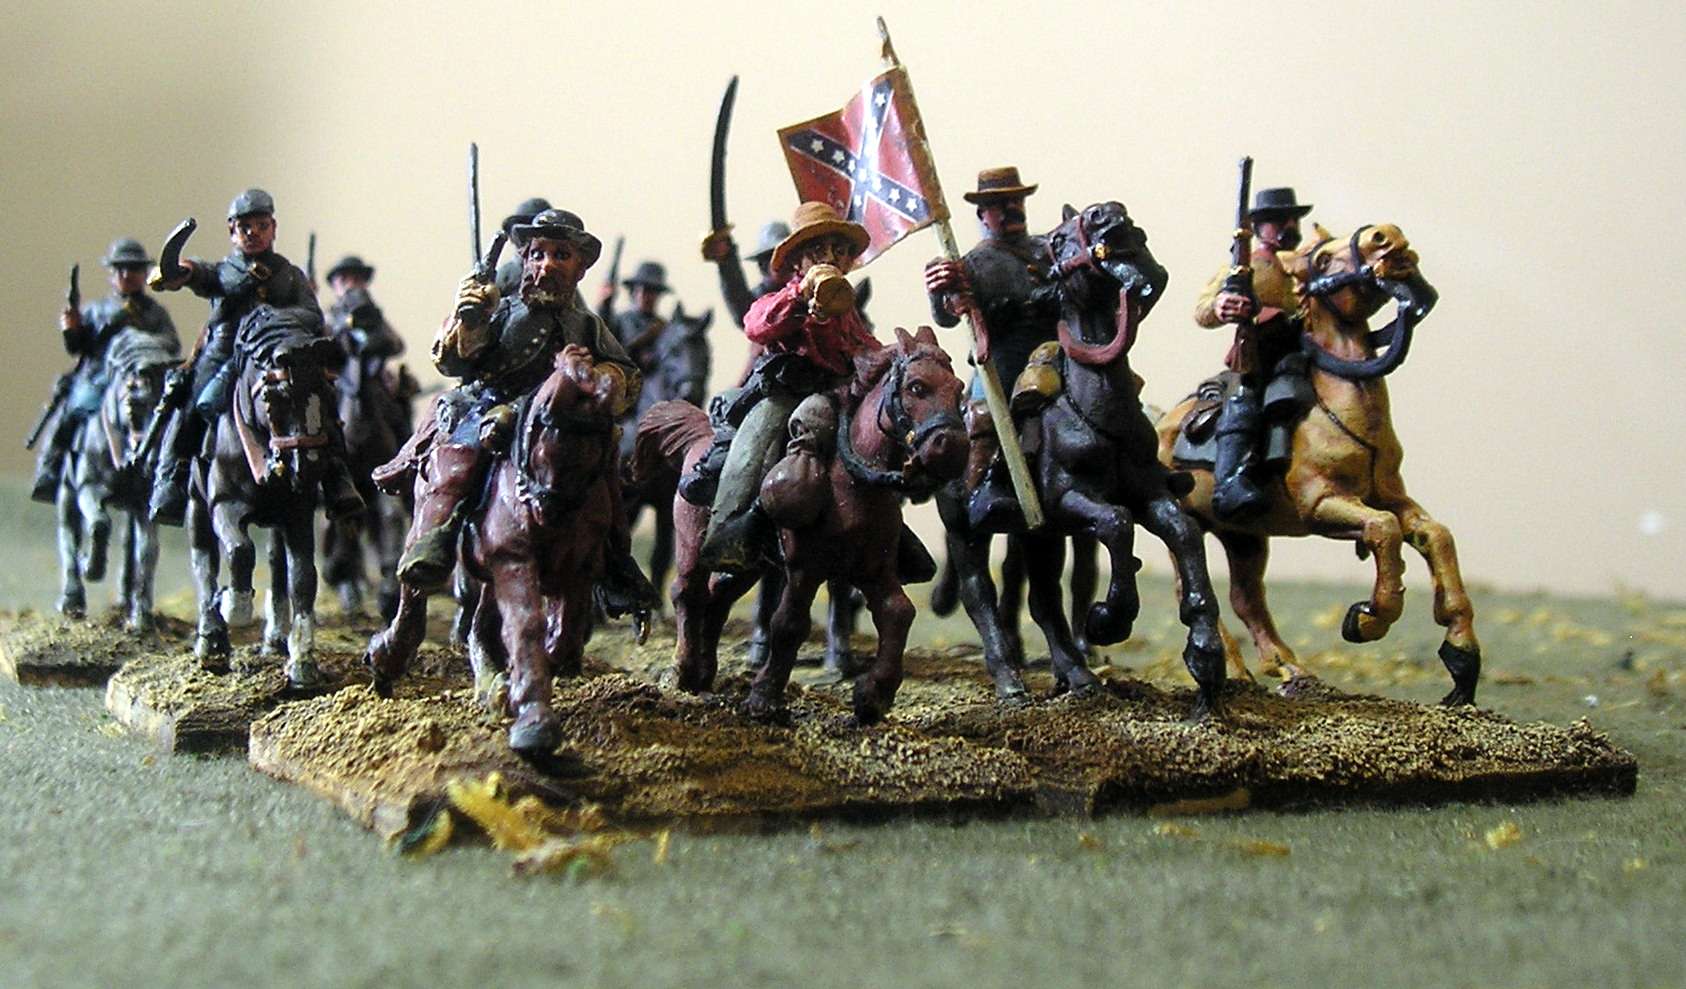
Bonus marks if you can identify the manufacturer of that little chap on the runty horse on the back left of this picture:


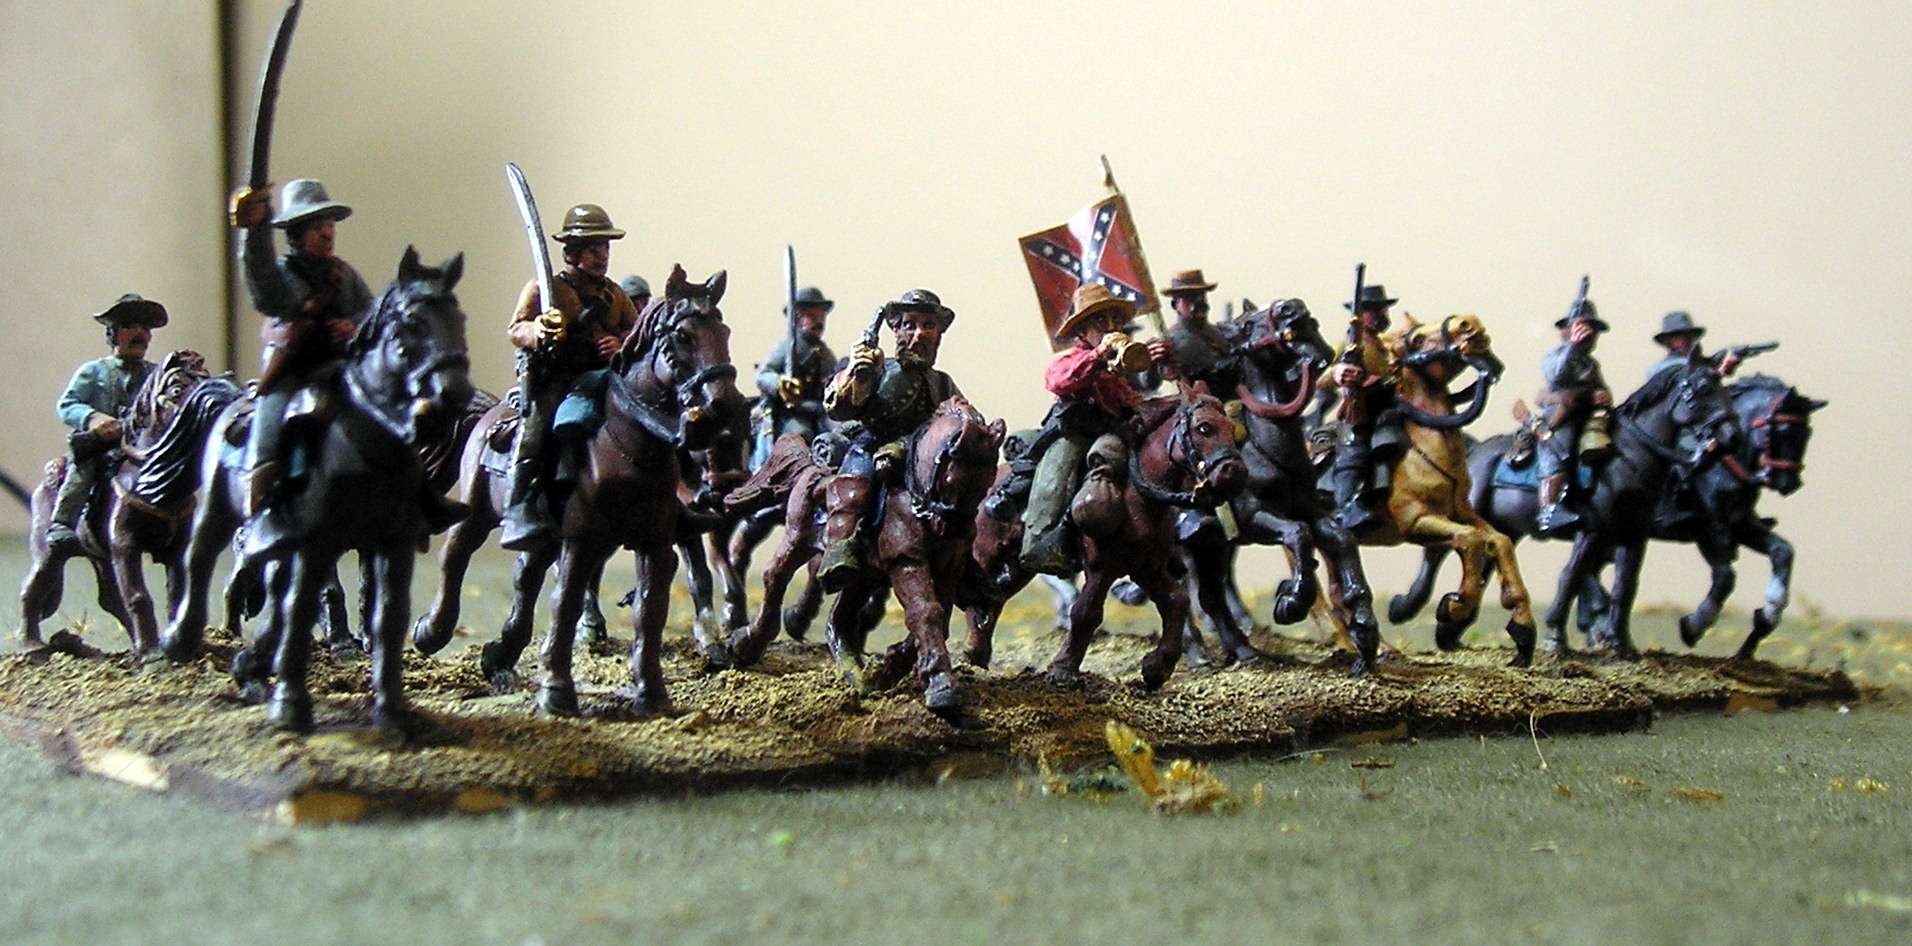
A view of the dismounted fellows.


Six of these, the sturdy looking fellows, are made by Redoubt, who decided to pose their dismounted rebel cavalry in shirts. Perhaps it is a hot day and they've left their coats with the horseholders? (that reminds me, I could use some horseholders). I didn't like these guys at first, but like all Redbout figures I've painted, they've grown on me. Extra bonus marks if you can identify the manufacturer of the two small dismounted fellows on the left.


There is also a dismounted cavalry command group for these lads, manufactured by Sash and Sabre, but they got left behind in the painting queue. They're next, I think. And then to start the Union equivalent of these guys. The Bluffsburg campaign I am running has several cavalry units in the orders of battle, and it will be nice to represent them on the table.

Better pictures to come once I get them all flocked and finished.

Monday, February 27, 2012

An Alarming Number of Small Bits

The fellows at The Guild have another build project, this one with a flak /antiaircraft theme, and I am a sucker for collecting little virtual medals.

I recall having a flakish model in a box of unassembled plastic kits, one that my wife eyes dangerously each time we move, and found it. It's a vintage (sounds better than old) Airfix Bofors 40mm flak gun with tractor and some of those poorly moulded but charming little Airfix guys. As I recall, it was a gift from a widowed parishioner who was cleaning out her husband's hobby stuff. I should probably make it before it gets cleared out with the rest of my estate.


A rather alarming number of small pieces, and my eyesight, patience, manual dexterity and tolerance for sniffing glue are not what they used to be. The paint scheme on the model box and decals are for a 7th Armoured Division gun in the western desert, a theatre I don't collect.

However, I found this photo of a Canadian Bofors in Normandy in 1944, a theatre I do collect.


So as you can see, I don't really have a choice, do I?

However, before I can think more about this, I need to get these chaps off my painting table before Feb 29th, the date of another Guild deadline for the year long Project Build. I have quite a few more ACW figures to do this year.

Sunday, February 19, 2012

Board Game Nostalgia: Storm Over Arnhem


One of the chaps at the local wargames club was selling off an unpunched copy of Avalon Hill's Storm Over Arnhem last Thursday. He didn't want it, since none of that group are historical gamers. His copy was unpunched and while the box was a bit stained in a few places, the inside looked pretty much the way it must have looked when it was printed back in 1981 (surely a conincidence that this was a year or so after the film A Bridge Too Far appeared!).

I never did buy this game at the time but I always sort of knew that Courtney Allen and Don Greenwood published a significant game that spawned a whole series of impulse-driven tactical wargames.

I've always wanted to collect Arnhem figures (IMHO, British paras are so much sexier than their Jerry counterparts) but that's a project for my retirement, maybe. For now, this old game is now punched and set up in my study, and when I have a spare moment or two, I go to join Johnny Frost at the bridge.

Saturday, February 18, 2012

Ball's Cross Roads: An ACW Skirmish Report

is

Had some friends over last night to try a smallish American Civil War game using the Terrible Sharp Sword (an ACW variant of their Sharp Practice black powder rules by Too Fat Lardies. For the scenario we used "Ball's Cross Roads" from Chris Stoesen's TSS scenario set, The Coming Storm. In this scenario, D Coy of the 23rd New Yok Volunteers are near Falls Church, Virginia, and has been tasked to skirmish forward and identify rebel positions.


The table was quite simple, a road passing through woods, crops and split rail fences. Such a lot of rail fences. I had to improvise and clearly need to make some more.'


Gene, the CS player, has placed his starting force under blinds. He has four groups of eight men and two Big Men as leaders. Wisely concentrating along the fences by the cornfield in the centre, he also places a group on the hill on his right with a sergeant, keeping his other leader, Lt. Saunders, in the centre.


Ryan sends his US forces forward. He has nine groups of eight men each, divided amongst four Big Men and under the command of Capt. Luzerne Todd. Some of his blinds dsignate two groups each, and three are dummies to feint the rebs.


The Yanks spot a blind first,and see one of Gene's groups behind the fencerail.


And Gene spots two US groups under Sgt. Sherwood advancing down the road towards him. Gene now has a dilemma. Does he open fire now? If he fires, it will alert the rest of the rebs back in camp, allowing the reinforcement card to be put in the deck. But if he fires his blinds now, he reveals himself and squanders his first volley bonus at long range. Gene decides to wait, a nervy decision.


As Ryan pushes more groups out of the woods they become automatically spotted, and with a mass of targets now in effective range, Gene fires three of his groups, one on the hill and two behind the fences, inflicting a few kills and heavy shock (morale, combat and movement penalties) on one group. But Ryan has another punch coming, and can be seen here pushing more groups into the cornfield where they are hidden from rebel view by the corn stalks.


Ryan pushes four groups under Lt. Colby through the cornfield and up to the fence, where they now engage the three rebel groups under Lt. Saunders. A random firing event means that one of Saunders groups sets fire to the dry grass in front of it, presumbaly burning wadding from a musket. This fire will slowly spread and the rebs are too busy to put it out.


The firefight at the fence rages for several turns, during which the centre rebel group takes the worst of it. Heavy smoke from the grass fire, and from the muzzles of Saunders' muskets (a random firirng event) hang between the two lines and impede accuracy.


Help now arrives for Gene. Sort of. His five remaining groups, almost forty rifles with three Big Men, arrive. Unfortunately, the scenario calls for a dice to see if they arrive in separate groups or in one formation. They arrive in one formation, under Captain Leghorn, a level 4 Big Man. Unfortunately Gene will need his card to come up to activate the formation, and this won't happen each turn.


Under the fire of Ryan's formations, Gene's groups on his left have been melting away, routing off the hill and and away from the fencerail and conflagration in the centre. Capt. Leghorn's large formation in the wood has fired once, shaking the Yankees along the fencerail, but Leghorn isn't budging from his wood.


Lt. Saunders decides that now is his chance and he leads his men forward in a desperate charge. He doesn't have the dice to make it across the road, and takes fire from the fenceline, causing some shock. Then the sasparilla card comes up, ending the turn. It all depends now on whose card comes up next. Gene is lucky, Saunder's card comes up again and he charges home. Two rounds of melee follow at the fenceline, with clubbed muskets and fists, but there are too many damn Yankees and Saunders falls back, having lost two men to the Yankee's one, and his group is blown and too shocky to do more good.


Captain Leghorn and his men remain in the woods. Other than fire one volley, they did nothing. Gene wasn't blessed with his card for two turns, and when it did finally come up, Ryan negated it with the Yellowbelly card, which denies one leader his turn. I suppose this was an example of one of those may ACW situations when a leader dithered, was drunk, or just strangely passive during a battle.

As it was late, and Leghorn's attack had fizzled out, Gene graciously conceded. Gene had some experience gaming, Ryan had no tabletope gaming experience. Both enjoyed the game and liked the rules. I am sure we will try another of Chris' scenarios soon.

Wednesday, February 15, 2012

Another Padre Figure!

I was trawling the TQD Castings website today and was delighted to discover that they make a 20mm (1/72nd scale) WW2 Commonwealth padre figure (the chap on the left). I hasten to point out that this photo comes from the TQD website. I did NOT paint them (I'd give my left arm to be able to paint like this, but then it would be hard painting figures with just my right arm, I'd need something to hold the figures with while painting).


Needless to say, he's on order. The other two figures in this pack look useful as well - the officer on the left will do nicely for my WW2 character, Lt. Denis Audet, who is overdue to make another appearance on this blog.

I've ordered some figures from TQD's partner line, CP Models, and haven't found time to paint them yet. They are quirky figures, some are in awkward poses and the sculpts aren't very fluid, but they fill in some holes and make some nice personality figures.

I am sure we can find a use for this padre on the battlefield.

Sunday, February 12, 2012

Royal Marine Centaur


A while back I purchased a 15mm Battlefront Miniatures Cromwell w Centaur 95mm howitzer barrel variant, since Mark Piper's Rapid Fire Normandy scenario Battle for Rots calls for a Centaur from the RM 2nd Indpt Armd Btty.

I finished painting it recently only to discover that the RM Centaur turrets had special markings on their turrets to aid indirect fire while on LVTs. I asked Dom Skelton if he had any decals to do the job, and he politely suggested that I cowboy up and try painting them myself. So I did, deciding that I could do justice to the markings but would not bother with the numbers. I also did the RM 2 Btty tactical marking. I used some images of a model by Brett Green as a guide.


I know there are some howlers - I believe that the Centaurs removed the BESA bow MG in particular.

I just have a few more models to finish for that scenario - particularly some Jerry 105s and Opel Blitz trucks, and then I should be able to run through the scenario and post an AAR here.

Comments welcome, thanks for looking.

Friday, February 10, 2012

Board Games Night: Paths of Glory

Two Thursdays in a row have found me at the local board games club playing Ted Raicer's Paths of Glory, published in 1999 by GMT games. I'm hooked,


The last time I posted here about a boardgame, Trajan, I said it was a clever game but not an informative simulation. PoG is both.

So much to like about this game. The card driven sequence of play not only drives strategic events but also determines operational possibilities and allows players a limited palette of choices each season or turn of play.

As the Central Powers player in the first game I hammered my mate Tyler on the Western Front and while we bled each other dry, my focus West meant abandoning opportunities in the East. In our rematch, as the Allies I strengthened the line in the West, then ignored it and flooded the zone in the East with the Russians. That diverted most of Austria-Hungary's forces and several precious German armies to stopping me and allowed me a narrow win in a shortened scenario ending in 1916.

Other mechanisms, including combat, operational movement, supply, strategic redeployment and replacements are clean, simple and workable.

I would be happy to play this game again, maybe taking a whole day to play 1914-18. I might even buy a copy if I can find one somewhere. A great game and a great simulation.


Posted using BlogPress from my iPhone

Friday, February 3, 2012

Bash On Recce!

I've just finished a motley little late WW2 Canadian recon (recce in CanAnglo milspeak) troop in 15mm. My thanks to Mrs. Padre for letting me use her nice camera and tripod, and for coaching me in Photoshop Elements.


Where are the dismounts from the Bren carriers in the pasture? No doubt ransacking the two houses.

Most of these vehicles are intended for a friend of mine, Matt. He is gritting his teeth working a staff job as base adjutant, but he wears the cap badge of the Lord Strathcona's Horse and in his heart of hearts he's a hard-charging armoured recce officer. He's also the only tank commander I know who has been under fire in Afghanistan. And he's also a gamer and a cool guy, so it's only fitting that he command a recce unit.

Most of the models shown here are one-piece resin kits from Gaming Models. I heard some good things about them on the Too Fat Lardies discussion list, and wasn't disappointed. Quite inexpensive, too, and for every ten models you order, Craig Lechner throws in one free. Good customer service.


All of these vehicles have the regimental and brigade markings to show that they belong to the headquarters squadron of the Fort Garry Horse, a regiment in the 2nd Canadian Armoured Brigade which served in the Normandy campaign. I am not 100% certain that this formation would have possessed the turreted Daimler armoured cars shown here, at least not in Normandy in 1944, but I had the decals for this formation, so c'est la vie. The decals, by the way, are marvellous little products from Dom's Decals.

The other manufacturer represented here by three crewed Daimler Dingo scout cars is Battlefront Miniatures. I bought for my own collection. I'm guessing one crew nicked the .50 cal from some Yanks.


And by comparison, here are two Daimler Dingos from Gaming Models, which, sadly, don't come with crew. I think I have some more in my bits box for Matt.


And finally, the two afore mentioned Daimler Armoured Cars:


Hopefully this little troop will see plenty of action before Matt and his lovely bride to be Krista gets posted back to the regiment this summer. Rumour has it that the same shipment from Gaming Models included some Panthers, so he may well have something to try to get his recce eyes on.

Thanks for looking.

Blog Archive

Followers