
I am happy to say that I am writing this on my Macbook, which I got back from the nice Apple Genius Bar folks yesterday. I you read my last post here, you will recall that I was bracing for a $300 repair bill, but the good news is that only one part, an I/O Board, needed to be replaced, and so the total bill was $70 and it appears to work just fine. Happy days. My happiness level got a further boost when I was about to drive my Kia Soul to the garage to check out why the dreaded Check Engine Light (which should have the shape of a money sign ($) rather than a little engine) had come on on Tuesday. After a day of sitting in the driveway, the light did not come on and the service guy told me it was probably just a bad seal with the gas cap. Happy days indeed.
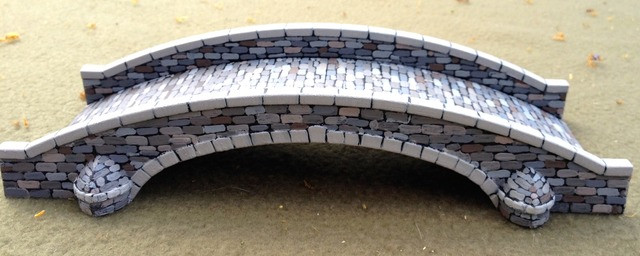
One of my painting projects while watching Game of Thrones with Mdme Padre over the last few weeks was to build and paint this Italieri kit, since I needed a stone bridge that would work for 20 and 28mm scales, and this looked like a sturdy and useful sort of kit for everything from Europe to the ACW (it does have an Antietam / Burnside bridge kind of vibe to it). It also had the merit of being incredibly easy to put together. Italieri has really thought out what gamers need in plastic kits. Simply and strong as a rock when put together.
But how to paint the blasted thing? After an undercoat of flat back spray from the DIY store, I had to decide, should I just paint it a simple slate grey with some highlighting, or perhaps a brownish sandstone sort of look? All the while this image from the box art kept staring at me, as if to say, come on, Mike, you know you want to paint it like this. Cobblestones are fun, you can do it. I almost got all wobbly and said no, but then I thought, I can do this on the couch with one eye on the TV, just choose half a dozen or so colours and do one colour at a time.
Never being one to do something simply when it could be incredibly difficult, I decided I would not back down. I would not be a cobble wobbler.

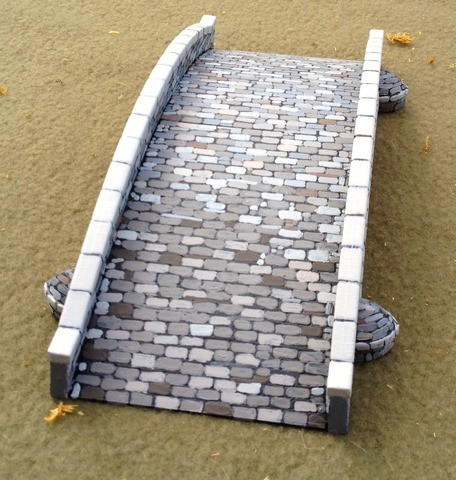
There were many, many times when I almost lost my nerve and thought that the bridge was looking like shite. It was not terribly difficult to paint within the bricks and leave most of the black undercoat showing as outlines, but for this job I was using cheap craft acrylic paints (mostly Folk Art) and the paint didn’t always go on cleanly. Also, with so much black showing, it just looked odd, but as I persevered and applied more and more colours, with the grey shades dominant and the darker colours as infrequent highlights, it started to come together. Suddenly, I had a bridge that looked almost as good as the box art! I’m pretty sure I missed half of GoT season one, something about winter coming, heads on spikes, dwarves with naked women, dragons with naked women, etc. I’ll have to watch it again, I suppose.
Now that the bridge is done I am debating whether to put some sort of wash on it. I was thinking of Army Painter’s Soft Tone, but my concern is that since that product is basically a light brown colour, similar to GW’s sepia wash, I would lose the various shades of light fray, particularly along the top and bottom of the span, and the whole thing would look kind of gross. I’m kind of thinking I might just spray the whole thing with Dullcote and move on, but I would welcome your suggestions as to what the finishing touches might be.
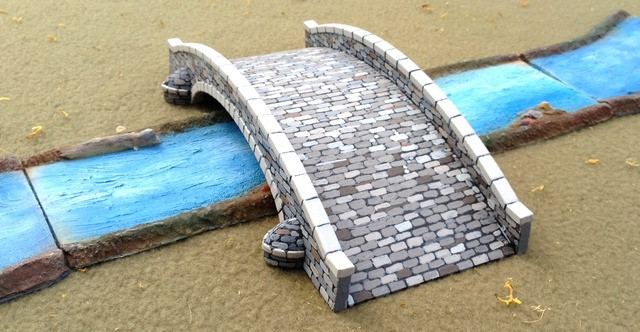
The all important test of the bridge, using a river. Hey, it works!
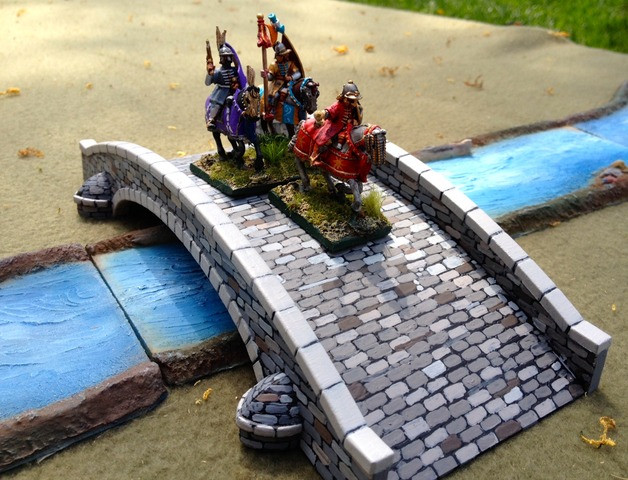
Why did the Ottiomans cross the bridge? My newly finished Spahi command group test the bridge by riding across it. That test was successful as well. Hooray!
These figures bring my 2014 totals to:
28mm Mounted: 13
28mm Foot: 22
28mm Artillery: 1
20mm Buildings/Terrain Pieces: 1
15mm Vehicles: 4
15mm Foot: 26
15mm Buildings/Terrain Pieces: 3
6mm Buildings/Terrain Pieces: 2
Kilometres Run: 520
Blessings to your brushes!
MP+
I've not seen that bridge kit before - I shall look out for one. I too have had the scary engine waning light on (Saab 9-3 TTiD) which my specialist swiftly diagnosed as a dodgy sensor. A palatable £60 including diagnosis, fitting and VAT.
ReplyDeleteHi Tim:
DeleteThis kit is sturdy enough for your LCW games in the backyard, and should be big enough to handle most vehicle kits up to 28mm.
My old '85 VW camper has an engine temperature sensor that is incredibly primitive and quite broken, and an old rotary odometer that packed it in at 230,000kms. I get on with it quite well. It's the new cars, really just computers on wheels, where the sensors give you grief.
Glad to hear the technology is sorted out cheaper than expected...
ReplyDeleteA relief to be sure. The perverse side of my brain was telling me what figures and models I could buy with the money that I didn't spend on repairs. How crazy is that?
DeleteThat’s a really nice looking bridge. What are it’s measurements, if you don’t mind my asking?
ReplyDeleteTo be honest Michael, I think the brown wash would work just fine on the actual span of the bridge – where travelers would tred upon. Dirt and dust would collect in the grooves and recesses so it wouldn’t look all that clean in my mind. Then go ahead and wash the sides and supports with a light black wash to give contrast, which will also help keep the greys you are wanting. Last thing I would do is a slight green wash on the underside and lowest parts to account for mosses and river slimes that would accumulate there due to the moisture, etc.
Dai:
DeleteMeasurements are:
Width 3.5 " / 9 cm
Length 9.5" / 240cm
Height 2.5" / 6cm
I'm going to take your advice on the washes. I used AP Soft Tone on the top bit just now and it looks good. I'll follow on tomorrow.
Padre, I forgot to ask, did you manage to get a pic with a 20mm model astride this thing? It'll help me figure out if it'll work for my 15mm table or not.
DeleteHooray for the Apple people. I'm glad you were not a wobbler the bridge looks great. You might consider a very light black wash to tie it together.
ReplyDeleteThanks Robert, you and Dai have talked me into using a wash on it. I'll report back.
DeleteI've had one for a while and it really is a cracking kit. The only thing that has stopped me from getting another is that it would look a little odd for *every* bridge to look the same.
ReplyDeleteYou've done a very nice job on it Mike. Well done.
Thank you CK. I agree that several of this type would look rather baroque. Ideally I'd like to have a modern iron or steel bridge, perhaps a rail bridge, just downstream of it, as bridges tend to come in twos or threes in many places.
ReplyDeleteNice bridge and the paint work looks great. I'd be inclined to leave it looking like the new bridge it as, and simply let the patina of time modify its ... erm ... pristinity. If you do go down the wash track, I'd suggest this: 'less is more'.
ReplyDeleteVery nice bridge- worth the effort on the cobbles as it really sets it off.
ReplyDeleteImpressed with the running totals too.
Cheers,
Pete.
Very nice work, Padre. Now allow me to ruin your life, or at least the next three seasons of GoT:
ReplyDeleteHere is Burnside bridge.
http://upload.wikimedia.org/wikipedia/commons/5/56/Burnside_bridge_antietam.jpg
Note how it has three spans. Note how easy it would be to create it out of three of these kits and a bit of foam board and maybe some clay. There are three whole seasons of GoT to go. You can do it!
You are the wonder, great patient work Michael!
ReplyDeleteI was going to recommend the AP Wash was as well, soften the edges and tie everything together. But I see in the comments you've already done that.
ReplyDeleteAwesome looking bridge Mike. Well worth the effort mate.
ReplyDeleteI don't reckon it needs a wash myself. I would give it a very light dry brush with a buff colour. Very light mind you. Practice the amount needed on the underside.
Well done Padre, you should have been a Sapper!
Just a note to let you know that I've nominated this blog for a Liebster Award. It's entirely up to you if you want to accept it and how you want to respond. Details at http://diplomatist2.blogspot.co.uk/2014/05/liebster-award.html
ReplyDeleteGreat cobblework! I really like this, it's a gem of a terrain piece.
ReplyDelete