
Hello friends:
Recently someone said on gaming Twitter that they preferred actual battles with stories and backstories to random X points per side battles, and I confess I've been leaning that way myself lately. Since I wanted to return to Dave Brown's Pickett's Charge ACW rules and employ some newly painted figures, I opened Vol. 1 of my copy of The West Point Atlas of American Wars at random and picked a corker of a battle, Seven Pines, the beginning of the end of the Peninsular Campaign of 1862.
Seven Pines was a terribly fought battle on both sides, and brings little credit to anyone except the ordinary soldiers who fought and died there. McClellan's Army of Potomac had crawled its way slowly towards Richmond, giving the Confederates ample time to mass their forces. At the end of May, 1862, McClellan was within a few miles of Richmond, but had inexplicably pushed two of his corps (Keyes' IVth and Heintzelan's III corps) across the swollen Chickahominy River, making them a tempting target for CSA commander Joe Johnston.
The Union line was arranged in what has sometimes been described as a fishhook, with the most exposed Corps, Keyes', being the least trained. Some accounts say that the regiments in the furthest forward Division, that of Brig. Gen. Silas Casey, were raw recruits, armed with inferior Austrian muskets. As one historian put it, "Casey's division, the smallest and greenest of McClellan's vast arsenal, was inexplicably ordered to lead the army's advance on to Richmond". These poor guys had been marching and working for days, exposed to torrential rains, often without their shelter halves and coats, so they were pretty used and abused going into the battle.
Johnston decided that Keyes' Corps was too tempting a target to pass up, even though by May 30 the CSA command knew that the Union IVCorps was digging in around Seven Pines. Johnston's plan was that D.H. Hill's division would attack it from the front, up the Williamsburg Stage Road, supported by Longstreet's division, while Huger's division would move south to hit the Union left and Whiting's division would move to hit the Union right.
It was a good plan in theory, but there were several problems. First, a heavy rain on the night of 30 May left the roads that the CSA divisions must use a wet soggy mess. That would slow down the rebels, but it was hoped that the same rains would prevent the rest of the Union army from crossing the Chickahominy to help Keyes.
The plan required far too much coordination for an army of the period, especially considering that the chain of the command of Johnston's army was complicated and inefficient and Longstreet basically got in Huger's way because he thought he knew best, while Huger's orders were unclear, leaving Hill to wait impatiently and finally launch the attack on his own. Or something like that. It was basically a big mess and many of the troops Johnston assigned to this movement never made it to the fight. If you have an hour to spare, there's a good lecture here on the leadup to the battle.
GAMING THE BATTLE
This would be an easy battle to recreate as a whole in the smaller scales, but since I do ACW in 28mm, the only way to recreate it is in sections. Fortunately the timeline of the fighting meant that the battle on the first day unfolded as a series of episodes, which is how I intend to proceed.
EPISODE 1: Garland Vs Keyes
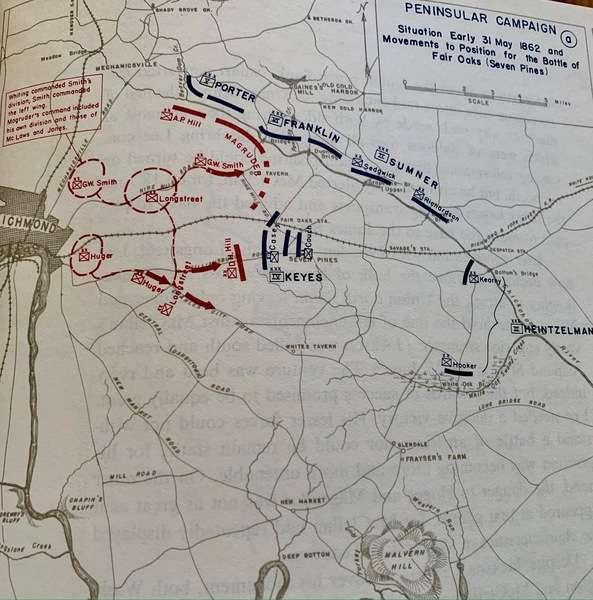
I found this map from the US Civil War Preservation Trust to be most helpful. It shows the initial dispositions of both sides as well as the Confederate plans. Modern maps are no help, as the entire battlefield has been developed, including a substantial portion which is now covered by the Richmond airport.

The Confederates had done enough reconnaissance to know that Casey's division was deployed in an open space that had been cleared of the surrounding trees, and bisected by the Williamsburg Stage Road. Roughly 800 yards east of the start of the clearing were two buildings known as the Twin Houses, about 135 yards south of the road, and in front of them Casey's troops had constructed a redoubt with a battery in the centre.
At the west end of the clearing, the Union had felled enough trees to form a substantial abatis on the north side of the road, and had posted a picket line of troops drawn from Casey's three brigades. Just before 10:00 hrs, after abundant signs that an attack was coming, Casey sent an additional regiment, the 103rd PA, to support the picket line.
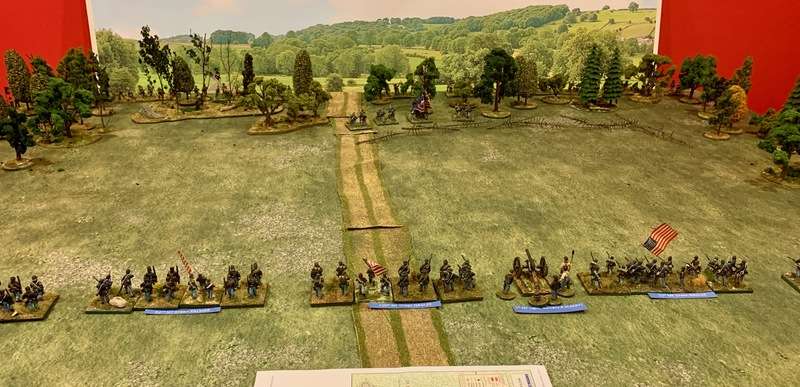
Working with the Pickett's Charge rules ground scale of 9" = 150 yards, with a 6' by 5' table, this is what I came up with. The clearing is about 60" north to south, with Casey's first line, two regiments each from Naglee's and Palmer's brigades, about 27" back from the start of the clearing. I've used model railroad pine trees to represent the abatis. As I figure the ground scale, Casey's redoubt is about 36" back from the first line, so there is no room to represent them on the table in this first episode. However, Casey's two batteries in the redoubt line (1 NY Co A, 7 NY) can fire from off the table if the rules permit. From what I can read of the maps, this part of the battle was dead flat, so no need to model elevations. Some of this clearing was planted, and possibly had snake rail fences, but I am guessing that after a few days camped here, Casey's men would have dismantled them and used the wood.
The first minutes of the fight in the woods doesn't need to be modelled, which is a good thing because it was absolutely terrible terrain. In his report after the battle, Garland wrote that:
The difficulties of the ground were almost insurmountable. The recent rains had formed ponds of water throughout the woods with mud at the bottom, through which the men waded forward knee-deep and occasionally sinking to the hips in boggy places almost beyond the point of extrication. The forest was so thick and the undergrowth so tangled that it was impracticable to see the heads of the several regiments as they moved forward, and the deploying intervals were in consequence very imperfectly preserved.
The accounts agree that the Union pickets were driven in without much resistance. Stephen W. Sears, in his book To the Gates of Richmond: The Peninsula Campaign, has an account by one Yankee skirmisher who hid himself when he saw the first of Garland's men: "I [then] left the place and took a course to get away".
Thus, Garland's brigade will activate on the first turn within inches of the hapless 103rd PA, while Rode's brigade will have to spend several turns moving through the woods (difficult terrain) before they can get into the fight, as per the battle.
Troop ratings are easy to figure out for the Union - every regiment in Casey's division is rated Green, while Casey himself was a competent and brave commander (he was chosen for the job because he'd written an important drill manual before the war). I don't know how to rate the three US brigade commanders - Palmer, Naglee, and Wessells - I'm assuming that they were competent. Rating Hill's division is a little more difficult, but considering the relative quality of the ANV in 1862, I'd rate them as Veteran with a few regiments being Elite, just to reflect the qualitative difference between the two divisions. I hope I'm not buying into rebel mythology here, but these same troops will be carried over to the next episode where they have to face the redoubt (which historically they did), so they will need some staying power.
I'd be happy to hear your thoughts/comments before I kick off the battle, hopefully tonight. If this works, my plan is to work on a set of scenario notes for Seven Pines that might be publishable somewhere in our hobby.
In the meantime, blessings to your dice rolls!
MP+
This a very nice AAR. It is unusual to find a quality map such as the one you provided from the US Civil War Preservation Trust in a blog post. Your conception of how to play out this rather large battle is commendable.
ReplyDeleteThank you CC. I was lucky to find that Trust map to be sure. I'm pleasantly astonished at how much raw data is out there for the finding. Just the other day I came across the regimental history of the 103rd PA online, likewise Garland's report of the battle. There's a ton of digging to be done and odd that nobody has written about this battle since Sears' book, as far as I know.
DeleteTroop ratings should never be done in a vacuum. It's far better to judge them relative to their peers and to their opponents. So I completely agree with having the Union troops as green and the Confederates as veteran or elite. In those Peninsula battles, the Confederate troops were far more motivated and that made them relatively superior to the Union troops.
ReplyDeleteWith a relative rating in place, you could argue that the Union troops at Gaines Mill shortly after this battle would be the veteran troops and the same Confederates troops were green given how that battle was fought.
Those are really good points about troop quality, thank you for them.
DeleteGaines Mill would also be a good battle for you to do. I did a layout for 2mm so you can get an idea of which parts to focus on if you do it.
ReplyDeletehttps://littleleadwarriors.blogspot.com/2020/06/project-2mm-terrain-done.html
The Civil War Preservation Trust have a great set of maps and I used the 2:30 map as my inspiration.
Thank you sir, I was mightily impressed with your blog post and have started following your blog, well done. Gaines Mill is likewise a fight I don't know much about so, as you say below, a series of linked battles would be an excellent idea. Probably best done in the small scales, 2 or 6mm. Again, thanks for your kind comments.
DeleteGreat background info and maps and look forward to seeing how this played out. This campaign begs to be played as a campaign or series of linked battles, with one affecting the outcome of the other.
ReplyDeleteThanks Steve, quite agree with your idea and it may become a long term project of mine.
DeleteI'm not sure I can add anything to help you with this one Mike, it seems like you have a good plan for how to run this scenario. I'm not familiar with the battle though, so it's been an interesting history lesson at the very least!
ReplyDeleteThanks Dai, we're both learning then!
DeleteI do recall reading about Seven Pines in Shelby Foote, and thinking it would be a horrific encounter because of the terrain, and extremely difficult to game. Will look forward to seeing this play out.
ReplyDeleteHi Doug. Yes, Shelby Foote has a cracking good account of it, the part about men propping their wounded comrades against trees so they wouldn't drown in the swamps really stuck with me.
DeleteLooking forward to seeing the after-action narrative, Michael! Seven Pines and Gaines's Mill are the most interesting battles of the Peninsular Campaign I've long thought.
ReplyDeleteThank you Ion, quite agree they are fascinating examples and good examples of bad generalship. Both sides at Seven Pines were inexcusable.
Delete